NYCEGUY01
Well-Known Member
- Location
- Willard, UT
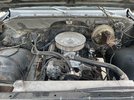
Drug home the next project last week.
It was living at sea level so it ran pretty crappy up here in the cold.
Checked the Choke and adjusted the hi idle, then set the idle mixture.
Went to check the timing and it had like 34 degrees at idle and the distributor was super loose.
The crappy china chrome holddown was bent and too thin.
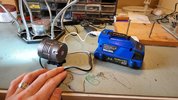
Grabbed a stock hold down from the parts bin and of course the starter that had been grinding now refused to engage at all.
Had a brand new crappy full size starter because the previous owner had swapped it twice already.
I had one in the shed for a 99 Vortec 5.7 motor, these all had nice mini starters that work 1000 times better then the old giant models.
Swapped in the new starter and then finally got the timing and idle set again.
Still running pretty lean, I didnt have any springs on hand but clearly it has a super light secondary spring in it now.
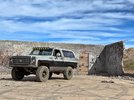
Anyway, I can at least drive it around a little while I wait for spring so swap in the 6.0/4l80/241 I have here for it...
Also getting front and rear Deaver springs, Fox Bypasses, new 37's. Parts have been piling up..lol
It was living at sea level so it ran pretty crappy up here in the cold.
Checked the Choke and adjusted the hi idle, then set the idle mixture.
Went to check the timing and it had like 34 degrees at idle and the distributor was super loose.
The crappy china chrome holddown was bent and too thin.
Grabbed a stock hold down from the parts bin and of course the starter that had been grinding now refused to engage at all.
Had a brand new crappy full size starter because the previous owner had swapped it twice already.
I had one in the shed for a 99 Vortec 5.7 motor, these all had nice mini starters that work 1000 times better then the old giant models.
Swapped in the new starter and then finally got the timing and idle set again.
Still running pretty lean, I didnt have any springs on hand but clearly it has a super light secondary spring in it now.
Anyway, I can at least drive it around a little while I wait for spring so swap in the 6.0/4l80/241 I have here for it...
Also getting front and rear Deaver springs, Fox Bypasses, new 37's. Parts have been piling up..lol