
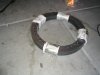
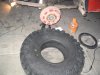
ok ok i know their is another one out here but i thought since mine are a little different i would post up,
cost: 175.00
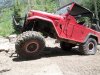
rim size: 15x8
kit: ruffstuff
tools: air compressor, welder, grinder, some paint, a few nickels, some drinks and some patience
Time: 8+ hrs, waiting for rims to cool, paint and tightening 165 bolts twice
bananas: 3
word of caution, do not attempt on reverse mount wheels, youll never get them on.
cost: 175.00
rim size: 15x8
kit: ruffstuff
tools: air compressor, welder, grinder, some paint, a few nickels, some drinks and some patience
Time: 8+ hrs, waiting for rims to cool, paint and tightening 165 bolts twice
bananas: 3
word of caution, do not attempt on reverse mount wheels, youll never get them on.
Last edited:

 Thanks for the write up.