Box Rocket Offroad Trailer Build

I had a few pictures of my trailer in my Tacoma build thread and had a few people ask for more details on the trailer, so here's a little build thread to hopefully give some ideas to those considering a trailer.

First off, I had no idea what I was going when I started this build. I knew what I wanted but had no experience with anything trailer related. I did lots of research and got some pointers from some good friends with trailers and off I went.

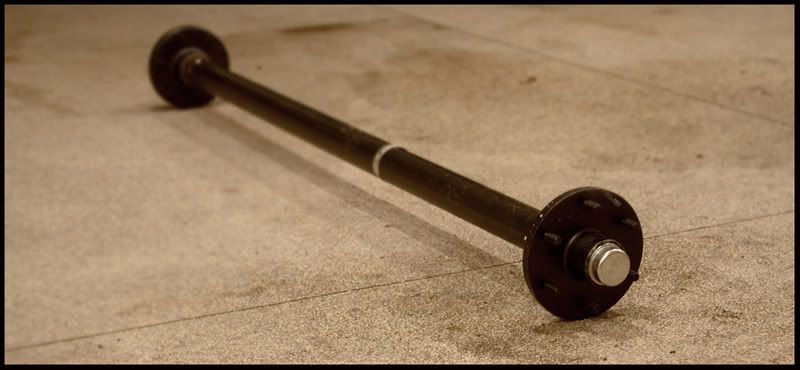
To start I needed an axle. I built the trailer originally to be towed behind my FZJ80 so I had Henderson Wheel on 1700 S and 300 E in SLC build me an axle to match the track width of the cruiser with the same lug pattern.


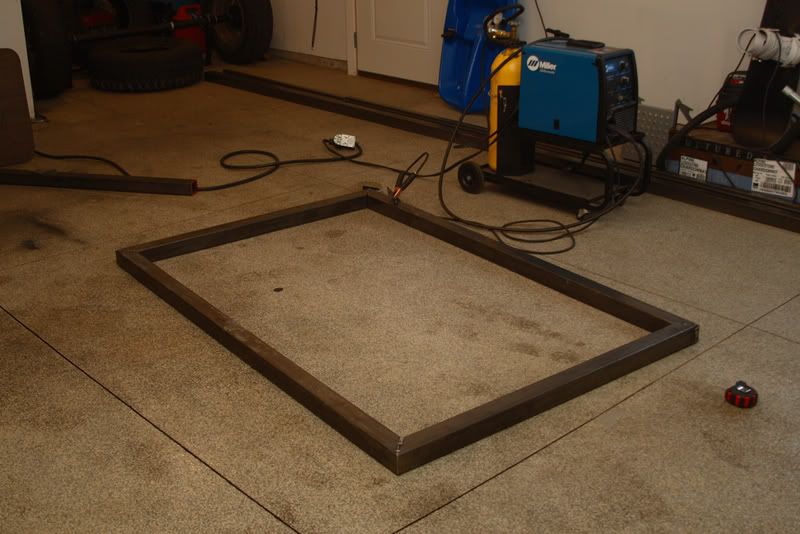
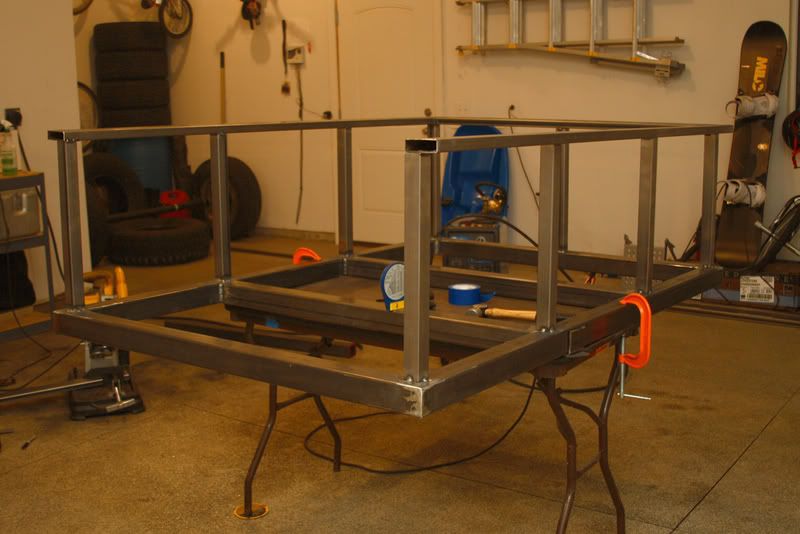
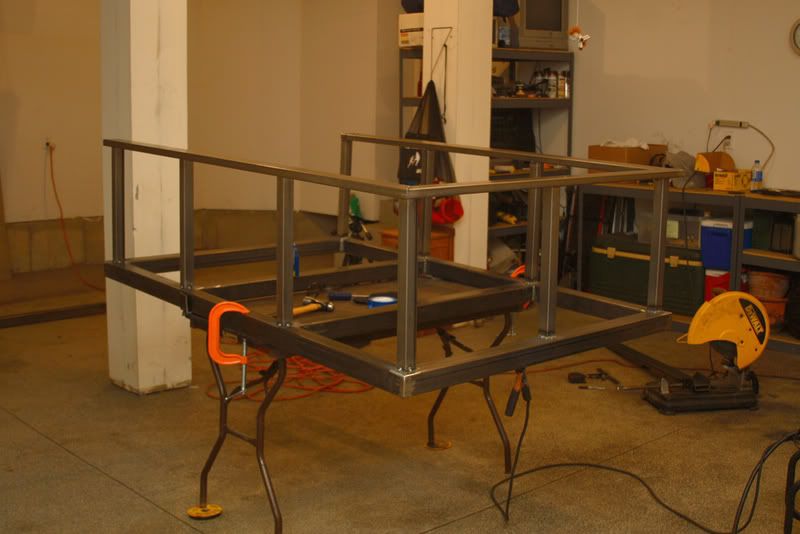
The basic idea for the trailer was something about the same size as an M416 1/4ton trailer. So I planned on a 4x6' box. I started with some 2.5" square tube and got to work on the frame. Outer dimensions of the frame are 4x6'.


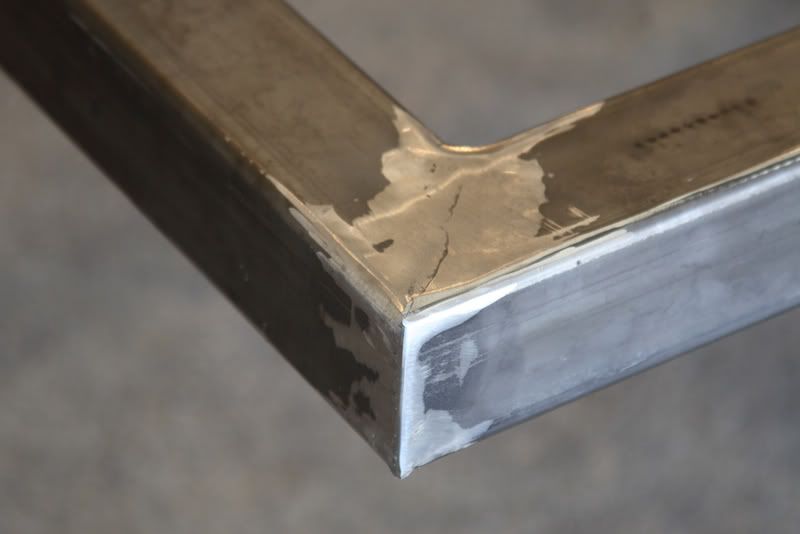
cleaned up the corners


added some crossmembers


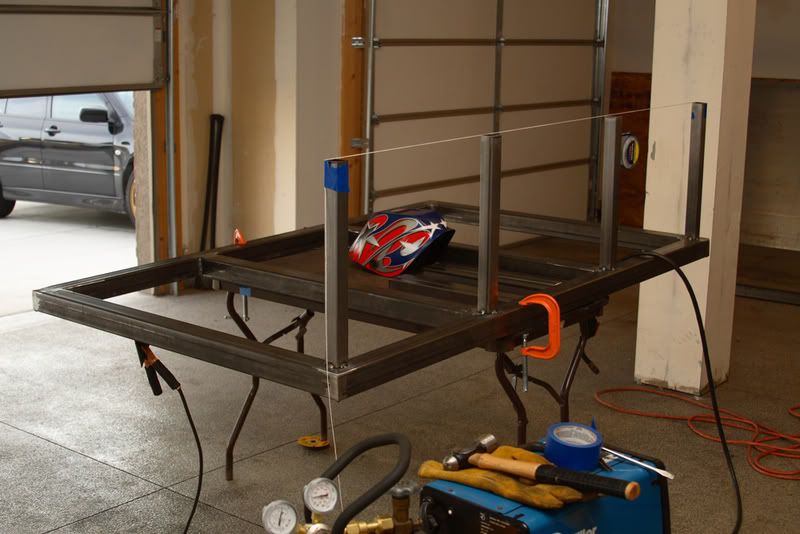
I used some 1.5" square tube for the box frame. I decided on 18" tub height. Used some high-tech string to help line them up. :)


Then it was some 1x3" rec tube for the top rails.


More to come........
 

Box Rocket

bored
Location
Syracuse, Utah
...Continued.

One I had the box sides framed and the top rails on it was time for the suspension so I could get the axle under it. I went the cheap route with the trailer springs that came with the axle from Henderson Wheel. I flipped the box over and measured a few times with the springs centered slightly behind the centerline of the box to give it a little more tongue weight, and welded up the hangers.


Then I mounted up some small wheels that I had and bolted the axle in place to get the whole thing rolling.


Test fit a pair of Thule bars I had. With a slight tweak to the feet they attached perfectly to the top rails. Not bad when you lucky.


Last edited:

Box Rocket

bored
Location
Syracuse, Utah
Trailer needed a tailgate so I framed one up and welded some hinges in.


About that time my coupler showed up. I ordered a Lock-n-Roll.


...and just about lit my frank-n-beans on fire. :)
 

Box Rocket

bored
Location
Syracuse, Utah
Jumping ahead a little bit I didn't take pictures of the process of building the tongue, but its stupid simple just a tongue that extendeds through to the second crossmember and is triangluated. Also I found a pair of wheels in Idaho to match the Cruiser and they showed up and I mounted a pair of 285's I'd picked up for free. This would give me an idea of the actual ride height with the correct tires.


Cooler test fit.


I welded in some simple tabs for pin latches to close the tailgate.


I know these are a bit ugly. I cut them off and redid them and they turned out much cleaner.


Threw the hitch in and hooked it to the cruiser to check ride height. Sat pretty level. The Cruiser is a little tail high here because my driveway has a little slope to it so the trailer is slightly tongue high but on level ground it sat almost perfectly level.


Last edited:

Box Rocket

bored
Location
Syracuse, Utah
With it hooked up and rolling it made sense to take it for its first test run around the neighborhood to see how it pulled. Worked great and didn't notice any issues. Later I would test it at freeway speeds.


after the test run it was time to get working on the skins. I picked up a few sheets of 16ga steel for all the skins and got to work. I guess I should point out that I have a ridiculous supply of tools for fab work. I have a welder, a 4.5" angle grinder and a chop saw. So cutting the sheetmetal was all done by hand with a cutoff wheel in the grinder. That took a little time but worked.

First sheet cut and the front skin clamped in place ready to be welded.


I went to the State Trailer Supply store and picked up some odds and ends. One of the things I got was a bag full of weld-on safety chain "loops". These, as the name implies are loops to weld to the trailer tongue so you can attach your safety chains. I planned to use them for tie downs all over the inside of the trailer. With the skins on the outside of the box frame it left me with the framework exposed on the inside of the trailer and a perfect place to weld the new tie downs.


I continued to weld in the rest of the skins and the floor. I had to do a little shaping to the floor to fit around the tie downs I had welded in.


welded the underside of the floor too.


All done


One of the other thing I picked up from State Trailer Supple was some 10" wide round fenders. I could have fabbed some flat top fenders but to save time I thought I'd try these. Couldn't go wrong since it was like $15 for the pair. I needed to trim the ends since they were too long but they ended up working great. I wish they were a little wider to completely cover the tires but I had an idea to fix that.


I had some 1x3 tube left over from the top rails so I made some small steps in front of the fenders with a little tab to bolt the fenders to. This really made the fenders solid. I could stand on the fenders with no movement now.


Kevin B.

Not often wrong. Never quite right.
Moderator
Location
Vehicular limbo
The axle and spring kit from Henderson was $115 I think. Would be more if had brakes on the axle but I figured my final weight would be light enough that brakes wouldn't be necessary.

That's awesome. You just solved a problem I've been chewing on, thanks! Keep the pics coming. :)
 

Box Rocket

bored
Location
Syracuse, Utah
I forgot to mention that I measured the tongue length to be as short as possible but still long enough that the trailer box would not contact the truck if I jackknifed the trailer.
 

Box Rocket

bored
Location
Syracuse, Utah
One other little detail..... This trailer needed to be multi-purpose. It wasn't going to be a dedicated "overland" trailer. I needed to be able to use it for crap around the house too. So I welded in some captured nuts into the interior uprights in the tub so that I could bolt in some tall plywood sides if I needed to haul a load of brush or yard crap to the dump or something.


I cut down an extra square u-bolt I had and welded it to the tongue for a handle and added some plate to the tongue end to reinforce it for the coupler.


I had a set of magnetic towing lights so I hooked those up and took it for another spin since it was more or less complete. This time I was able to get up to highway speeds. I was pumped about how well it pulled. Tracked totally straight and didn't wander one bit. This may not seem like a big deal but for someone like me that was going into this project completely ignorant it was a major success. Also checked the coupler out on a dirt pile. :)


Box Rocket

bored
Location
Syracuse, Utah
So back to the fenders that weren't quite wide enough for the tires. Someone on another forum had given me an idea that CJ7 fender flares might be the same radius as the fenders I was using. I called the Rad Jeeper (here locally) and he had some used flares. Brought them home and wouldn't you know they fit perfect! Looked like they were made for it and covered the tires and gave a much more "finished" look to the fenders.


Here you can see that I had paint on the frame and primer on the tub at this point.


Then it was time for paint. I was doing everything I could to keep this trailer on the cheap so there were no bells and whistles. The only things left at this point was paint and some bedliner inside the tub and on the underside. I had all the supplies I needed for that so my final cost to get it to this point was $1600. That included the axle kit, all the steel and the two most expensive bits, the wheels/tires and the coupler.

Since I was doing a "budget build" the paint was just rattlecan Rustoleum Gloss White. I took an afternoon and sprayed 4 coats of white on the exterior and the fenders and once it was dry I put it back together and pulled it outside to take a look. Not bad if do say som myself. ;)


Box Rocket

bored
Location
Syracuse, Utah
Oh! I forgot to mention that before I sprayed primer or paint I used 3M seam sealer on all the joints and seams that weren't fully welded. I did this inside, outside and underneath.
 

Box Rocket

bored
Location
Syracuse, Utah
The next and almost final step before having it useable was to get the bedliner sprayed. Again I was going on the cheap so I got some DIY Raptor Liner and borrowed a compressor and sprayed it in the back yard. All in all I'm really impressed with the Raptor Liner. IMO it is hands down the best DIY bed liner. I can't stand Herculiner. It's too rough, the finish sucks whether its rolled or brushed and it turns dull and looks cheap. Not to mention it gets thin and flakes off faster than other liners.

The Raptor Liner can be brushed but is much easier to spray. Just be sure you mask well and wear clothes you don't care about, cuz it gets everywhere. But the finish is much smoother and more similar to professional spray in liners. It is nowhere close to as thick as professional liners nor as rubbery/flexible. It cures to a harder finish, but it still quite durable.

I sprayed the underside of the tub/fenders and inside the tub and extended it over the tub rails.


Not a great shot but this should give an idea of the finish.


For the lights, I decided to just use the magnetic lights. I covered the harness with wire loom and secured it all to the underside of the trailer. The nice thing about the magnetic lights is if I'm running a technical rocky trail I can pull the lights off and not risk breaking them. They have a small plug in the harness where the lights can detach. You can see it in this photo.


I built a small rack on the tongue for my Stainless Coleman cooler, added a couple "brackets" for my water cans and the bracket for my CO2 tank. Then we were off for the first shake down run. Took the family camping out to Skull valley and White Rocks.


Box Rocket

bored
Location
Syracuse, Utah
Everything above was completed back in 2008. I ran the trailer this way for quite a while with no changes. I borrowed a friend's 1st Gen Mombasa tent several times and carried it on the trailer. It was a great camp set up and the trailer worked great.

Canyonlands campground in Moab. You can see that I added a tongue jack with a caster bolted onto it that I found at NPS. This pic was also while I ran some 35's on it for a few years.


Black Dragon Canyon


San Rafael Swell


Row Lakes on Boulder Mountain


Box Rocket

bored
Location
Syracuse, Utah
The fenders took a pounding over the years and were covered in rock chips from lots of trail miles. So about a year ago I pulled the fenders off and sprayed them with Rustoleum bed liner. I like the look of the black fenders and the fenders are more durable now.


Box Rocket

bored
Location
Syracuse, Utah
About this point my Cruiser went into semi-retirement and I was pulling the trailer almost exclusively with my Tacoma. The Tacoma isn't as tall as the Cruiser and has 33's instead of 35's so the trailer was a little tongue low behind the Tacoma. I sold the 35's that were on the trailer and picked up some old-school Toyota wheels from Ricsrx on here. I was putting new tires on the Tacoma and replacing the 33x10.50 BFG KM2s that were on it. the KM2s still had life in them so I kept one to use as a spare on the Tacoma, and the other three were used on the trailer. Yep, kept one for a trailer spare as well.

Here's the KM2 mounted on the Toyota wheels I got from Ricsrx (after I painted them black).
 

Box Rocket

bored
Location
Syracuse, Utah
This past summer we had some family camping trips planned and the trailer needed a few changes. First off I wanted to move the water cans from the tongue of the trailer to the sides in front of the fenders. This let me move the cooler rack farther back. I did this because crossing steep ditches the trailer would pitch upward (coupler at the bottom of the ditch) and the stuff on the tongue of the trailer would get very close to the back of the truck. Moving this stuff gave me more room so the trailer would never contact the truck.

To move the water cans, I added to the steps on the fenders and made them extend all the way to the front of the trailer and to the back behind the fenders.


Cans moved and the cooler moved back
 

Box Rocket

bored
Location
Syracuse, Utah
I was tired of mooching the RTT from my friend and finally invested in one of my own this summer. I picked up a Tepui Autana with the annex. It is nearly identical to the ARB Simpson II. And is essentially a rebadge of the TJM tent and the CVT tent. I've really enjoyed it.


Top