CJ Stretch

kirk86CJ

Registered User
Location
Riverton, Ut
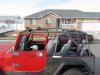
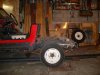
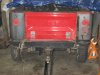
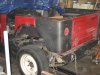
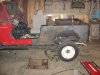
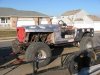
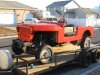
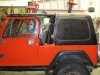
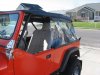
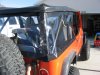
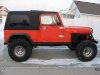
I decided to make room for a 5th passenger in my Jeep. I added 10 inches to the frame and body. I got the idea how to do it from Jay5.9L on this board. I started on it around Thanksgiving, but haven’t been able to work on it consistently. My wheelbase is 105” now.

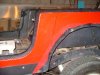
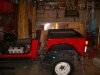
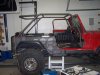
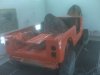
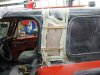
I started out with the idea of keeping my front seats, and cage. I was just going to add to the cage. I later decided to just build a new cage, and get new seats – Buying new seats is the one thing I regret right now. The corners are Off Your Rocker (10 guage) – very happy with them. I decided to buy them, and add the material going forward, rather than buy custom Poison Spyder corners. This saved me a few hundred dollars.
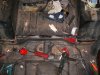
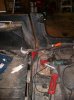
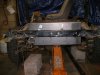
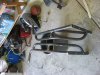
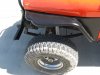
I had my driveline extended, added 10” to the exhaust, added to the wiring, and actually just pulled the bends out of the brake lines where they went around the shock.

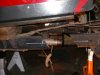
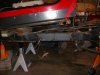
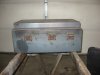
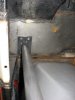
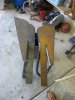
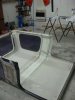
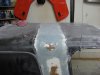
Everything was going to plan until I was getting ready to add to the corners, and cover the holes in the body. My stupid gas tank started leaking. It had a hole in it. The gas tank added a full month to the project. I went back and forth whether to buy one, or build one. I ended up making one which turned out good. I used the sender/pickup tube from the original tank. I figure it holds over 19 gallons, but it doesn’t hang down any lower than the original 15 gallon. I used a cardboard box to get the right size. I had it bent at Kingden Sheetmetal – very happy with them. I made it out of 10 guage , then doubled the bottom for a skid plate. I put baffles in it also. Its pretty heavy:D .

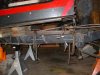
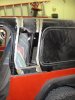
We welded the side on, and continued the 10 guage under the doors to the front fenders. This will all be painted with the Jeep. I will then bolt on some rocker guards. The white top channel pieces came off a tub I bought for that reason. I used 14 guage to fill in the floor.

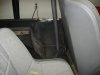
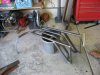
The cage is mostly done. I used 1 ¾ DOM for the structural stuff, then 1 ½ on other parts. The cage will be tied to the frame in the front, middle, and rear. I’m going to run the cage along the floor and have all the seats rest on those pieces – none of the seats will touch the floor.

I’m pretty happy with it – especially cause it’s the first time we have done anything like this.

Hopefully the pictures work.
http://www.imagestation.com/album/pictures.html?id=2094667893
Kirk
 

Greg

Make RME Rockcrawling Again!
Admin
Very cool Kirk, it's like an Unlimited CJ! Nice work for your first time, looks well thought out. The extra capacity in the gas tank will be a great addition. Keep us posted on the final look when it's all painted. :cool:
 

Jay5.9L

...I just filled the cup.
Location
Riverton
Stupid work filter... I'll have to take a look at the picture at home. Can't wait to see how yours turned out :)
 

kirk86CJ

Registered User
Location
Riverton, Ut
very nice... any plans for a top?

My plan right now is to cut my hardtop in half - between the window and the door opening, and add 10". I'm not going to worry about that until everything else is done. the only time I use the hardtop is to store it in the winter.

I forgot the best part of this whole thing. I smashed the drivers side rear corner last spring in Coyote Canyon. Since I'm fully insured, I turned it in just to do this stretch. - it won't affect my rates My insurance company gave me a check for $1,200.00. Thats the reason I did the new corners and all.
Worked out quite nicely:cool:
 

Jay5.9L

...I just filled the cup.
Location
Riverton
yup that worked :) I like how you did the sides, I may have to do the same with mine to cover the body splice. Got any interior shots of the tub? I may have to swing by some weekend to check it out :)
 

kirk86CJ

Registered User
Location
Riverton, Ut
I didn't try to make the storage pockets like yours - I ran out of motivation. I also didn't know how to make it work with the B pillar. Here's a couple pics.
 

Attachments

  • Jeep21.JPG
    Jeep21.JPG
    28.2 KB · Views: 38
  • Jeep17.JPG
    Jeep17.JPG
    31.4 KB · Views: 32

Jay5.9L

...I just filled the cup.
Location
Riverton
Looks good. So you just used the exrta armour to fill in the gap in the side of the body. I'm still trying to decide if I want to bondo the little splice area in my sides to make it look good under the paint or to just do a plate over the top like you did. How hard was it to make them?
 

kirk86CJ

Registered User
Location
Riverton, Ut
Looks good. So you just used the exrta armour to fill in the gap in the side of the body. I'm still trying to decide if I want to bondo the little splice area in my sides to make it look good under the paint or to just do a plate over the top like you did. How hard was it to make them?

Exactly, The only reason I added all the 10 guage was to emilinate the need to do the body work. I used a little 4" grinder/cutoff disks to cut the pieces. It took a lot of time to get it right. (Especially down the door opening, then curving down to the "rocker piece) It has also warped a little from welding. I think I would just pay somebody do add the sheetmetal (flush) if I did it again, especially if my corners weren't damaged.

You can see the seams in this picture.
 

Attachments

  • IMG_0147.JPG
    IMG_0147.JPG
    61 KB · Views: 81
Last edited:

Rusted

Let's Ride!
Supporting Member
Location
Sandy
My plan right now is to cut my hardtop in half - between the window and the door opening, and add 10".


When you do this make sure you post up photos. I concidered doing this to convert a 7 top into a 8 top. Only I was going to cut in through the windows, and then getting longer glass. I worried aobut the extra space between the door and the window would look odd.
 

Jay5.9L

...I just filled the cup.
Location
Riverton
I does not look to bad with the extra space between the windows and the doors. At the off road expo last year I took some pics of a bobbed scrambler with modified CJ-7 top. I'll try to get them off my cell phone.
 

Kirk

Active Member
2011 Update

I finally finished the last major part of this - the hard top. I notice the pictures in my original post don't work, so I will recap here so it is all on one place.
 

Attachments

  • Jeep1.JPG
    Jeep1.JPG
    36.7 KB · Views: 32
  • Jeep2.JPG
    Jeep2.JPG
    52.2 KB · Views: 33
  • Jeep3.jpg
    Jeep3.jpg
    45.1 KB · Views: 33
  • Jeep4.JPG
    Jeep4.JPG
    44.9 KB · Views: 31
  • Jeep6.JPG
    Jeep6.JPG
    30.9 KB · Views: 31
  • Jeep10.JPG
    Jeep10.JPG
    37.4 KB · Views: 34
  • Jeep12.JPG
    Jeep12.JPG
    37.3 KB · Views: 29
  • Jeep11.JPG
    Jeep11.JPG
    43.2 KB · Views: 30
  • Jeep9.JPG
    Jeep9.JPG
    35.6 KB · Views: 30
  • Jeep8.JPG
    Jeep8.JPG
    42.4 KB · Views: 31

Kirk

Active Member
More of the stretch
 

Attachments

  • Jeep13.JPG
    Jeep13.JPG
    26.3 KB · Views: 21
  • Jeep14.JPG
    Jeep14.JPG
    39.6 KB · Views: 23
  • Jeep15.JPG
    Jeep15.JPG
    44.5 KB · Views: 26
  • Jeep16.JPG
    Jeep16.JPG
    43.8 KB · Views: 26
  • Jeep17.JPG
    Jeep17.JPG
    31.4 KB · Views: 23
  • Jeep18.JPG
    Jeep18.JPG
    41 KB · Views: 23
  • Jeep19.JPG
    Jeep19.JPG
    39.6 KB · Views: 29

Kirk

Active Member
Paint
Since then, I took an evening auto body class at Jordan Tech and painted the jeep orange. I luckily got help from Marc Bryson and Brian Cannon doing some body work. I lucked out and was able to use the school paint booth to spray it. I had never done body work/paint before. The funny part about this was the first night of class the instructor said the class was intended to teach people how to repair fenders – etc. It was not to paint complete vehicles, and there wouldn’t be enough time to do a complete vehicle. He then went around the room and asked each person what their project was. I said I was going to paint a jeep. :D He shook his head.
Fenders:
I then made the tube fenders. I painted them black because I didn’t get them done in time paint during my class time.
 

Attachments

  • Jeep20.JPG
    Jeep20.JPG
    46.1 KB · Views: 23
  • Jeep21.JPG
    Jeep21.JPG
    21.1 KB · Views: 20
  • jeep22.JPG
    jeep22.JPG
    47.4 KB · Views: 22
  • Jeep23.JPG
    Jeep23.JPG
    44.5 KB · Views: 26
  • Jeep24.JPG
    Jeep24.JPG
    46.9 KB · Views: 27
  • Jeep25.JPG
    Jeep25.JPG
    41.5 KB · Views: 27
  • Jeep26.JPG
    Jeep26.JPG
    31.7 KB · Views: 24

Kirk

Active Member
Soft Top
My dad has an industrial sewing machine, so we made the safari type top for it, and then tried to make some soft windows for it. I have used them in a couple rain storms, and they did keep us dry – I still haven’t finished them all the way – but they work. They zip to the main top across the top, then Velcro together at the corners.
Hard Top
The last part of this was getting the hard top to fit. I picked up a used hard top with no glass a couple years ago, and was able to use pieces from it, to add to my existing top. When I made my cage, I kinda had to guess how high/far back the cage could go without hitting the hard top – because my plan was to make it fit eventually. I wanted it as high as possible because my rear seat is pushed back, and right below the rear of the cage. I really lucked out, because I had no way to test fit the top at the time. I just measured it with a tape for a couple minutes, and then built the cage. The rear cross bar on my cage it about 1/8” from hitting the hard top. This was the first real time I’ve worked with fiberglass. Definitely a learning experience…
 

Attachments

  • Jeep28.JPG
    Jeep28.JPG
    41.7 KB · Views: 29
  • Jeep31.JPG
    Jeep31.JPG
    39.5 KB · Views: 37
  • Jeep30.JPG
    Jeep30.JPG
    38.5 KB · Views: 33
  • Jeep29.JPG
    Jeep29.JPG
    38.7 KB · Views: 30
  • Jeep27.JPG
    Jeep27.JPG
    42.7 KB · Views: 30
  • Jeep32.JPG
    Jeep32.JPG
    41.6 KB · Views: 37
  • Jeep33.JPG
    Jeep33.JPG
    32.6 KB · Views: 37
  • Jeep34.JPG
    Jeep34.JPG
    26.9 KB · Views: 40
  • Jeep35.JPG
    Jeep35.JPG
    34 KB · Views: 47
  • Jeep36.JPG
    Jeep36.JPG
    32.1 KB · Views: 57

BCGPER

Starting Another Thread
Location
Sunny Arizona
Turned out pretty nice Kirk! How did that hood work out?

Are you going to paint the front fenders?

Still itching from the fiberglass? :D
 
Top