CYJ Willys Thingy

Bart

Registered User
Location
Arm Utah
As some of you know I get bored with vehicles and then change directions. That happened recently when Greg posted is RME TJ project for sale. It was based on a build I have had in mind for over a decade. At that time I talked to the wife and made the decision to move forward with the change. The first step was picking the project up from Greg and that purchase was already posted on RME as the Retirement TJ. The second major step was selling my 2007 JKUR, and that in itself was a tough decision. I had a lot of offers and sold it last Tuesday to a great guy that already has some amazing rigs. I'm glad it went to a good home.

2 hours later I picked up my new donor rig. I knew the second owner of this rig and it was beautiful 8 years ago, but didn't work worth crap. He didn't own it long and sold it to a guy in Washington, who took it to Jeremy Thompson (Eminence Off-Road) in Washington, who made it work much better. It has been used, and abused, and is in dire need of some TLC just to get back to being reliable.

I used this during Winter 4x4 Jamboree last week and when it was actually working, it did amazing. That was after a visit to Eminence immediately after purchase to fill ORIs and weld, tap, and reattach the rear axle truss. It was a purchase I second guessed many times last week. I had to charge the ORIs with nitrogen every morning, and by the end of the day at least one was down. The cooling fan quit one time and after a half hour chasing wires and checking fuses while it was snowing, it somehow started working again.

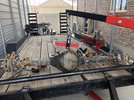
With all of that said the donor rig has a very decent drive train and most of it will end up in the new project. Still trying to think of a good name for it. The drive train consists of a real 5.7 LS1 (aluminum block and aluminum heads), 4l60, Atlas 4.3, Rock Jock 60s front and rear, ORIs with remote res in dire need of rebuilds, almost new 42" sticky Treps, ....

The goal is to get the donor rig reliable by EJS to work the trails that I'm on, and then start the transition of moving parts to the new platform. Sadly, the ORIs are going to Jensen Bros tomorrow for a rebuild and won't be back for a couple of months. It will be tough to see this sitting in my garage for that long. Lots of cleaning will be done in that time.

shop1.jpgshop2.jpgshop3.jpgmotor.pngCJ1.pngCJ2.jpgCJ3.jpg
 

Bart

Registered User
Location
Arm Utah
Finally an update on this project. I started this post after Winter 4x4 and then made a substantial change in the direction. Surprise, surprise

Originally I was going to swap the drive train over to the sexy frame I bought from Greg, and use it with the bobbed TJ tub to build a project I've dreamed about building for years. After running the rig for the few days at W4x4 I came to the realization that I really liked the aluminum tub on the new rig, so why do a LOT of work on the bobbed tub (for this project) when it will be heavier in the end. BOOM, decision 1 in Change of Direction.

Then I started measuring, calculating, and coming up with a plan to move the aluminum tub over to the amazing new frame when some realities set in. First, the aluminum tub is already boat sided, and the mounts are completely different, so I would have to cut the cool body mounts off the new frame. Second, the ORI's wouldn't fit the cool TMR shock mounts that were on the frame, because they have the big attached reservoirs, so they would have to be cut off, or heavily modified. Third and final problem, the frame was too long for the tub so I would have had to reconfigure the rear Motobilt section.

With all the needed mods, it was more time and cost efficient to sell the new frame, and deal with the limitations of the existing frame, which are substantial. BOOM, decision 2 in Change of Direction.
 

RockChucker

Well-Known Member
Location
Highland
So....the directions have changed. But now what is the plan with the current rig to make it more yours? I know you can't leave it alone. Excited to see what you come up with. Right now it kinda reminds me of a larger version of the little Jeep/buggy that campell ent built for walker evans.
 

Bart

Registered User
Location
Arm Utah
With the decision made I now had 2 months get the new rig ready for EJS. I actually started working almost full time on it to get it where I wanted it, and like most projects, very little went as planned. The wiring was atrocious, and the rig was in rough shape. I didn't have time for any major changes, but needed it comfortable to drive, and more functional than it was.

I started out by removing the ORIs that were leaking badly and took them to Jensen Bros in Salt Lake for complete rebuilds with seals. Next was addressing the brake problem. They simply didn't work. I had to put it in neutral to get the thing to stop at W4x4. I pulled the front end apart to get the rotors off and had them resurfaced, and then bought new Willwood pads for all 4 corners. The rig has Willwood 4 piston calipers on all 4 corners, and 2 Willwood 3/4 bore master cylinders, so hopefully this would improve the braking. I also completely bled and replaced the brake fluid in the entire system. Before I put the front end back together I also replaced all of the heims in the steering and started to paint over the blue color that was all over the rig.

Next in line was gutting the interior. The seats were old and rubbing on the 10" wide Tuffy box console. Once they were out I pulled the bent roof panels off and cut off the 40 ish rusted tabs that were used to attach them. Every roof panel was bent so I'm assuming they made contact with rocks at some point in their life. The PO also had a CJ windshield frame and glass welded to the inside of the cage, and since I was planning on licensing this I knew I had to run a regular windshield, so I cut that out also. Once that was all out, I taped everything off and painted the cage.
IMG_0622.JPEGIMG_0643.JPEGIMG_0619.JPEGIMG_0616.JPEGIMG_0645.JPEGIMG_0648.JPEG

Next came the wiring, gauges, and dash layout. There were wires and switches everywhere, and nothing was marked. Luckily most of it had been wired correctly with relays, so I replaced the misc switches and a switch panel. I also added a few new gauges, including a GPS speedo, in dash tach, and a trans temp gauge, and reconfigured the dash. I added a decent sound system, but didn't have time to get everything in and wired before EJS. There wasn't a lot of room, but I'm pretty pleased with the way everything came together. I may redo it in the future, but I can live with it for now.
IMG_0668.JPEGIMG_0683.JPEGIMG_0660.JPEG
 

Bart

Registered User
Location
Arm Utah
I bought new PRP seats, harnesses, and a new 8" Tuffy console and had to remount everything associated with them, which was a lot., I also put in a substantial amount of time straightening the dented aluminum tub, and am very pleased with the results.IMG_0608.JPEGIMG_0610.JPEGIMG_0611.JPEGIMG_0614.JPEGIMG_0733.JPEG
 

Bart

Registered User
Location
Arm Utah
In the end I ran out of time doing the cosmetic things I wanted, and didn't get to some critical mechanical issues I knew I had. I worked on it hard the first 2 days of Safari, and didn't know if I'd have a running rig the next day. I bandaided it the best I could and managed to have an amazing week. I didn't break until the last trail of the week, on Pritchett, which I was gunning. I was almost out and towing a broken Jeep out the bottom when the rear ring & pinion blew up. I could have been disappointed, but it really worked well, when it was running. It was a great week. There is so much potential here that I'm looking forward to using. I was able to do some obstacles that I haven't done since the Willys buggy and can't wait to do more. There is a lot of changes happening now and I'll get to those in the near future. Stay tuned for more updates.
 

Hickey

Burn-barrel enthusiast
Supporting Member
In the end I ran out of time doing the cosmetic things I wanted, and didn't get to some critical mechanical issues I knew I had. I worked on it hard the first 2 days of Safari, and didn't know if I'd have a running rig the next day. I bandaided it the best I could and managed to have an amazing week. I didn't break until the last trail of the week, on Pritchett, which I was gunning. I was almost out and towing a broken Jeep out the bottom when the rear ring & pinion blew up. I could have been disappointed, but it really worked well, when it was running. It was a great week. There is so much potential here that I'm looking forward to using. I was able to do some obstacles that I haven't done since the Willys buggy and can't wait to do more. There is a lot of changes happening now and I'll get to those in the near future. Stay tuned for more updates.
Can’t wait to wheel with you!
 

Bart

Registered User
Location
Arm Utah
Update time. I had to step away from the Jeep for a few weeks after Safari, because I was burned out. The complete lack of maintenance on this rig from the PO have had me second guessing the purchase since I loaded it on the trailer the first time. It's a love/hate relationship at the moment, but like I said in the last post, it has soooooo much potential. As much as I hate to admit it, there is so much to do, that it's almost overwhelming. I have to break this down by components and tackle them one at a time. Key areas of focus have been identified and will be addressed before it hits another trail.

Rear axle - I was hoping to baby it for a year and just run the rear Currie the way it was, but the R&P broke on the last day, and that moved the project to the top of the list. I have purchased a 2002 Chevy 14 bolt with discs and e-brakes, along with a TMR shave kit and an Artec truss. The axle is stripped down with will get cut by this weekend. I also picked up an ARB 14 bolt locker and and ARB dual compressor pump from Skippy. I hope to have this installed in the next couple of weeks.

Rear suspension - There are lots of things I would like to change about this, but it flat out works. I haven't decided what I want to do but I need to quickly.

Front axle - since the rear 14 bolt is 8 lug I will need to upgrade the front axle from 5x5.5 to 8x6.5. This has turned into a bigger project than expected. The front Curry Rock Jock has 2000 Superduty outer knuckles. I was hoping to just buy new 8 lug hubs, and then buy a conversion spacer to go from 8x170 to 8x.6.5. Matt (UPNO4) reminded me that I have 35 spline outer shafts and there are very few options to accommodate those. I ended up buying Nitro Gear hubs that were already 8x6.5 and getting the spacers I needed. I knew I would need spacers because the new 14 bolt is 68.5" wide and the front axle is 66". I also had to buy new Superduty calipers and rotors, that will need to be redrilled to 8x6.5

Brakes - The rig came with 2 Willwood 3/4 bore master cylinders attached to a single Willwood pedal, feeding to small Willwood calipers and rotors on all 4 coners. As mentioned previously, the brakes didn't work well when I bought it, and now with new axle parts will be completely different. I may have to add a booster and new master cylinder of some kind to send fluid to the new 1 ton rotors and calipers.

Atlas - I found out that the Atlas didn't like road speeds and puked out a lot of fluid while driving back to the condo after my Sunday run on Poison Spider. I will be pulling the skid plate, and the inspection cover on the Atlas to evaluate next steps. I may buy a rebuild kit from AA, but it is actually still working really well. We will see after the inspection plate comes off. I'm hoping I don't have to pull it, but will if I need to.

Steering - for some reason the orbital was mounted directly next to the driver side header. There is some heat shield there, but after running the rig for 15 minutes the pump begins to groan. I will be moving the orbital forward and down onto the frame, purging and replacing the fluid, and replumbing, including adding a cooler to the system. An alignment is also needed.

Fluids - It needs a complete change of oils and fluids, that I should have finished before EJS. The rear axle and t-case are already in the works, but the front axle, trans, engine, and steering will all get attention before the next outing.

Cooling system and fan - as of now it is direct wired to a switch on the dash, why I don't know. I will at least put a temp controlled switch so I don't have to manually operate it. Down the road it may get a bigger radiator with 2 fans on a controller. I may flush this system also, just because.

There are a 1000 more things that need to be changed on this rig before I am happy, but I can at least wheel it after these main issues are fixed.
 

Hickey

Burn-barrel enthusiast
Supporting Member
If those new Yukon hubs didn’t come with wheel studs, look into them soon. I’ve read about two different guys this week who bought those and had problems finding the correct studs.
 

Bart

Registered User
Location
Arm Utah
If those new Yukon hubs didn’t come with wheel studs, look into them soon. I’ve read about two different guys this week who bought those and had problems finding the correct studs.
They are Nitro Gear hubs, and for what they cost they had better come with gold wheel studs. I think they're complete, but we'll find out tomorrow for sure.
 

Bart

Registered User
Location
Arm Utah
I haven't posted in a while but things are progressing on the CYJ. It took me a while to get up the nerve to cut into the 14 Bolt. After watching some videos I decided to use a porta band on the first few cuts, then use a cut off wheel and sawzall to get close. What I found out was I could only get close with the tools, because it was tough to get the right angles. I ended up doing the last 3/8" with grinders, and finishing with a flapper. I also wanted to keep the fins on the diff to weld in runners to the new bottom plate, which added a lot of extra work. Pretty happy with the way it turned out.
IMG-0943.jpgIMG-1039.jpgIMG_1063.jpgIMG_1060.jpgIMG_1061.jpgIMG_1064.jpg
 

Attachments

  • IMG-0935.jpg
    IMG-0935.jpg
    487.5 KB · Views: 6

Bart

Registered User
Location
Arm Utah
It's been a long time since an update post, so I'll start trying to catch up. The reason for the delay is because I've literally been working non-stop on this for the past 6 weeks. Matt (UPNO4) was kind enough to let me use his lift just before he left for a 10 vacation. As luck would have it, this project snowballed, and it went waaaaaaaaay beyond what I played for this upgrade. Long story slightly condensed., the following projects occurred.

After getting the 14 bolt shaved and welded together, we went to install it. Matt talked me out of using the existing lower control arms because they had poly bushings on the axle side. As long as we were changing those, why not stretch it to 112" wheel base, which was a future planned project. That would also require longer upper control arms and a lengthened rear driveline.

IMG_1094.jpg
IMG_1137.jpgIMG-1501.jpg
70987048127--3E62F33F-C19C-48F6-8018-7258D43B1F8D.fullsizerender.JPEG

When we started on the front, the coil overs I bought were too long for the old mounts. There were problems with weak points on axle side anyway, which again, I was planning to address down the road. We completely re-engineered the front suspension, and substantially upgraded the lower control arm/shock mounts along with the cracked upper control arm axle mount which also eliminated the upper control arm trying to occupy the same space as the front driveline. As long as we were doing this we might as well upgrade the front control arms, thus eliminated the poly joints there.

IMG-1315.jpgIMG-1412.jpg

Since we were neck deep in the front and after talking with PSC on the 15 year old full hydro steering system, I upgraded the reservoir and added a cooler to the system. I hated where the orbital was mounted (right next the exhaust manifold) so I cut that off and relocated it further forward. All of this required new hydraulic lines and plumbing, along with extending the steering shaft.

IMG-1494.jpg

Another problem that I was going to try and live with for a while, exposed itself as I dove into that area of the Jeep, and that was the 15 year old braking system, or the lack there of. The rear axle now had big 14 bolt brakes, and to match the 8 lug pattern, I had to swap out the 5 on 5.5 hubs with the small brake pads, and replace them with 2000 Superduty, 8 x 6.5, 35 spline hub assemblies. YIKES, they were expensive. These required the upgraded Superduty brake calipers and rotors., and as long as I was buying those, might as well upgrade to the complete PowerStop setup.

IMG-1488.jpg

IMG-1487.jpg

With the larger calipers and pads front and rear I knew the little 3/4 bore Willwood master cylinders were not going to cut it, and even through I had bled the complete system before EJS, the brake fluid again had a silverish tint to it. We also decided that if we could find a vacuum assist booster that it would help. I had limited space on the firewall and under under the hood, but Matt pulled a rabbit out of his hat, and came up with a booster/mc setup from a 1985 Jeep YJ, which is a unicorn specifically for that year and model of Jeep. It was a real puzzle to get that, and the new steering location to cooperate with each other.

After all was said and done, I had all new control arms and joints front and rear, a stretched wheel base from 108 to 112", along with new 16" ORIs for the rear and new 14" x 2.5" Fox coil overs for the front. An all new brake system was added including new lines and proportioning valve from the pedal to all 4 corners., and the steering was completely rebuilt with upgraded parts and new hoses, and new fluid. Oh, I added a new ARB to the rear 14 bolt, and Matt rebuilt the front diff with new bearings. It was a major overhaul of every system, and I'm glad it's finally done. I have a few things to address, but looking forward to actually wheeling in the next couple of weeks. BIG thanks to Matt for all the help and advice.
 

Bart

Registered User
Location
Arm Utah
After bringing it home from Matt's I was able to complete many small items that had been bugging me since the purchase. I won't go into most of the details, but happy with the results. Lots of wiring, moving things, adding vents and catch cans, zip tying new wires and lines, paint, .......

A couple of the larger projects included getting the old M8000 Warn winch mounted and wired, and getting color change on the grill and hood.

I was thinking about wrapping the front clip when I stumbled on some rattle can paint that was close to what I wanted. I shot the grill and it turned out well enough that I painted the hood also. I'm pretty happy with the way it turned out. I also wanted to get away from the aftermarket lights and get back to a more stock CJ look. To do that I had to move the grill forward, and get some factory looking headlight assemblies, included buckets and bezels. I love the stock look.

IMG-1559.jpgIMG-1563.jpgIMG-1564.jpg

I've always thought that the more space you leave open in front of the radiator, the more cooling you'll have. I had purchased this old M8000 for a previous project, and couldn't wait to get it installed on this. I'm also pleased with where I was able to locate the solenoid control box, and I added an in cab winch controller that I've had for several years.

IMG-1603.jpgIMG-1604.jpgIMG-1602.jpg
 
Top