Show Us Your PROJECTS!

MikeGyver

UtahWeld.com
Location
Arem
This thread is long overdue on this forum. People here are always up to something interesting.

Show us your projects that you're working on... doesn't have to be jeep/auto related, could be anything!
Could be a past, present, or future project.
Share some details, construction challenges, why you chose to do things how you did, etc. Show us what other types of things you're interested in.
 
Last edited:

MikeGyver

UtahWeld.com
Location
Arem
I'll start...

Here's a high power LED project I've been dinking with for a while.
It's a constant current boost driver for a 100 watt led, meant to run from a car battery. I'd like to get this driver to the point where I can make and sell some on ebay. The only thing comparable to this are chinese circuits which at their minimum input voltage can't really run these LEDs at full power .

These 100 watt LEDs are a 10x10 array of 1 watt emitters, they require about 33 volts to run and draw around 3 to 3.5 amps, so driving them can be a bit challenging. The price of these has come down a lot; they're only about $8 each on ebay and they produce somewhere around 7000 lumens of light output (double that of a 35w HID headlight).

Since LED are current controlled devices, they should be driven at a certain current, not a certain voltage. They have non-linear voltage-current curves so a small change in voltage can cause a large change in current which can blow them up. Also as they heat up and their 'resistance' changes, constant current control accounts for this automatically.

24loi1g.jpg


temporary_zpsace4bc8d.jpg

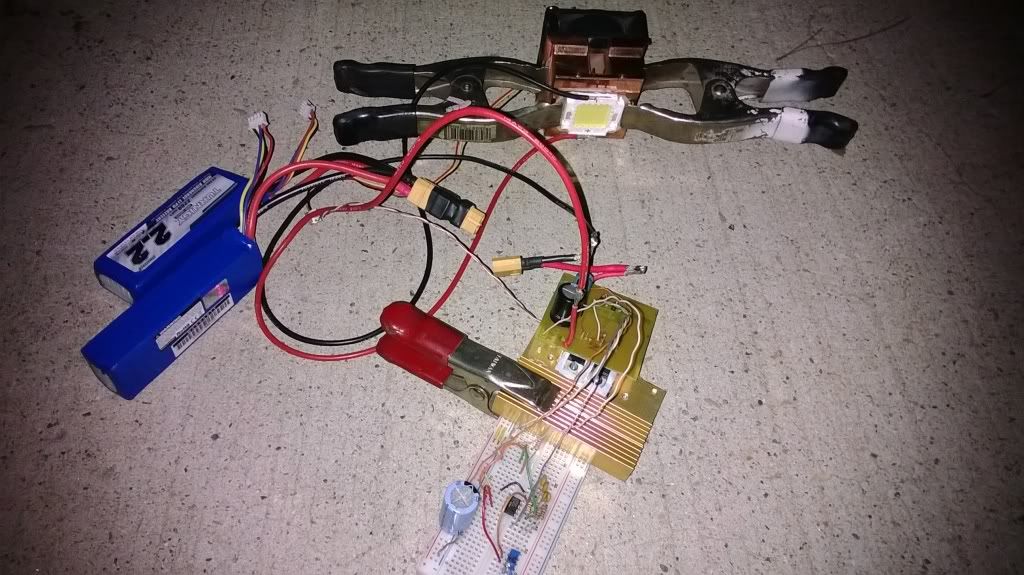
Here's a picture of the circuitry and the mosfet switching waveform, running at around 155khz in this picture.
Still in development, overall circuit efficiency was 91% last I checked. It's drawing about 10 amps from the battery pack.


temporary_zps065e2190.jpg

Here's the prototype running from a 11.1volt 3 cell LiPo battery pack. A large copper CPU heatsink and cooling fan is used to deal with the ~80watts of heat output (high power LEDs have a luninous efficacy of around 20-30%).


temporary_zps5fc8547d.jpg

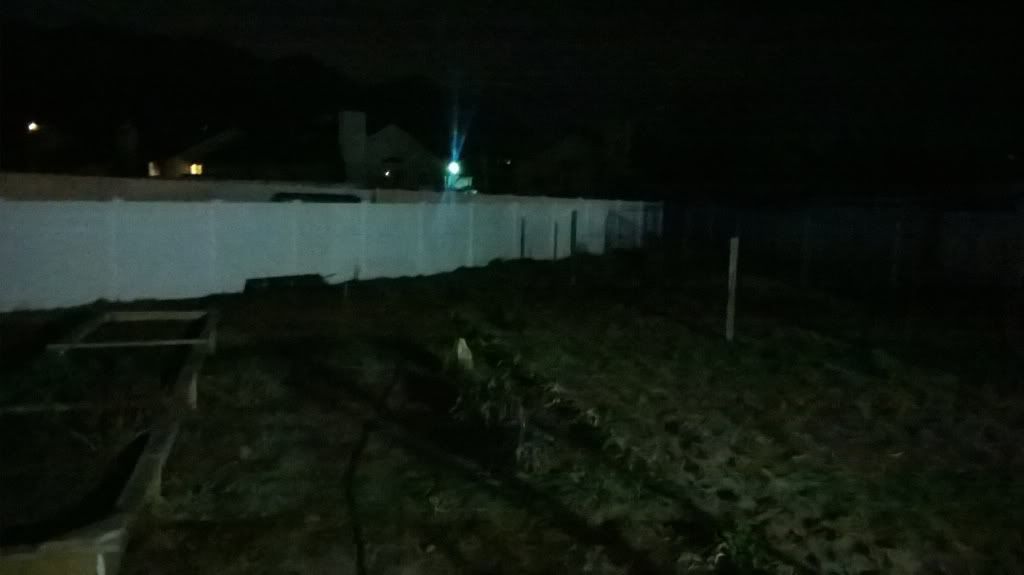
Here's a light output comparison picture. This is 'before' with only ambient lighting.


temporary_zpse073e9be.jpg

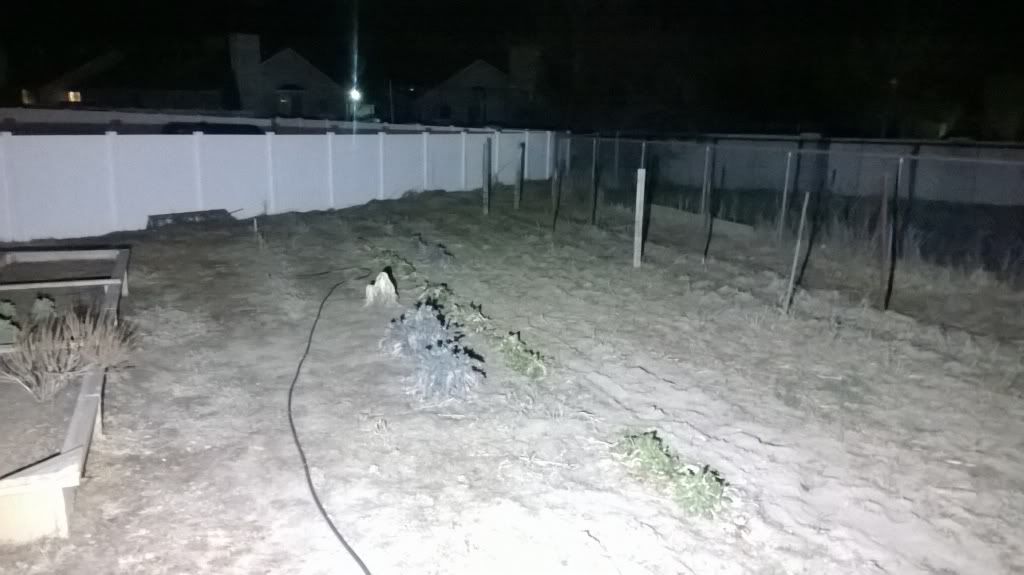
And after with... This is without any optics, just the bare emitter flooding light.
These would make really good, cheap outdoor lights as you can see.


temporary_zpsc9198af2.jpg

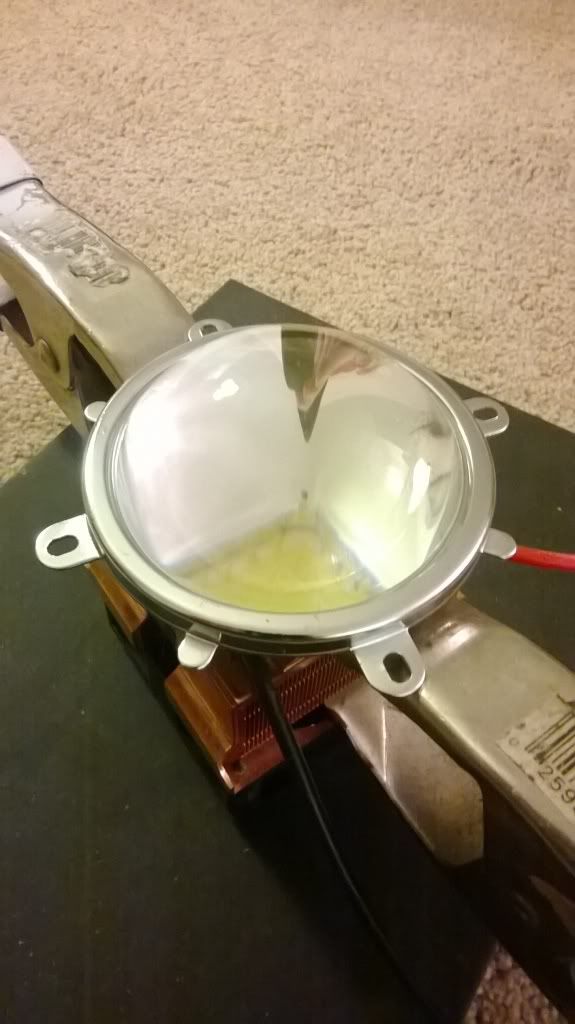
Optics are available for these though. Here's a 82mm aspheric glass lens and reflector.
These are probably what I'll use when I make an offroad driving light out of one of these.
 
Last edited:

sixstringsteve

Well-Known Member
Location
UT
i can't tell the difference between the before and after pics. :p

Those are awesome, I think you're really onto something.
 

Pike2350

Registered User
Location
Salt Lake City
I'm more of a construction/remodel type of guy for projects....I've owned this duplex in Sugarhouse for about 9 years now. I did a major renovation on the basement of the side I lived in...digging it down and repouring the concrete floor to make the ceiling height at least 7'. Unfortunately Webshots has deleted all those photos, so hopefully I can find them in then near future on an old computer of mine...I hope so.:(

Anyway, over the past 5 years my ex has lived in "my" side as my child support...she is now moving in with her ailing mother....so I have to do some work to make it rentable...at least up to my standard. It will be a little slow, but hopefully not too slow since I need to get rent coming in from it.:homer:

Anyway, decided to start on the back stairway. There is a small landing on the upstairs that leads down about 4 steps to a middle landing (that is at ground level) for the backdoor...then goes down to the downstairs. The wall that created the center wall of the stair was old beadboard...while normally I like this old stuff, this stuff has seen MUCH better days. Also, the stairs on that went from middle landing to upstairs didnt meet code....they only had about a 9/8 pitch....pretty steep. The problem is that the landing where the door is, is pretty small...so I didn't really want to eat into that too much...so my solution was to make the last 2 steps "spiral". So, with that, I also decided to cut down the upper railing/wall because it was ugly, blocked a ton of light and it didn't angle with the stairs.....it was a square wall, which when you are standing at the backdoor, it just felt pretty imposing.

Anyway, on to the pictures.

Looking from the upstairs hall into the stairwell
2014-02-01+21.11.51.jpg


down the stairs
2014-02-01+21.11.43.jpg


small landing
2014-02-01+21.11.11.jpg


beadboard wall/railing
2014-02-01+21.10.55.jpg


from downstairs
2014-02-01+21.10.41.jpg


stairs
2014-02-08+12.19.20.jpg


stairs "spiraled"
2014-02-16+11.49.00.jpg
 

Pike2350

Registered User
Location
Salt Lake City
Cut off the wall
20140316_154656.jpg


20140316_154644.jpg


test fitting new railing
20140317_215236.jpg


20140317_215249.jpg


finished with the major stuff
20140405_162832.jpg


20140405_162849.jpg


20140405_162858.jpg


20140405_162915.jpg


I plan on skinning the lower part of the wall with 3/8" drywall, or maybe even a 1/4" mdf...since it will see a bit of wear as people move things up and down the stairs.....the upstairs landing as well as down to the mid landing will be tile that will match the tile in the hallway upstairs. I have also framed around the electrical box to create a wall bump out so it's not just hanging on the wall, but "flushed" with the wall.

Nex up is the upstairs bathroom. Hopefully I can find the pictures of the downstairs....going from a big open room with a laundry/storage room to a bedroom, bathroom, and storage/laundry room and actual ceiling height was very nice. the lowest point before I dug it out was about 6'...the highest was only about 6'5"...not exactly comfortable for most anybody.
 

Zac001

Active Member
1981 CJ5

turning it into a military memorial for the POW and MIA support group here in Utah.

army jeep 2.jpgarmy jeep 3.jpgArmy jeep.jpg

All ready ordered a new soft top.
Just ordered a back seat.

next on the list is get custom gauges with the POW/MIA logos on them.
also having the front seats reupholstered with the POW/MIA logos on them.
while the seats are out im going to put bedliner on the inside
having the dash plate powdercoated

then after that some new paint and small lift. thats about all im concerned with now there are more things like engine bay dress up and what not but im working on the outter appearance for now.

anyone on here that has a line on how i could gain access to a small little army looking trailer to pull that would be an awesome help to me im not finding much.
 
Last edited:

MikeGyver

UtahWeld.com
Location
Arem
Here's a simple rack I put together for a guy a couple weeks ago. It's a stand for some food processing equipment, made out of 2" square .065" wall brushed stainless tubing.

stand_zps29c3027f.jpg


temporary_zpsee817b26.jpg


temporary_zps799f1a8d.jpg


IMG_1019_zps6893e03f.jpg


temporary_zpsa7dfb23b.jpg

Here's a pic after electopolishing the welds.
 

MikeGyver

UtahWeld.com
Location
Arem
Mike, do you have a homemade electropolishing unit? That stand is clean looking. I'm envious of your skill.

Yes, I reverse engineered (an expensive) commercial electropolishing system and made my own. Those two welds probably took 10 seconds to clean, and they're completely passivated so they'll never rust. :thumbs:
 

choptopbII

Well-Known Member
Location
Clearfield, UT
Almost forgot my tow rig project, I just got done swapping a 12v cummins, nv4500/np205 into it. Fun truck. Planning on doing all the body work and paint next.


OB1

Active Member
Location
West Point
ImageUploadedByTapatalk1397841804.955079.jpg
This is a test to see if my picture loads up. It is a picture of a 1953 m100 trailer tub that I picked up and am going to build a expedition trailer out of. If this works I'll start a thread on the build since all the pictures are on my phone.


Sent from my iPhone using Tapatalk
 
Top