General Tech What did you work on Today?

zmotorsports

Hardcore Gearhead
Vendor
Location
West Haven, UT
My son brought his Jeep over yesterday afternoon so we can begin the next round of work.
254b2d77c55b84ad0a588757e2ab1060.jpg


I then racked the wife’s car and performed a service on it.
92c36685c635249c26e1ab24743d3eaf.jpg


It’s supposed to be a cold and wet weekend so it looks like a great time to get some work done in the shop.

In preparation for the colder weather I also vacuumed the gas-fires heater out in the shop and cleaned and inspected the house furnace then removed the glass front from the fireplace and gave it a good cleaning last night.

Mike
 

YROC FAB.

BUGGY TIME
Vendor
Location
Richfield, UT.
It was upgrade time for chads buggy. We got his radio installed, and a 12v main power disconnect which would of been handy when he had a starter wire melt and run the starter while he panicking trying to disconnect the battery terminals lol. He had also broken 18 steering studs since hes had this thing over the last year. The one time he lawn darted coming down chewy on Pritchett and broke all 4 off at once, that was a fun day. . .

We finally talked him into some Solid knuckles. I prefer them over the Green ones or the Orange ones. The green ones use 4 bolts with a key way. The orange ones use 5 bolts and no key way. The solids have 6 bolts and a key way. Cant loose with 6 bolts and key.71181391_515889742574266_3001327089224777728_n.jpg
71711164_1599959850140342_2737413748456161280_n.jpg

I milled out his old arms instead of buying new ones.
70981768_632600530597987_721437669732646912_n.jpg71023986_2400253153569876_249176234234216448_n.jpg71149744_417792172263695_5236098371193667584_n.jpg
We also installed some bronze upper cone bushings.

download.jpg
71774872_778807025871906_7447330346162454528_n.jpg69623405_397932704231813_7684682874733199360_n.jpg
 

Attachments

  • 71181391_515889742574266_3001327089224777728_n.jpg
    71181391_515889742574266_3001327089224777728_n.jpg
    202 KB · Views: 9
  • s-l1600.jpg
    s-l1600.jpg
    45.8 KB · Views: 9
Last edited:

zmotorsports

Hardcore Gearhead
Vendor
Location
West Haven, UT
What a great day working with my son in the shop on Saturday afternoon. I’ve missed that lately.

Started by dropping the transmission pan.
555eacbd3396bb4ccbd1d6e77b87a823.jpg


Actually looks pretty good with very little sludge.
e9233de5f134a51d319d1b94336b7802.jpg


2e3bb8658105667f7f21ae3f28f2df8f.jpg


While everything was dripping off I machined a bung to be welded in the pan for the transmission temperature sending unit
4ca5d830fc0adc7e51425936da10fe2a.jpg


90839acd9810f688f5d5705e4cfc599f.jpg


871462e11993f883276a2cf325ab9432.jpg


a44adf4607c2f10567913dc85549115f.jpg


Used my sheet metal bits to drill the hole once the location was determined.
3770bd71645a681636d6aac0250232b9.jpg


f250cfa05f3425fd9b81d70e027953d7.jpg


78447b039026440cc8da748593cb029d.jpg


b546d98aa4ee508cc7f6414a747a0c1f.jpg


Welded and painted.
4e7e024fac25f5a34ab03249292ac7cb.jpg


79f12b72fee2c85c097b9f1b9add5163.jpg


While I was waiting for the paint to dry and while I had the welder out I fixed my 3rd hand and fabbed up a holder for my dust pan and small broom.
34a850245cf9a0d96826040931f36f60.jpg


Painted.
216049e298a9ed6e32e350e504612e70.jpg


Bolted to side of my cabinet.
e48ade9c4dcb67633b6cd263b6fe1d43.jpg


c649895cbde1d25b1bad95c2f1656245.jpg


Old trans filter and filter seal removed. Careful when removing this seal to avoid scoring the inside of the seal bore. I will install a prybar until it contacts the bore then back it off slightly to avoid damage.
bfda56d0e5fe8370476a9802ca0e188f.jpg


Deep socket inverted to drive the new seal in flush with the bore. I lubed up seal as well as the filter and installed new filter.
15cd1cdbf9d152ab63013ed00e9b892d.jpg


While I had the pan off I also replaced the spin on cooler filter prior to installing the pan.
881cae0425150dac234d6d79fbc82206.jpg


A small amount of dressing to hold the pan gasket in place during installation.
31f47ce9588937d0bc29c1cd04e43ae8.jpg


While we were looking at mounting the aux. transmission cooler locations my son noticed a small trace of coolant at the tank crimp on the radiator. We ultimately decided to replace the radiator while we had it in the shop. We also noticed a slight leak around the power steering hose at the crimp so picked a new one up.
eb97d280c86cd600cd726cff951c9d3e.jpg


e82eb8d239b8d10c449dd4cf5098b248.jpg


Everything going back together.
a8f1631aeecf3d3d3229008eb85bfd22.jpg


More to come.

Mike
 

4x4_Welder

Well-Known Member
Location
Twin Falls, ID
Nice. Now you have a draining point for the trans pan as well.
I have a cheap HF 180° hook tool for pulling those seals, it works very well and you'd have to try hard to damage anything. Just stick it through the seal and pull down.
 

zmotorsports

Hardcore Gearhead
Vendor
Location
West Haven, UT
Nice. Now you have a draining point for the trans pan as well.
I have a cheap HF 180° hook tool for pulling those seals, it works very well and you'd have to try hard to damage anything. Just stick it through the seal and pull down.

Thanks. I add a drain and/or temp sending unit on all of my personal vehicles and used to offer it as a service to clients which many had me perform.

I have a MAC seal puller like you describe but I've found a heel bar is just as quick and easy but you have to pay a little more attention or you'll damage the seal bore.

Mike
 

zmotorsports

Hardcore Gearhead
Vendor
Location
West Haven, UT
Last night my son came by after work and we were able to get the aux. transmission cooler completed as well as the upper and lower radiator hoses installed and most all of the engine bay reassembled with the exception of the battery tray.

I fabricated three brackets to mount the cooler.
655cc832849079447094ebdee0dd937d.jpg


d494cc4b183a78c40a1ac633ca7436b0.jpg


0fcb57c00db3af5c2088b03778820cf3.jpg


Mocked up.
c3a0d69a89697fac7a707bb95316dbfe.jpg


Top of the cooler nestled right under the core support.
47713fb5c3404bd975da9f297e2a4af9.jpg


Brackets bead blasted, painted and installed for the last time.
5e839f82bc1d46e6b79e0c49fc0a3f4b.jpg


I also installed abrasion sleeve on the transmission cooler hoses.
41aad2bef8f486c9690f210714f3ef2b.jpg


40d5f98381b1707d5918f87b47a58e71.jpg


Thanks for looking.

Mike
 

zmotorsports

Hardcore Gearhead
Vendor
Location
West Haven, UT
We finished up the cooling system, transmission cooler lines and refilled transmission as well as power steering on my son's WJ the other night. After a road test we racked it again to tear into a front axle seal that was leaking.
72b29df3b20b06f71f2e5500ce46fc24.jpg


Last night we finished replacing the inner axle seals.

Carrier out.
fb327af8ad52913047c18b1e1eb2ad98.jpg


Wear patten looks fantastic.
2a34ee561795392debbf32a3780f2850.jpg


Wear pattern on the races and bearings looks great also.
182be1bf453128e4b13150caed6b3a1a.jpg


We put everything back together last night and my son took it home to put some miles on her and make sure we have addressed all of the leaks. Hopefully this weekend we can finally get around to putting his tire carrier on and completing the bumper/carrier project. We have to address mounting the license plate as well as install his CB and wire the antenna while we're at it.

Thanks for looking.

Mike
 

zmotorsports

Hardcore Gearhead
Vendor
Location
West Haven, UT
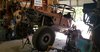
Saturday my son and I got a few little things done on his WJ. Not as much as we would have liked but these little details took a bit more time than I had anticipated.

We installed his tire carrier that has been sitting on my shop floor for about nine months now.

While I was waiting for my son in the morning I added some stainless steel material to the Destaco toggle clamp for his carrier.
cf0d1907dec5afa5ef866c8274cdb6df.jpg


328521f22be3a0cdbd83aeb215c907f1.jpg


20021b3cf4ecfbe9eef6c461e69c0a76.jpg


4180333b7d42a3b9ce050804b5879466.jpg


838546e427546c9f7aa2b26cd4a7768b.jpg


When my son showed up we installed the carrier.
b1e8276a015d246e1b499722150d2f5d.jpg


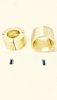
Installation of the dust cap with my machined driver.
2aa330f474ffcec93b54a7866daa0fb5.jpg


26b000bba1d93c208fbb3bfbd6c837ca.jpg


We installed the toggle clamp and welded a small tab on the clamp to locate a push pin.
b70dd860d54d7839f058ba0983cd6fe3.jpg


c374eb29414a892a2cd211ea5a841b80.jpg


2b5504f2ff7da1e3f844a9e44959ba2f.jpg


7b203c390194326100e2ca8b8286a032.jpg


The battery terminals were in pretty poor condition so we replaced them with some high grade marine connectors. We cut the original connectors off as the cables themselves were in pretty good condition and crimped new lugs on with heat shrink.
46e588349d9628d071ea43e0a02e2248.jpg


e6d6bb0364463f65b9bb7cc941437192.jpg


Next task was to fabricate a license plate mount as now with an externally mounted spare tire the license plate is hidden if left in the OEM location. We used standard 1/2”-20 lug nuts which left about 3/4” of threads protruding. The plane was to machine some standoffs from 1” aluminum with flats for a 3/4” socket, the same as the lug nuts.
76172b3af2fbf2b7efde575e241d13ca.jpg


They were drilled and tapped with 1/2”-20 threads on one side and 8mm x 1.25 threads on the other. Then placed into my 6-sided collet holder in which to machine the flats.
b120f92d6de71a6533a79489ffc76eff.jpg


Machining the flats.
2beebaf3f5f6013ac540081f9497a036.jpg


One down one to go.
7a45326dd2d699b731f995605c03b515.jpg


Standoffs mocked into place.
9aca73df9a362caa0b2909c106e461b2.jpg


I cut a piece of 3/16” aluminum plate just a little taller than the license plate and drilled & tapped for the plate and LED light.
c1c5ac9e523331d614dad91dee606c4f.jpg


f498d21b84af5ad817e71ff5b4895851.jpg


Before closing up the shop I ran a couple of wires from his right tail light marker circuit to power the license plate light and temporarily zip-tied the wiring until we can install the CB some time this week.

Thanks for looking.

Mike
 
Top