The Rubi Q Build

Hickey

Burn-barrel enthusiast
Supporting Member
As much as I would like to have a VSS inside the housing I don’t want to butcher my 241j and don’t want to invent something, as much as I can help it.

I forgot to mention a clocking ring in my last post. I assume I need one?
I wonder if you can use a clocking/rotation ring for a Dana 300? JB conversion sells them with input spline adapters for a great price.


UNSTUCK

But stuck more often.
I wonder if you can use a clocking/rotation ring for a Dana 300? JB conversion sells them with input spline adapters for a great price.

That is a nice kit. Looks to be specific to a 300 as the clocking ring is actually a new input shaft bearing housing. The JK 2.73:1 241 does not have a removable front housing.
 
Last edited:

UNSTUCK

But stuck more often.
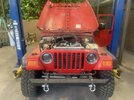
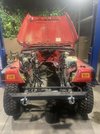
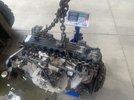
I got busy today. I have a buyer for the transmission and didn’t want to lose that sale so I ripped it all out.

IMG_4809.jpeg

IMG_4817.jpeg

IMG_4812.jpeg

In case anyone is interested, I weighed all three pieces so I can compare them to the new pieces going in.

4.0L engine fully dressed, clutch, wet: 542 pounds.
6 speed manual transmission w/o clutch, dry: 110 pounds.
NP241J 4:1 transfer case, dry: 98 pounds.

The new engine will be lighter, but the new transmission will be heavier. Tcase will be very similar. I’ll get them all weighted. Hopefully it’s lighter and then similar once I add a winch.

*Edit: Todays milage shows 186775.
 
Last edited:

UNSTUCK

But stuck more often.
So I want to fully rebuild my new JK 241J 2.73:1 transfer case. I purchased it from a used car dealer who bought it from somewhere to repair a Jeep they had that "had a bad transfer case". They realized it was an axle issue before putting in the case. They fixed the axle and sold the Jeep. This new to me case had been sitting around for a while when they decided to sell it. Long story short, no one really remembers anything about the case, like miles or even where they purchased it. They were happy to take my $200 and get rid of it.

I need to install the 32 spline input shaft I have have now so the entire case needs to come apart. It makes sense to put in new parts. So my question is, what parts do I purchase? Looks like most of the "full" kits come with bearings and seals. The different companies all claim their kit is superior. Looks like I can purchase a chain, which I would do. I can also purchase a pump separately. To me it makes sense to purchase a pump, but I don't know if they are needed. Do they fail? It's like $35 so it not a huge deal to install a new one. Are there any other parts I should replace that I have missed?
 

zmotorsports

Hardcore Gearhead
Vendor
Location
West Haven, UT
I generally tear a TC down for inspection before ordering parts as they seem to vary quite a bit on what they actually need unless you want to replace everything, but I don't like throwing parts at stuff that are not needed as that just seems wasteful.

Chains and gears are kind of hit and miss as far as when they are needed. Only about half, or maybe even less, of the TC's that I have rebuilt actually required chains or bearings. Seals are about the only thing I would replace as a rule of thumb while it is apart. Then I would inspect everything else but the other wear items I find needing to be replaced a vast majority of the time are the UHMW wear pads on the shift forks. Those seem to wear on a regular basis on a TC that has been used much at all in anything other than 2HI.
 

UNSTUCK

But stuck more often.
I wish I had the space to tear it down and leave it for a week or so while waiting on parts. I really need to tear it down and put it right back together. I’ll make sure the kit I purchase includes all the fork plastics.
 

UNSTUCK

But stuck more often.
I generally tear a TC down for inspection before ordering parts as they seem to vary quite a bit on what they actually need unless you want to replace everything, but I don't like throwing parts at stuff that are not needed as that just seems wasteful.

Chains and gears are kind of hit and miss as far as when they are needed. Only about half, or maybe even less, of the TC's that I have rebuilt actually required chains or bearings. Seals are about the only thing I would replace as a rule of thumb while it is apart. Then I would inspect everything else but the other wear items I find needing to be replaced a vast majority of the time are the UHMW wear pads on the shift forks. Those seem to wear on a regular basis on a TC that has been used much at all in anything other than 2HI.
Mike, have you replaced the oil pump in any of your rebuilds? I read on Alldata today that you are not supposed to remove the pump as the alignment is critical. It says if the pump is removed you must replace the rear case half with a new pump already installed. I see many places selling just the pump, so that is strange to me.
Do you know how these pumps work? I assume there must be some bearings that do not get splashed well enough so the pump supplies fluid to them. Probably not really creating pressure as much as flow? Assuming I have a clean transmission with no issues, ie, no metal through the pump, it should be fine to reuse?
 

zmotorsports

Hardcore Gearhead
Vendor
Location
West Haven, UT
Mike, have you replaced the oil pump in any of your rebuilds? I read on Alldata today that you are not supposed to remove the pump as the alignment is critical. It says if the pump is removed you must replace the rear case half with a new pump already installed. I see many places selling just the pump, so that is strange to me.
Do you know how these pumps work? I assume there must be some bearings that do not get splashed well enough so the pump supplies fluid to them. Probably not really creating pressure as much as flow? Assuming I have a clean transmission with no issues, ie, no metal through the pump, it should be fine to reuse?

I apologize for the delayed response, haven't checked in for a few days.

No, as a general rule I do not replace the pumps. I do however, inspect them thoroughly. They are a gerotor style pump and if there is any signs of scoring or debris that got flushed through the pump then I don't risk it and replace the pump but that has been a very small amount of TC's. The gerotor style pump uses an offset wheel that has one less tooth than the body and as it is rotated around it creates a less than atmospheric pressure (vacuum) on the supply side and as the void or space between the teeth decreases, it creates a higher than atmospheric flow (pressure) out of the discharge side of the pump.

They are very efficient and resilient as long as they have a constant supply of clean fluid to keep the moving components lubricated, but if that supply is contaminated or starved severe damage will most definitely follow.
 

UNSTUCK

But stuck more often.
So I shuffled some stuff around and made room to work on this transfer case. I'm glad I did. The tear down went smooth. I was surprised at how well everything looked. I can't feel any play in any bearings. The teeth on all the gears look great as well. There were a few small pieces of aluminum in the pick up screen. I'm guessing they were casting flakes. The pump didn't have any marks on the teeth or in the housing, that I could see. I could still see machining marks around it. I got it torn down completely and removed the input shaft from the planetary housing.
I started to compare this input shaft to the one from the NP241C 32 spline I was hoping to install. There are some differences that put a halt to the job.
To refresh memories, the case I'm using is an "MP241" 2.72:1 out of a JK. I don't know what year. It has a 23 spline input which suggests it was for a manual transmission. Being that it's an "MP" and not a "NP" suggests it's a 2012+ as it seems that is when Magna Powertrain took over for New Process.
Assembly Number: 52853400AC
SN: 01-25-13 A

The NP input shaft is about 7/8" longer. No problem. The NP main shaft snout has a 1.125" diameter. The MP snout measures 1.315". Big problem.

I'm guessing this is a change that MP made. I can't find any information about NP241's using anything other than a 1.125 ID bearing. This means there probably isn't a 32 spline input shaft out there that uses that size bearing. So I'm guessing I either need to open up the NP input shaft to accept the MP bearing or turn down the MP main shaft snout. Turning down the snout seems like the way to go as it wont see any load where as the input shaft will become weaker with material removed. It needs to remain as strong as possible.

I hate to modify parts, but I don't see another way.
 

UNSTUCK

But stuck more often.
Just a couple small updates.
1. The machine shop called today. 6-8 weeks has turned into 12 weeks. They forgot they were supplying my pistons and rings so now maybe another week. Also, they lost the lower timing sprocket I brought them to press onto the crank. Then 2 months or so ago when my engine parts showed up I took the valve springs, seals and that sprocket to them to install. They told me the heads were already rebuilt and they reused the stock springs. The guy told me he would take them apart and install my new springs. I hope they did. I'm not sure I'll be able to identify new springs vs. used springs when they are installed. Other than that they said everything was fine and remained stock. That surprised me a bit. I was sure the bores would need to be enlarged.

2. I made a very educated guess/gamble and purchased an input shaft for an NP261/NP263HD. $60 in Ebay with free shipping. It took a while roaming through Rockauto to locate a truck that had a transfer case that used an input shaft pilot bearing with the same part number as the one for the JK case I have. Then to find one with 32 splines, then eyeballing pictures for all the other features. This input is identical to the NP241 input shaft I have, except for the main bearing is the narrow bearing instead of the wide bearing and that it uses the larger pilot bearing that I need. NP241's came with either the narrow or the wide bearing. From what I can tell, the 261/263HD only used the narrow one. Next I need to purchase a narrow bearing with a retaining ring groove in it and hope that fit is the same as what the wide bearing would be. From pictures it looks like the narrow bearing with the groove has the groove offset to one side a bit, I think for that reason. We'll see.

3. I'm banging my head against the workbench trying to figure out the GM cruise control. I hate that I have so much time into something I have never used in the Jeep, and will likely continue that pattern. I just want to keep this thing as factory original as possible. I have read quite a few threads on LS1 Tech and HP Tuners forums where people say they have done it, but no mention of how they did it. I have PMed people, started new threads on both sites and have gotten nothing. I have emailed multiple companies selling aftermarket systems that all seem to trick the ECM. I've asked them if they know anything about the factory CC. None of them responded to me. At this point I am going to wire up the CC circuits just they way they are drawn up in Alldata, using the BCM. I'm not sure what to do with the VSS. I am remote mounting the jeep VSS. I could mount the GM VSS right next to it. I could try to use the Jeep VSS and send that signal to the GM ECM. I will have to tune the ECM no matter what for the new pulse count. There may or may not be an issue with the Jeep hall effect sensor signal not being read by the ECM though.

Ok, back to banging my head on the workbench.
 

UNSTUCK

But stuck more often.
I pulled the bearings out of the tcase today. They all say China on them. I can’t imagine jeep is using china parts so maybe thing was gone through already? Either way I’m looking up a few bearings and seals right now. Everything else looks great.
 

glockman

I hate Jeep trucks
Location
Pleasant Grove
3. I'm banging my head against the workbench trying to figure out the GM cruise control. I hate that I have so much time into something I have never used in the Jeep, and will likely continue that pattern. I just want to keep this thing as factory original as possible. I have read quite a few threads on LS1 Tech and HP Tuners forums where people say they have done it, but no mention of how they did it. I have PMed people, started new threads on both sites and have gotten nothing. I have emailed multiple companies selling aftermarket systems that all seem to trick the ECM. I've asked them if they know anything about the factory CC. None of them responded to me. At this point I am going to wire up the CC circuits just they way they are drawn up in Alldata, using the BCM. I'm not sure what to do with the VSS. I am remote mounting the jeep VSS. I could mount the GM VSS right next to it. I could try to use the Jeep VSS and send that signal to the GM ECM. I will have to tune the ECM no matter what for the new pulse count. There may or may not be an issue with the Jeep hall effect sensor signal not being read by the ECM though.

Ok, back to banging my head on the workbench.
Keep good notes on how you accomplish this so I can copy it later.
 

UNSTUCK

But stuck more often.
Keep good notes on how you accomplish this so I can copy it later.
Isn’t your drivetrain gen 3? As I recall, that’s a straight forward (easy?) wire up through the ecm. Even easier if you use Novaks tach emulator with CC option. I can’t remember but I think you went aftermarket gauges so you may not want to go that route. Gen 4 is not as easy, either way.
 

bryson

RME Resident Ninja
Supporting Member
Location
West Jordan
You'll have to search the thread, but I know there's a lot of good CC info here:


UNSTUCK

But stuck more often.
Well, after WAY too long messing with things and learning a bit, I have the transfer case rebuilt and back together. Only slightly modified.

For a (not so) quick recap, as I may have mentioned it earlier, I purchased this "MP241" from a car dealership that purchased it to fix a Jeep they were selling, and ended up no needing it. I found a tag they put on it that fell off in the bed of my truck that simply said 2015 Jeep. So I assume this T-case came from a 2015 Jeep. It came with an internal splined input shaft which tells me it was from an automatic. The manuals use an external splined input shaft.
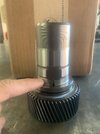
To work in my Jeep this T-case needed a few things. First it needed a 32 spline input shaft. Then an externally mounted VSS. Lastly a clocking ring. I quickly found out that an old school NP241 32 spline input shaft would not work. The two shafts are the same except the pilot bearing for the main shaft is two different sizes. The NP bearing measures 1.5xx" and the Jeep MP bearing measures 1.6xx". I found one video where a guy opens up the bore to fit the 1.6xx" bearing and was done. Local guys wanted a minimum of $200 for any lathe work. I discovered that Novak sells an input shaft that either just works, or they modify it to work. They couldn't tell me exactly. It sells for $200. I then spent a few hours on Rockauto crossing numbers and vehicles and came up with an input shaft for a NP261/NP263HD. It was $80 and free shipping from ebay. I purchased it. I knew it uses the narrower main bearing, which is common in 241's, but it also uses the larger pilot that I needed. I also purchased the narrower main bearing. When it all arrived I tried to install the main bearing in the jeep housing and quickly found it would not line up with the retaining ring built into the housing. I gave up and returned those parts and purchased the Novak shaft. When it arrived discovered it's the same shaft that I had ordered, but they turn down the shoulder that the main bearing rests against. This allows the wider Jeep/NP241 bearing to work, and still use the wider pilot bearing as well. DONE. I need a lathe bad. Would have saved me a month or so of headaches.

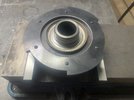
This picture shows the shoulder that was turned down to fit the wider main bearing on the input shaft. The bearing should be a tight slip fit. They did not turn it down enough for that. I spent about an hour with a file to finish "turning" it down. With the bearing installed in the housing I still had to tap the shaft into place with a hammer. :mad:
IMG_5162 - Copy.JPG

After that, the case went back together normally with new bearings and seals. The chain was in great shape so I reused it. Once the case was back together I turned my focus to the external VSS. Carl cut the tone ring I drew up. It fits on the weighted rear yoke. I drilled and tapped the yoke weight.
IMG_5040.JPG

I temporarily put the yoke on the output shaft and was able to tap the tone ring into place to make it as centered as possible. Then I tightened all the bolts for the last time with a bit of blue locktite.
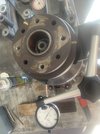
IMG_5176.JPG

I then found that a piece of angle iron across two of the extra bolt holes on the back of the case worked great for mounting the sensor. It was a tight fit and took a bit of finesse to make it work, but turned out great. The far side bolt is a tight fit while the near side bolt hole is slightly elongated to allow adjustment of the sensor depth. I goes from .000" to about .050". I have the air gap set to .030" right now.
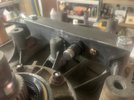
IMG_5177.JPG

I then installed the clocking ring and a new plastic bushing in the shift lever. It's ready to go!


This week I'm working on all the small details and prep work for the engine build. I hope to do full build this weekend.
 

UNSTUCK

But stuck more often.
Ive really been slacking on the engine build. It’s been here for a couple weeks now after picking it up from the machine shop. I’m not impressed and think there may be issues.
First off, the block was not bagged at the machine shop and had sat for at least a week while waiting for pistons to arrive. In that time there was surface rust developing on the bores. I had to lightly sand it and then applied oil to help prevent it from happening again.

Now on to the measuring.

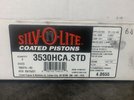
These are the pistons the machine shop ordered for me. I asked for “stock” equivalent pistons. The stated diameter is 4.0640” with +.0000 and -.0005 allowable. The recommended bore is 4.0655. That would mean a .0015” piston to wall clearance.
IMG_5289.jpeg

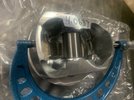
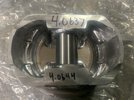
All 8 pistons measured exactly the same at 4.0637”. Very impressive. This is within the -.0005 they state.
IMG_5287.jpeg

That measurement does not include the nominal .001” coating on the piston wall, and it’s not supposed to. With the coating the diameter measured 4.0644”.
IMG_5288.jpeg

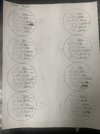
Here is the measurement chart I created with all the numbers filled in.
IMG_5290.jpeg

My build book says all the numbers should be within .001 of each other. Looks like I have slight taper issues as well as clearance issues. These pistons are going to slap like crazy huh? My book doesn’t have a max ptwc number but from what google says it is .0022”. All of the cylinders are out of that spec. If you add in the coating on the piston that helps a lot, but I don’t think I’m supposed to look at it that way. Some would still be out of spec.

Am I right in thinking I need to take the block back?
 

UNSTUCK

But stuck more often.
I took the block and pistons back to the machine shop at lunch today. Their measurements were the same as mine and agreed it wasn’t right. They are now going to bore/hone it to 10 over and swap out the pistons for a new set. All on their dime of course.
They said it will ready next Wednesday. Some how I doubt it.
Hopefully it will give a bit more power. Not that I’ll ever know or not.
 
Top