Hunt's Debadged RME TJ

Owners Name & City- Hunt, Carmel , NY

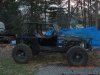
Make, Model & Year of Vehicle- Jeep, TJ 1997

Engine- 2003 5.3L LM7 from a truck, LS1 Oil Pan, ECU re-flashed for 325 HP and 375 Ft lbs of torque,
Sanderson Headers with 2.5” collectors and 3” exhaust with Magnaflow muffler, Aluminum radiator with 2 speed Taurus electric fan,

Transmission- TH 350 (recently rebuilt and resealed!) with full manual valve body & engine brake, Summit Racing 12” 2000 RPM stall converter, Art Carr shifter, Spal transmission cool, Advanced Adaptors, deep extra capacity aluminum transmission pan,

T-Case- Advanced AdaptorsAtlas II with 4.3 to 1 ratio, 32 spline outputs front and rear, Roark Fab Atlas mount

Axles- Rear- Dana 60 with 40 spline Mark Williams 1.75” shafts, 5.13 gears, spool and disc brakes, Tera HD diff. cover, Width=62”, 1.5” spacers at both wheels, TeraFlex axle bridge truss,
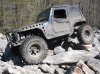
Front- Tera CRD60, Dodge Kingpin Knuckles with chromo shafts, 5.13 gears, ARB locker, 35 spline outers(not chromo) and Warn Premium hubs, crane diff cover, Width=64”, Full hydraulic steering with single-ended ram, PCS pump and Appleton power steering cooler/reservoir/filter, 83” wide from the outside of the tire to the outside of the tire,


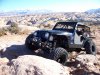
Suspension- TeraFlex longarm LCG for an Unlimited Wrangler, Rear coil buckets have been moved back 11”, wheel base is 104”, 3” of suspension lift, 1” body lift under the tub but not under the radiator shell, TeraFlex Dual Rate S/T swaybar, BTF coil mounting kit, Custom from 3 link with the upper link built using lower components, TeraFlex Belly-Up 1/4” t-case skid plate,

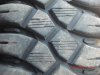
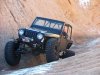
Wheels and Tires- 17”x9” Cragar Soft 8 steel black wheels, 5 total, 3” back spacing, 6 on 5.5 lug pattern, Staun internal beadlocks @ 30 psi, 40x13.5x17 Maxxis Creepy Crawlers DOT compound running 6 psi rear and 8 psi in the front,
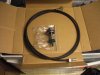
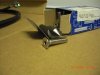
Winch- Warn M8000

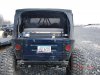
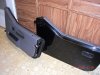
Body Modifications and Protection- BTF Crusher Corner Comp Cut rear quarter panels with LED rear brake lights, BTF Rocker Protection, Highline hood, Ben Hank’s Racing custom front fender raised for more tire clearance, Custom Ben Hank’s Racing roll cage tied to the frame in 6 places, BTF front bumper with d-rings, BTF winch plate,

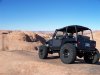
Favorite Trails- Hell’s Revenge and Hell’s Gate Moab, UT

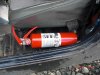
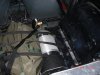
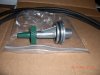
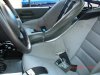
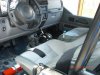
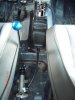
Other-Summit Machine aluminum fairlead (I need to get a synthetic rope or switch to a roller fairlead), Orbial battery, Corbeau Ultra SS seats tied to the roll cage, RCI seat harnesses, Custom 15 gallon fuel cell behind the rear seat built by Ben at Alliance Metal Works in SLC with a Napa P5000 pump, Bestop Super Top with soft doors, Bestop Bikini Top, AutoMeter white face Hotrod style gauges,
 

Attachments

  • 100_0064 (Large).JPG
    100_0064 (Large).JPG
    166.2 KB · Views: 385
  • 100_0090 (Large).JPG
    100_0090 (Large).JPG
    133.7 KB · Views: 360
  • 100_0057 (Large).JPG
    100_0057 (Large).JPG
    97.7 KB · Views: 345
Last edited:

Hunt

Active Member
Location
Carmel, NY
I mounted a High Lift Jack on the rear C-pillars. Just a tab on each bar with a bolt through the jack at either end. It holds the jack nicely; it does not rattle and does not interfere with the soft top or the fuel cell filler neck. I also mounted two fire extinguishers on the floor next to he driver and passenger seats. I just have the mounting frames zip tied in for now but I will build some bracket to more securely mount them. The synthetic winch line is in and Zack from A to Z Fabrication gave me a new fairlead because the steel cable had gouged the aluminum on the old one. I was just going to use a die grinder on it and smooth it out but I couldn’t beat the price of the new one!
 

Attachments

  • CIMG1031 reduced.JPG
    CIMG1031 reduced.JPG
    112.2 KB · Views: 40
  • CIMG1030 reduced.JPG
    CIMG1030 reduced.JPG
    84.4 KB · Views: 25

Hunt

Active Member
Location
Carmel, NY
I got a few more things checked off on my to-do list this weekend.
Changed the differential fluids. The covers on the diffs are heavy as heck. The rear caught my off guard and squished my little finger on the floor. Lesson learned. Refilled with Royal Purple. The front CRD housing is a pain to get the fluid drained out of because it leans back.
I pulled the rear seat out and installed some slot rails for tie down points. There was simply no room for a rear passenger with the roll cage bar behind the driver. I feel better now that I will be able to tie down anything that is loose in the cab. In November I was a passenger in a Jeep that when upside down on a seemingly easy spot on the trail. luckily every thing was tied down well, but it was amazing how much stuff shifts and moves.
I got the Dodge master cylinder installed. The brakes are still spongy but it stops well! I need to do some more bleeding of the lines. It is almost the exact same pedal feel as with the Jeep master cylinder. I'm not sure what is going on. The stock one would creep a little so I thought it was bleeding past. I upgraded to the Dodge truck MC and got the same feel. Swapped it for another truck MC thinking maybe the first one was bad. Finally, 3 MCs later I am back where I started with spongy brakes. More to follow.
The patch panel under the tail gate in in. Greg had a Rocky Mountain Extreme laser cut sign there. I cut a piece of 3/16 plate to cover the area and used the same bolt that are on the rockers and corners. If you feel up under that lip there are four factory holes cut there. I used those as my locations for the bolts. I also installed matching hardware in a few places that where missing on the corners.
I started siping the tires this weekend too. Right now I have every other lug done on the inside lugs. I figured I would see how they do and go from there.
 

Hunt

Active Member
Location
Carmel, NY
I ordered the Autometer tach adapter this weekend. I searched and searched the wonderful world of the internet and determined that I need to tap into the white wire at the number 10 pin on the computer for my tach signal. Great problem solved. Until I go to do the installation and I have no wire at all coming from the number 10 pin. I go back to the internet and there is a disclaimer saying if the wire is not there you need to spend $80 on the adapter.

I also got around to measuring for the speedometer cable. Nevada Speedometer is sending me the part to finish that installation.
 

Hunt

Active Member
Location
Carmel, NY
I picked up a set of four (0.5”, 1”, 1.5” and 2”) JMR dimple dies. I’m going to build an arbor style press with an air over hydraulic bottle jack. I’m thinking about doing the edge of the hood. Greg high lined the hood by taking out about 3 inches off the bottom lip. It looks great but the factory rolled edge gave the hood a lot of rigidity. I think the holes would add some rigidity and look really cool. The picture is just a quick paint shop job. The panel behind the front fender opening is already dimpled. Let me know what you think of the hood idea.
 

Attachments

  • Dimple die hood concept.jpg
    Dimple die hood concept.jpg
    167.5 KB · Views: 67
  • Dimple die hood concept 2 .jpg
    Dimple die hood concept 2 .jpg
    157.7 KB · Views: 57
  • Dimple die hood concept 3.jpg
    Dimple die hood concept 3.jpg
    157.8 KB · Views: 52
Last edited:

Hunt

Active Member
Location
Carmel, NY
Here are a shot of the patch panel under the tail gate. The 5/16” stainless hardware is identical to the rest of the body panels. I counter sunk the screw threads and it turned out pretty well. The panel is just painted now but I think I am going to have it power coated to prevent rust. I am looking at doing a panel for the tail gate but I am worried about the extra weight on the hinges. It’s not necessary but I think it would finish up the rear body armor nicely. Not to mention it would make a HUGE smooth area to put a vinyl graphic later. What do you think?
Also included a shot the tie down rail I installed in the rear cargo area. It is very solid, adjustable, and convenient. The rail is the same product you may have seen for motorcycle trailers. I happen to find mine at the Tractor Supply Store. I will just have to wait and see how it holds up.
I’m going to use some blue painters tape and lay out the holes for the hood. I’ll try a couple of different things to see what looks best before I do any cutting.
I keep updating the “To-do” list on page one. It’s mostly a place to put down my thoughts as I think of things to do and things I have done; an online journal of sorts.
I was looking back through Greg’s build thread and there is still a fair amount of discussion there. I didn’t want to highjack his thread so if anyone wants to know more, see a specific picture on how something was done, or I can help in any way just let me know.
 

Attachments

  • CIMG1274 reduced.JPG
    CIMG1274 reduced.JPG
    122.1 KB · Views: 47
  • CIMG1276 reduced.JPG
    CIMG1276 reduced.JPG
    84.3 KB · Views: 40
Last edited:

blacktj1997

New Member
i like what you are doing with the jeep! it is sweet! on the tailgate armor, what about using a sheet of aluminum? that would be alot lighter than steel and probably wouldn't affect the hinges much if at all....
 

mbryson

.......a few dollars more
Supporting Member
i like what you are doing with the jeep! it is sweet! on the tailgate armor, what about using a sheet of aluminum? that would be alot lighter than steel and probably wouldn't affect the hinges much if at all....


Aren't those tailgate hinges designed to take the weight of a stock spare tire? I'd assume that a piece of plate would be of similar weight?
 

Hunt

Active Member
Location
Carmel, NY
i like what you are doing with the jeep! it is sweet! on the tailgate armor, what about using a sheet of aluminum? that would be alot lighter than steel and probably wouldn't affect the hinges much if at all....


Aluminum may be an option (an expensive one). Thanks for the complement.

Aren't those tailgate hinges designed to take the weight of a stock spare tire? I'd assume that a piece of plate would be of similar weight?


I was talking with a friend and he too pointed out that the stock spare tire mounted to the tailgate. We are thinking the 3/16” steel plate should weigh about the same as the stock spare wheel/tire combo and tire carrier. I will not be mounting a tire to it so the hinges should be okay. I am going forward with building the panel.
 
Last edited:

Hunt

Active Member
Location
Carmel, NY
More parts.
Speedometer cable and adapter/gear from Nevada Speedometer, a smoking deal on a set of black half doors with grey interior panels off of Craigslist, and the hardware for the tailgate armor panel from Grainger.
 

Attachments

  • CIMG1280 reduced.JPG
    CIMG1280 reduced.JPG
    93.1 KB · Views: 7
  • CIMG1281 reduced.JPG
    CIMG1281 reduced.JPG
    72.5 KB · Views: 7
  • CIMG1282 reduced.JPG
    CIMG1282 reduced.JPG
    91 KB · Views: 9
  • CIMG1286 reduced.JPG
    CIMG1286 reduced.JPG
    83.9 KB · Views: 8

LT.

Well-Known Member
I like the way the rig is looking. I also think that I like the middle picture the best. Not as many holes but the dimple dies should make a difference there next to the hinge. Go for it!

LT.
 

Hunt

Active Member
Location
Carmel, NY
Speedo works!
It's horrible video but you get the idea. Come to find out where I had been shifting it was only about 3800 RPM. At 4000 it will bark the 40" tires on the asphalt. She is a beast. With the sway bar locked in the jeep runs 55 pretty well. I ran out of straight road close to the house and didn't push it any further. Drives great at 45! I used my GPS to verify the speed and it is right on. The gear charts on Advanced Adapters' website are excellent.
The weather has been great so I put the half doors and the bikini top on. It looks good.

http://www.youtube.com/watch?v=sfdgTh9nZGM
 
Last edited:

Bart

Registered User
Location
Arm Utah
Cool. I have a working speedo in my buggy but have been thinking about adding a tach. Always liked that dash config.
 

Hunt

Active Member
Location
Carmel, NY
Here are a few more update photos. The Dodge master cylinder. A shot of the jeep with the half doors on it. Its not really a dark blue jeep any more. Now it’s a black jeep with a blue tub. One of the fully siped tires. I figure I only have about an hour maybe an hour and a half in each tire. I mounted the cutting brake handle this weekend. I need to put a few washers under the driver’s side bolts to shim the handle over a little. The floor has just a little arc to it and it really throws the handle over more than I wanted. I still have to plumb it in.
 

Attachments

  • CIMG1419 reduced.JPG
    CIMG1419 reduced.JPG
    95.6 KB · Views: 20
  • CIMG1407 reduced.JPG
    CIMG1407 reduced.JPG
    90.2 KB · Views: 29
  • CIMG1415 reduced.JPG
    CIMG1415 reduced.JPG
    98.9 KB · Views: 20
  • CIMG1416 reduced.JPG
    CIMG1416 reduced.JPG
    84.5 KB · Views: 28
  • CIMG1417 reduced.JPG
    CIMG1417 reduced.JPG
    95.1 KB · Views: 33
  • CIMG1410 reduced.JPG
    CIMG1410 reduced.JPG
    121.8 KB · Views: 67
Top