Rubicon "buggy" build...

waynehartwig

www.jeeperman.com
Location
Mead, WA
The one guy that I thought got it on film, turned out not. He was cutting firewood and not taking pics.

But here is the link to the pics he has posted so far...

And some teasers....
DSC_00020002_JPG.jpg

DSC_00010001_JPG.jpg

D'oh! Broken studs on his D44.. He was able to fix 2 of them...
DSC_00050005_1_JPG.jpg

Cool rock out cropping like little moab, but much larger and with more oh s**t lines. This is lava rock, too, so lots of traction...and lots of worn out tires!
DSC_00320030_JPG.jpg

This crack raised he** with several...:eek:
DSC_01260029_JPG.jpg

DSC_02310223_JPG.jpg

DSC_02360228_JPG.jpg

DSC_02630255_JPG.jpg

DSC_02540246_JPG.jpg
 

waynehartwig

www.jeeperman.com
Location
Mead, WA
Updates? :)
Lowered the front to you liking yet? cool pics!

I'm still playing with it... I went back to the 12" front/14" rear CO's yesterday, but with only one spring (and tender) this time so that I have more adjustability on height.

Biggest problem is my drag link hits my tie rod when low. I may need to move my tie rod down to the stock location, but then it looks like the track bar bracket will hit my upper control arm. So then I'll need to move it as well. I think right now I'm at about 5" of lift and would like to be 4".

I also ordered my new driveline from Tom Woods this morning and had them make it a little longer than needed to force me to move the rear axle back another 1-2" (center up the tire in the opening) for a total of ~102"WB.
 

waynehartwig

www.jeeperman.com
Location
Mead, WA
First time yet... This weekend I had a Sheriff (wifes xmas party) come up to me and tell me that my tires aren't legal here. I said 'really?'. He said 'Oh, God no".

....Looks like I might want to look into some wider flares... :D
 

waynehartwig

www.jeeperman.com
Location
Mead, WA
Well, time to get back on this thing and see about finishing up some things I didn't do last May..

Re-did the trackbar on the frame side, so that I could drop the ride height 3" inches - we'll see if I can keep it there or if I need more up travel...

I put it on parallel to the axle, but at an angle to the ground. My thought is the axle will droop and that will be the way the trackbar will rotate. Trying to split the difference on the angles...
 

Attachments

  • rubicon build 081008 079.jpg
    rubicon build 081008 079.jpg
    67.9 KB · Views: 31
  • rubicon build 081008 082.jpg
    rubicon build 081008 082.jpg
    58.1 KB · Views: 23

waynehartwig

www.jeeperman.com
Location
Mead, WA
I also really liked the idea of sloping the hood line from Greg's build, so I thought I'd steal that idea :D


Had to set a gas can on the hood to keep it down. I removed all of the mounts, cut all but 1/2" off the one for the radiator, and then put it back. That way it's not sitting right on the frame - vibration control, since I do still drive it on the road.. Also, I'm not going to do any cutting on the hood. I played with the hinges and got it adjusted so nothing hits. Sitting on the bump stops, I will still have roughly 2" under the tube fenders before it rubs.
rubicon_build_080608_002.jpg

rubicon_build_080608_001.jpg


....These pictures are at the old ride height before modifying the track bar mount....
 

waynehartwig

www.jeeperman.com
Location
Mead, WA
Nice. So you're thinking you can drop it 3" from where it is here? Really nice.

3" might be too much for the suspension to handle, so 2" is probably more realistic to keep control arms from hitting the frame, trackbar from the top of the diff cover, etc. My frame was at 24" before and I'm hoping it will be 21" when I'm done. And instead of a xmember that hangs ~3" below the frame rails, I'll have a flat belly - Tera belly up or a custom xmember to triangulate the lower links ;) If I go that route, I'll be able to ditch the trackbar. It just depends on how energetic I get! I'm already going through withdrawls form not having it driveable for ~2 weeks, so we'll see...

Over the winter, I'm working on customers junk and don't have time to work on my junk. Then when I do have time, it's summer and I want to go play and not work. Soo....:-\
 

waynehartwig

www.jeeperman.com
Location
Mead, WA
Here's some before/after pics of the head/intake/exhaust....

New/old exhaust manifolds...
rubicon_build_081508_083.jpg

New/old exhaust ports - the new one is much larger - 1" compared to 1-1/2" :D
rubicon_build_081508_085.jpg


Cylinder 1 before, with the gasket already matched to the intake/head. The openings in the gasket for the exhaust match the header pretty close, but I won't be able to match the exhaust. Not that it would matter anyway, as the valve I believe is only 1-1/8"
rubicon_build_081608_103.jpg

Here is a before and after on the exhaust... The round one on the left is now and the squashed on the right is before...
rubicon_build_081608_109.jpg

Here's with a 22MM socket in the port (1-1/4 OD)
rubicon_build_081608_110.jpg

Here's how far off it is from fitting in the before port...
rubicon_build_081608_111.jpg


Here's the matched intake...

rubicon_build_081608_124.jpg
 

waynehartwig

www.jeeperman.com
Location
Mead, WA
what is the advatage of opening the port to a larger size? more air flow=more hp? the jeep looks awesome!

Correct. With what I did, I should see about 30 more horsies.... Most of it because of the work on the intake side of things. Port matching really helps. Not to mention, the injectors were actually firing against the stock gasket instead of straight at the valve. That's a big increase there...

My only concern is that since the stock 4.0 comes with a dual pattern cam (intake/exhaust duration is different - in this case the exhuast duration is longer because of the smaller valve), that the exhaust will scavange too much and end up sucking the air charge from the combustion chamber before the exhaust valve fully closes. I don't think this will be an issue, as I didn't change the valve size. But it is in the back of my mind when I start it up and start driving it.

On the exhaust runners, I moved the floor lower. Actually, I removed the 'smog' bump in the floor. This is there to get the exhaust temps up, to get the cats hot, to clean the gases better.
 

waynehartwig

www.jeeperman.com
Location
Mead, WA
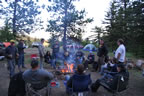
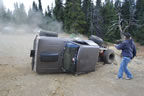
Well, I have no pictures at this time, but I wheeled it pretty hard this weekend and it made a huge difference....

Dropped the front 3" and the rear 2", need to go 3" and level it out more - even with the trailer attached, I have a rake.

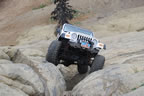
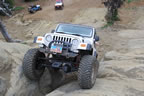
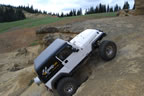
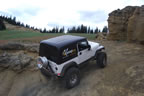
The visibility from the new hood line is awesome on the trail! The only time I can see the hood is if I sit up in the chair :D Lovin' it... Now the roll cage bar is in the way, so I might see about moving that to increase my viewing?

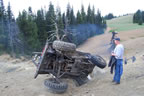
The right side of my rig had some bent 1/4" panels - teach me to go wheelin' before airing down! The tires rubbed and bent them to a 90* and pulled pen nuts out of the tub! :eek: So I pulled all of that apart, pressed it all flat again (very happy with how that turned out! no heat and it's near perfect!) and then welded the panels/rocker guard to the tub. After welding it all up, I smoothed the edges and repainted maintaining the original line of the black/white at the rocker/corner guard. Very awesome how that turned out! I still need to do a little body work there with some filler and get those lines looking even more original. I also want to tie the bottom of the rocker guard into the tub and make it more solid.

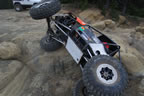
Got the tube fenders done and painted them gloss black. Love the look against the white; so I may paint the rear corners gloss black as well?

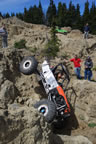
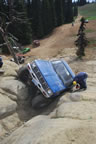
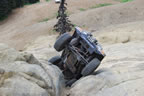
The rig is even more stable when off camber than before. I had it on a 45* trying to power through getting it off the 45* and it felt very stable and I was very comfortable in doing it. The only thing that was making me uneasy was the fact I knew I was on a 45* doing this.

I did gain a bunch of new HP/TQ though... There is a hill near the house that I loose 5 mph going up in 4th gear at 55 mph. Now I don't loose anything, nor do I even need to add more peddle going up it and in 5th loose only 10 mph - all with the cruise and AC on...

While wheelin' I've never been able to wheel in 2wd, as I would run out of power very easily. So because of it I would always be in 4lo, even when I didn't need the 4wd. This weekend I was in 2wd making hill climbs in 1st and keeping my rpm/speed down. So I think with my head work, I've gained a lot of low RPM power that I did not have before. With the 2500-3500 rpms I really don't see much difference, but 1500-2500 I see a huge improvement over stock!

Typically I drive on the highway in 4th gear at 65 mph whil pulling the camp trailer. Doing so I got ~15 mpg this weekend. I drove roughly 850 miles this weekend (total, highway and trail) and used roughly 55 gallons - 15 mpg. On the way home, I drove a different way that even without the trailer had hills I would have difficulty in 4th getting up. With the trailer I was only in 4th gear on two hills, the rest of them I pulled in 5th with little to no speed loss and kept it around 1800-2200 rpms.

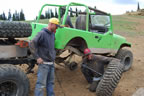
Now I'm sitting at 6'2" at the top of the A pillar. I'd have to measure the frame again, but I want to say it was 21" from the ground to the frame. I believe from the ground to the top of the rear bumper is 31" and 37" in the front? I have no tires rubbing, except where they did before - in the front of the rear fender opening.

I still need to finish up the links and mounts to get a flat belly. I'm toying with the idea of triangulation in the front - bring the lowers to the center and upers straight back. Now that it's sitting lower, I think I have enough room under the driveline to make it happen. If so, I can delete the trackbar and move the lower links inwards - which are the two items right now stopping it from going lower. The trackbar did hit the truss this weekend, so that does need to be addressed before I ruin/break a heim. But in all fairness, there were times we were doing 40 down forest service roads with kelly humps and such...

I need to pull the radiator out and modify it a bit. With the radiator support sitting so much lower, the steering had been binding and locking up on me. At one point this weekend it actually locked and I could not get it undone without some force. After searching around, I found the steering shaft lock nuts on the joints were coming in contact with the radiator. Simple fix with a cresent wrench and bending that tab. But I would like to pull it apart and do it right...

I need to adjust my anti rock, as the arms are sitting upwards at about a 40*. After working it hard this weekend (flexing it out), I can see where one arm did come into contact with the part of the tube fender that bolts to the radiator support.

I need to lower the rear another 1-2".

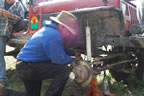
OH! When I was lowering the rear last week, I found a sheered bolt in the coil over! :eek: For a long time I had this clunk in the rear that I could not figure out what it was. Everytime I'd hear it, I'd get out and look at the shock thinking it was bottoming out or? I never figured out what it was and eventually just thought maybe the shock mount was causing the frame to wrap and actually come into contact with the tub, so it was dissmissed. Well, that noise is now gone and there is a new grade 8 bolt back in it's place (yes, it was a 8 before - 1/2-13").

And I still need to build the grille hoop....

Anyway, next thing on my list to do is pull the intake/header off and shove that Pacesetter up their arses and put the Banks on. When I put it on, I'm goign to wrap the header in tape to keep the heat off the intake manifold and drop the air charge temps. No idea if it will work or not, but I have to take it off anyway, so I might as well try it.....
 
Top