waynehartwig
www.jeeperman.com
- Location
- Mead, WA
Started this last weekend...
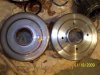
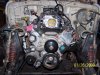
Donor: 08 GMC Sierra 4x4, 6 months old and less than 5k miles - 5.3L and 4L60E
Recipient: 04 Jeep Rubicon
So last weekend I started out by inspecting the donor parts and then pulling the tranny apart to replace the output shaft with one that will work withe the Rubicon transfer case that I will be keeping - at this point, this and the sticker on the hood are all that are left of the 'Rubicon' :-\
Monday I sent the wiring harness off to Speartech to get reworked. I was goign to do it myself, but there were several busted connectors and cut wires from the accident - it was hit hard in the front right corner.
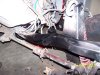
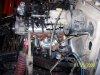
Yesterday I pulled everything out so I had basically empty frame rails.
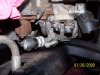
Today I notched the frame rail to clear the AC compressor and clearanced the fire wall. After pulling/putting the engine several times, I gave up early and will probably work on it some tomorrow.....
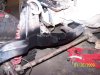
The notch turned out really well for not knowing what I was doing. I was scared? that I'd mess it up, but I'm actually impressed at how it turned out. If I do another, I'll definately know a better way.
Since the hoses come out of the top/side of the compressor, I trimmed the frame rail at an angle rather than a box. Nothing is really square but the vertical cuts. The cut starts at 5" wide and narrows to 3". I took a piece of 1/2" plate about 10" long and trimmed it to follow the curves of the frame rail and slid it in place. It's on an angle, because the lower part of the frame rail is wider than the top - since I only need to clear the compressor and hoses. But then I notched the last inch on both sides and hammered them over to touch the plate. Since it wasn't square, I had large gaps to fill. So I took some 3/8" solid bar that I had laying about and welded it up. Since all of my welds were in gaps, I was really able to make everything clean and flowing.
The next one I do I will do a bit different. I will leave the inside of the rail in tact, for the most part and just cut the top and bottom of the rail out. That way when I weld in the plate and hammer over the end pieces, I will have a lot of material left and not need to weld something in place to fill the gaps. Also, I think doing it this way would make it even cleaner and dare I say structural?
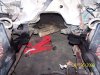
Anyway, not much left to do before the motor/trans/tcase are home. Tomorrow? I'll pull the motor again and weld everything up and paint it. Then I can put the motor/trans back in place and work on the crossmember. For now, I'll keep the RE crossmember that I have - just so I don't have to mess with relocating control arms. But to do so, I need to pick up 3.75" from the crossmember to the bottom of the trans. The mount that I have takes up 1.25". So I'll take some 2" square that I have and be .5" too short for now.
Pictures will come later. I tried to download them, but for some reason the camera won't connect? I still need to take pictures of the frame rails/mounts anyway....
Donor: 08 GMC Sierra 4x4, 6 months old and less than 5k miles - 5.3L and 4L60E
Recipient: 04 Jeep Rubicon
So last weekend I started out by inspecting the donor parts and then pulling the tranny apart to replace the output shaft with one that will work withe the Rubicon transfer case that I will be keeping - at this point, this and the sticker on the hood are all that are left of the 'Rubicon' :-\
Monday I sent the wiring harness off to Speartech to get reworked. I was goign to do it myself, but there were several busted connectors and cut wires from the accident - it was hit hard in the front right corner.
Yesterday I pulled everything out so I had basically empty frame rails.
Today I notched the frame rail to clear the AC compressor and clearanced the fire wall. After pulling/putting the engine several times, I gave up early and will probably work on it some tomorrow.....
The notch turned out really well for not knowing what I was doing. I was scared? that I'd mess it up, but I'm actually impressed at how it turned out. If I do another, I'll definately know a better way.
Since the hoses come out of the top/side of the compressor, I trimmed the frame rail at an angle rather than a box. Nothing is really square but the vertical cuts. The cut starts at 5" wide and narrows to 3". I took a piece of 1/2" plate about 10" long and trimmed it to follow the curves of the frame rail and slid it in place. It's on an angle, because the lower part of the frame rail is wider than the top - since I only need to clear the compressor and hoses. But then I notched the last inch on both sides and hammered them over to touch the plate. Since it wasn't square, I had large gaps to fill. So I took some 3/8" solid bar that I had laying about and welded it up. Since all of my welds were in gaps, I was really able to make everything clean and flowing.
The next one I do I will do a bit different. I will leave the inside of the rail in tact, for the most part and just cut the top and bottom of the rail out. That way when I weld in the plate and hammer over the end pieces, I will have a lot of material left and not need to weld something in place to fill the gaps. Also, I think doing it this way would make it even cleaner and dare I say structural?
Anyway, not much left to do before the motor/trans/tcase are home. Tomorrow? I'll pull the motor again and weld everything up and paint it. Then I can put the motor/trans back in place and work on the crossmember. For now, I'll keep the RE crossmember that I have - just so I don't have to mess with relocating control arms. But to do so, I need to pick up 3.75" from the crossmember to the bottom of the trans. The mount that I have takes up 1.25". So I'll take some 2" square that I have and be .5" too short for now.
Pictures will come later. I tried to download them, but for some reason the camera won't connect? I still need to take pictures of the frame rails/mounts anyway....