denhabr
Member
- Location
- Sandy, Utah USA
To Glass or NOT to Glass...
Some responses from the Broncospeeders over at fullsizebronco.com (Broncospeed forum...and my Utah Broncospeed build thread...) http://fullsizebronco.com/forum/showthread.php?t=146007 ...
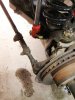
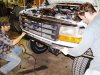
And no, I didn't order John's jack screws to adjust the F ride height.
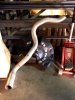
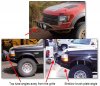
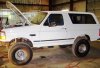
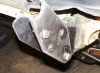
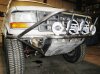
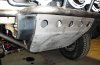
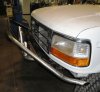
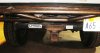
Roger on the alignment (and then check for clearance.) And the front bumper is going away anyway...to be replaced with a full tubular prerunner bar/light bar/brush plate similar to Image 1 below (don't know who you are, but your front prerunner bumper is exactly what I want on my '96.) Also note the trimming of his wheel well fender just behind the front wheel, as per BB's suggestion above...
Appreciate the feedback! Frankly, that was exactly my thinking up until I saw the truck last Friday...and then had doubts. So I thought I would ask you guys.
Thanks all!
-----------------------------------------------------------------------
So what do you RME guys think? Sticking with the stock steel is the right approach?
Local RME-friendly auto body shops here who could do that kind of trim/paint work? Jack Kesler?
Some responses from the Broncospeeders over at fullsizebronco.com (Broncospeed forum...and my Utah Broncospeed build thread...) http://fullsizebronco.com/forum/showthread.php?t=146007 ...
Quote:
Originally Posted by Brokenbronco (broncospeed.com)
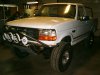
You could also do a little creative fender trimming like the bfg bronco.
Frankly BB, I think that trim work looks perfect to me! Originally Posted by Brokenbronco (broncospeed.com)
You could also do a little creative fender trimming like the bfg bronco.
Quote:
Originally Posted by TCM GLX (broncospeed.com)
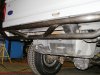
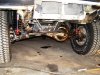
It looks great sitting at ride height.. what springs are you running (too lazy to go back and read through it all....) Here are my suggestions. It looks like you still have not aligned it, I would do that first, because that can definitely change height, angles, etc etc etc... then, take a look and check for clearances. Many of us are running 35's with a 4-5" Lift, and stock fenders, so I would assume you should be able to do the same. You would likely need to trim the front bumper a bit and loose the lower spoiler, but I do not think you need to jump the gun to get the fiberglass yet. Just my two cents..
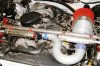
I'm using Autofab's Skyjacker brand springs that John supplies with his 16" travel dual 2.5" shock system (http://www.autofab.com/16lift.htm)Originally Posted by TCM GLX (broncospeed.com)
It looks great sitting at ride height.. what springs are you running (too lazy to go back and read through it all....) Here are my suggestions. It looks like you still have not aligned it, I would do that first, because that can definitely change height, angles, etc etc etc... then, take a look and check for clearances. Many of us are running 35's with a 4-5" Lift, and stock fenders, so I would assume you should be able to do the same. You would likely need to trim the front bumper a bit and loose the lower spoiler, but I do not think you need to jump the gun to get the fiberglass yet. Just my two cents..
And no, I didn't order John's jack screws to adjust the F ride height.
Roger on the alignment (and then check for clearance.) And the front bumper is going away anyway...to be replaced with a full tubular prerunner bar/light bar/brush plate similar to Image 1 below (don't know who you are, but your front prerunner bumper is exactly what I want on my '96.) Also note the trimming of his wheel well fender just behind the front wheel, as per BB's suggestion above...
Appreciate the feedback! Frankly, that was exactly my thinking up until I saw the truck last Friday...and then had doubts. So I thought I would ask you guys.
Quote:
Originally Posted by mda (broncospeed.com)
Keep the stock fenders. You can trim the bumper and fenders. Even have a body shop do a small flare job. The truck will look much better than swapping to glass fenders. 90% of the trucks with glass look like crap.
Thanks mda! You, BrokenBronco, and TCM GLX all convinced me to keep the stock stuff. The small flaring and trimming of the rear lower fender profile seem a helluva lot easier than messin' with glass, rattles, fit-n-finish, vibration, paint work, and $1250 for the glass (not to mention the tubular frame John sells to mount the F glass...) Rather spend that on the rear 8.8 disk brake kit and other misc. goodies...Originally Posted by mda (broncospeed.com)
Keep the stock fenders. You can trim the bumper and fenders. Even have a body shop do a small flare job. The truck will look much better than swapping to glass fenders. 90% of the trucks with glass look like crap.
Thanks all!
-----------------------------------------------------------------------
So what do you RME guys think? Sticking with the stock steel is the right approach?
Local RME-friendly auto body shops here who could do that kind of trim/paint work? Jack Kesler?