- Location
- West Haven, UT
You need your own "shop porn" forum! Awesome stuff thanks for posting
Thank you.
I appreciate the comments.
Mike

You need your own "shop porn" forum! Awesome stuff thanks for posting


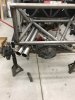
I fabricated this roll cage Friday night. Its a brand new Can Am 800 that will be a race car now for a 9 year girl with the coolest dad.
View attachment 111127View attachment 111128


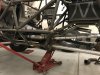
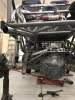
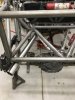

Working on building some new exhaust for the buggy. It used to dump right out the side behind the seats. Sounded awesome but way too loud. Hopefully this will still sound good but not be an eardrum blaster.
Working on building some new exhaust for the buggy. It used to dump right out the side behind the seats. Sounded awesome but way too loud. Hopefully this will still sound good but not be eardrum bursting loud.
Working on building some new exhaust for the buggy. It used to dump right out the side behind the seats. Sounded awesome but way too loud. Hopefully this will still sound good but not be eardrum bursting loud.
Looks awesome! Got a build thread or more pictures of it?
Thanks!Nicely done.
Mike