Gawynz Manche Thread

Gawynz

Active Member
Location
Ogden, UT
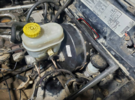
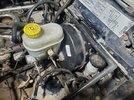
WJ booster/master fully installed, load sensing valve brake line removed, and all brake lines connected. Rear axle fully installed (just waiting on the correct soft brake lines).

20221014_102623.jpg

20221014_155918.jpg

Next up... I don't know ha. I think I'm just going to put a few things back together under the hood, bleed the brakes, charge the battery and take it for a spin around the block.
 

Gawynz

Active Member
Location
Ogden, UT
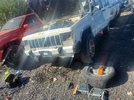
Spent quite a bit of time this past weekend working little things. When I bought this truck, damn near every one of the vacuum hoses was cut or missing or unplugged, just a spaghetti mess. I replaced the injectors, plugs, etc. a while ago and had it running; so I got the battery charged and the truck fired up, but not running great. After looking at lots of pictures on the google machine I got the vacuum lines I had connected but I was missing a lot of them. Luckily, I found a '89 XJ at the nearby junkyard that had every line! The hood, fenders, and front grill are all broke or cracked on the MJ, it looks like the hood latch broke so they jammed a crowbar on both sides to wedge it open. The junkyard XJ was in great shape in those areas so while I was there I stole the hood and latch mechanism, lights, and front grill (already got some fenders from another donor a while ago). As I installed each line I started/idled the truck to see if it improved, not much changed until I got to the MAP sensor; with the vacuum disconnected it ran OK, with it connected it wouldn't run. Got a new MAP sensor, same story. Checked fuel rail pressure at it was only 10psi and wouldn't hold, so I swapped in a new fuel pump that got me back to 37psi. Plugged in every vacuum line including the MAP sensor, turned the key and it fires right up and runs great! Added oil to the rear end, bled the clutch and a few other odds and ends, brake lines get here on Wednesday then we roll!

20221015_145101.jpg

Next up I need to build an exhaust, it's missing from the exhaust manifold back. I also need to figure out the parking brake to the 8.8.
 

kmboren

Recovering XJ owner anonymous
Location
Southern Utah
Spent quite a bit of time this past weekend working little things. When I bought this truck, damn near every one of the vacuum hoses was cut or missing or unplugged, just a spaghetti mess. I replaced the injectors, plugs, etc. a while ago and had it running; so I got the battery charged and the truck fired up, but not running great. After looking at lots of pictures on the google machine I got the vacuum lines I had connected but I was missing a lot of them. Luckily, I found a '89 XJ at the nearby junkyard that had every line! The hood, fenders, and front grill are all broke or cracked on the MJ, it looks like the hood latch broke so they jammed a crowbar on both sides to wedge it open. The junkyard XJ was in great shape in those areas so while I was there I stole the hood and latch mechanism, lights, and front grill (already got some fenders from another donor a while ago). As I installed each line I started/idled the truck to see if it improved, not much changed until I got to the MAP sensor; with the vacuum disconnected it ran OK, with it connected it wouldn't run. Got a new MAP sensor, same story. Checked fuel rail pressure at it was only 10psi and wouldn't hold, so I swapped in a new fuel pump that got me back to 37psi. Plugged in every vacuum line including the MAP sensor, turned the key and it fires right up and runs great! Added oil to the rear end, bled the clutch and a few other odds and ends, brake lines get here on Wednesday then we roll!

View attachment 153265

Next up I need to build an exhaust, it's missing from the exhaust manifold back. I also need to figure out the parking brake to the 8.8.
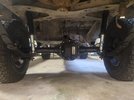
For the 8.8 in my YJ I had to make a new separate frame side mount to get them to pull the same distance so each line has its own mount on the frame side.
 

Gawynz

Active Member
Location
Ogden, UT
How involved was the WJ booster install? Did you just have to trim the cowl “flange”? Or was there more trimming of the firewall itself

It was pretty easy/straight forward. Only trimming was this sections of the cowl/flange (in red in the below pic) which I just did w/ an angle grinder and cleaned up w/ a dremel flap wheel. The two WJ lines out of the master come out of the opposite side of stock so you have to make those to get to the proportioning valve (also note these fittings aren't the same between the MJ/WJ master so grab those while you're at the junkyard or order them). On the booster peddle arm you have to grind a flat spot to fit the MJ switch as well as drill out the hole to fit. I bent the clutch line out a bit so as to not pinch between the booster/firewall.

Capture.PNG
 

The_Lobbster

Well-Known Member
Sweet, sounds like a good upgrade. I’ll have to go pick one up and try to pop it in, hopefully I can figure it out easy enough.

Good looking build!
 

Gawynz

Active Member
Location
Ogden, UT
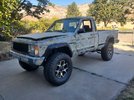
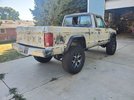
The rear sits a little higher than I'd like, but I'm hoping over time the new springs settle a bit and with the added weight of camping stuff and what not it sits down.

Next up is addressing leaks, once it's warmed up it leaves a solid puddle everywhere I park it which drives me nuts. Here's the list of seals/gaskets I plan to change, let me know if I missed something:
  • Valve cover
  • Distributor base
  • Oil filter housing/adapter
  • Oil pressure sending unit
  • Oil pan gasket
  • Rear main
Also, any insight on exhaust would be great, here's currently what I'm thinking.

1666187013371.png
 

Gawynz

Active Member
Location
Ogden, UT
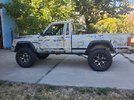
So, on the topic of paint, any advice on how you'd go about it? My plan is to replace both front fenders (green) and the hood (white)... so she's going to look reeeal nice. The trucks original color is black, so I'm leaning towards that as I won't need to worry about door jams or anything. The crazy blue/yellow/camo paint is just spray paint right over the Pioneer decals and everything. I want it to be a good/correct paint job, but it doesn't need a real nice paint job if that makes sense. The idea of sanding/stripping off all the paint and even painting the truck isn't something that really excites me, so I'm interested in outsourcing the job.

Any advice or opinions? Any recommendations of people/companies that would be willing to do this job?
 

mbryson

.......a few dollars more
Supporting Member
So, on the topic of paint, any advice on how you'd go about it? My plan is to replace both front fenders (green) and the hood (white)... so she's going to look reeeal nice. The trucks original color is black, so I'm leaning towards that as I won't need to worry about door jams or anything. The crazy blue/yellow/camo paint is just spray paint right over the Pioneer decals and everything. I want it to be a good/correct paint job, but it doesn't need a real nice paint job if that makes sense. The idea of sanding/stripping off all the paint and even painting the truck isn't something that really excites me, so I'm interested in outsourcing the job.

Any advice or opinions? Any recommendations of people/companies that would be willing to do this job?

Lots of suggestions:

I've bought the Summit single stage paints for pretty cheap and they have held up "ok". Black will show EVERY flaw in the prep. Just be aware of that. I'd sand everything down with a DA with 80 grit to clean up the surface. Spray some primer, dry sand with guide coat and 180 or 220 grit, prime again and dry sand with 320 and guide coat. Seal it and paint it. That should look "ok"?

I'm happy to spray it and give you some pointers while you prep it. Truth is, if you're spraying primer ok, you'll spray paint ok so you could do it. I'd hang in the rental booth with you if you like.


....Any advice or opinions? Any recommendations of people/companies that would be willing to do this job?

I found NOTHING remotely affordable out there when painting my Buick. Maybe prep it ok and take a chance with a Maaco paint job could work out?
 

Gawynz

Active Member
Location
Ogden, UT
Thanks @mbryson for the thoughts an offer, I may have to take you up on it when I get there. I didn't know there were rental booths out there, any one you'd recommend? I've asked around a bit and it's looking like I will likely end up doing this myself.
 

Gawynz

Active Member
Location
Ogden, UT
Maybe the least fun part of the project thus far, cleaning and replacing all the seals on the 30+yr oil soaked 4.0. Replaced the seals on the valve cover, distributor, oil filter adapter, oil pan, and rear main. I used Felpro molded rubber gaskets which seem great. All of the seals were very dry/missing, I don't know if they'd ever been changed. While I was there I put in a new oil pump. I think the main point of the leaking oil was the distributor base as it had no gasket and the wrong length bolt in it, about 0.25" too long, it bottomed out and the distributor wasn't even tight, just kind of rattling around in there. I found that there were two missing bolts on the power steering pump, so got that corrected and put on a new belt. My guess is the PO replaced the distributor and power steering pump about 80% ha.

I have no idea how long this engine has sat but inspecting the oil pan and below the valve cover it's pretty crusty. I scraped and cleaned the sludge and crusty cooked oil almost as much as I could reach. I put some cheap oil and a new filter in it. My thought was maybe an oil additive to help break it up and clean it out? I don't know, we'll just see how it does.

Got all my exhaust pieces in, this weeks goal is to wrap that up.

Also, my brake lights don't work after I did the WJ swap, I think I drilled the rod hole a tad too small so the switch isn't functioning properly, so I have to figure that out.
 

_Auzzy_

Current Rig: 12W Boots
Location
Richfield Utah
Swap a quart of oil for some ATF, the detergents will help break up a lot of the stuff and flush it out.

This works good, did it to my yjs motor often back in the day. then there's stuff like hotshot secrets stiction eliminator, I've used this on my duramax. Turned my brown oil black from all the crud it freed up. Did it at the end of the last two oil changes. I'm 3k into the current oil change and its still pretty golden.
 

Gawynz

Active Member
Location
Ogden, UT
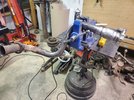
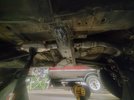
Started on the exhaust. The downpipe is all the truck had and the back end was torn (?) off. I cut off and cleaned up the end a bit and started cutting/tacking things together. My plan is for the exhaust to separate just in front of the trans mount. I'll use the factory hanger locations and add one near the trans mount if needed.

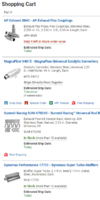
Thoughts on painting the exhaust to protect it a bit? My plan was to finish cleaning up the downpipe and paint all the tubes with VHT header primer and paint in an attempt to make it last... just not sure if it's worth it, the new tubes are "409-SS" from Summit.

20221031_174959.jpg

20221102_084600.jpg
 

_Auzzy_

Current Rig: 12W Boots
Location
Richfield Utah
Started on the exhaust. The downpipe is all the truck had and the back end was torn (?) off. I cut off and cleaned up the end a bit and started cutting/tacking things together. My plan is for the exhaust to separate just in front of the trans mount. I'll use the factory hanger locations and add one near the trans mount if needed.

Thoughts on painting the exhaust to protect it a bit? My plan was to finish cleaning up the downpipe and paint all the tubes with VHT header primer and paint in an attempt to make it last... just not sure if it's worth it, the new tubes are "409-SS" from Summit.

View attachment 153714

If ya do use header or bbq paint and clean it really good or it won't stick for crud. I've done it in the past and it did okay. Also with that flex coupler I'd put another vband on the forward side. If ya can't preload them during install they start separating and leaking quickly. That's why I recommend the vbands so its easily changed. Personally on a rig like this where the drivetrain isn't solid mounted and the exhaust is hanging on rubbers I think you'd be fine with out it cause the whole system will flex across the board.
 
Top