The "trophy husband" pro mod buggy build

N-Smooth

Smooth Gang Founding Member
Location
UT
Sausage links
Well now I'm hungry.

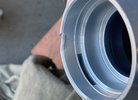
The aluminum tube is for coolant. I decided to go this route rather than run the coolant through the chassis tubes. I'm doing -16 fittings and lines from the motor to the aluminum tubes under the driver side floor, to the radiator. It will hopefully turn out pretty slick 🤞

The aluminum round stock is to sleeve the rocker tubes. It's kind of an old school trick. I had originally planned on sleeving them with 1.5" DOM but decided this would be more fun. It's actually only about 1/4 lb heavier per foot than the DOM and obviously WAYYYYY stronger/more dent resistant.
Oh and I'm cutting a few pucks off to make into radiator mounts.
 

N-Smooth

Smooth Gang Founding Member
Location
UT
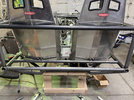
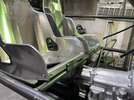
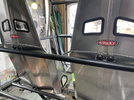
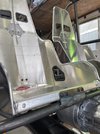
I got the seat mounts straightened out and burned in just now. It’s nice to be able to sit in it and not have the seats falling over and sliding off of stuff haha
I’m still going to add a small tab and one bolt on the harness bar to keep the seats tight against it and avoid them bouncing off of it. My Jeep seats do that and it makes me want to MURDER! Also using Kirkey’s is new to me and I’d like to keep them rigid. I’m going to add another small tab to each seat on the outside underneath the lap belt access hole. There’s a boat side tube right there so it will be easy peasy.
476562E9-74F4-4E05-8144-5E8DE0DEF465.jpeg
707AB7E1-248E-46CE-A515-CC4B5B83B2E3.jpeg
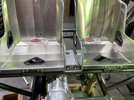
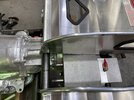
For the front mounts you can see I drilled out the middle two holes so the bolt heads fit in them. This is because I did my own nut strip on the backside with welded nuts and those two bolts hold it in place. I’m pleased with how it worked out considering it was a random idea I had. I’ll probably switch to allen head bolts like the rear mount and it will be even nicer.

One thing that sucks is that the front tube can’t span the whole chassis when all is said and done. For one, I have to be able to remove the transmission through the top and two, it’s right in the way of the Atlas shift rails. It’s fine though, I’ll support it with a vertical tube from the belly on each side and then chop out the middle, pretty much from the inside edge of the seat mount tabs. When the floor and shifters are in it shouldn’t be very noticeable. I still think this is the best route for seat mounts in my application.
27D5C80D-1DEB-4678-829F-CD533AA1973B.jpeg
D13DD576-0D91-4E00-BD4C-7CBC7AFD264A.jpeg

I know my posts are weird because I could skip these little updates, especially for something stupid like seat mounts... but since this is the biggest project I’ve ever had (and hopefully ever will have) I’m keen to document it. Also if I can talk somebody else out of building a buggy it’s worth it! Lol
 
Last edited:

RockChucker

Well-Known Member
Location
Highland
I think you should just leave the seat tube as is. Roll the dice that you have one of those fancy “lifetime” fill transmissions that will never have a problem. #livedangerously 😂

but seriously, looking good. Seat mounts are not small in my opinion. They play a huge role in how comfortable you are and are the foundation for getting the rest of their ergonomics to control the buggy. After all. You do plan to drive it for extended periods of time...might as well be comfortable doing it
 

N-Smooth

Smooth Gang Founding Member
Location
UT
I like the detailed updates. You can't talk me out of it.
Thanks but you should really reconsider your life choices if you get to the point of building from scratch :rofl:

I think you should just leave the seat tube as is. Roll the dice that you have one of those fancy “lifetime” fill transmissions that will never have a problem. #livedangerously 😂

but seriously, looking good. Seat mounts are not small in my opinion. They play a huge role in how comfortable you are and are the foundation for getting the rest of their ergonomics to control the buggy. After all. You do plan to drive it for extended periods of time...might as well be comfortable doing it
To be honest there are potentially a few tubes that will have to be cut to remove the drivetrain. I can measure and plan all day but without actually testing the removal it's hard to say. I will just try to cut nicely and add couplers or flanges if it comes to that.

Thank you. That's why I wanted them done, so I can start visualizing the interior panels, trans shifter, Atlas shifters, cutting brakes, switches etc.

As far as driving for extended periods of time... if it's not comfortable I just have to endure it for 10 minutes at a time :rofl: :grimacing: :confused: that's a sad thought so it better be moderately comfortable

Agree! Updates and details, for sure.
Sweet! Well, you're going to get them whether you like it or not but liking it is a plus for sure
 

N-Smooth

Smooth Gang Founding Member
Location
UT
Is there a reason you wouldn't just use couplers for the parts that may need to be removed?
I'm already using a few of those for the front motor mounts and have a few more on my shelf. For the front seat mounts they won't work since the tube is in the way of the Atlas shift rails but I'm sure I'll put them to use somewhere. That's what I was trying to describe above.
 

N-Smooth

Smooth Gang Founding Member
Location
UT
I’ve been reasonably productive today so that’s good.
My hardware order arrived so I was able to get the upper seat mounts on. They were already really rigid but this just finalized things. I’m happy with it.
7E3AA6AE-985C-4AC6-BDCA-7DC34D72ECD2.jpeg
I also switched the front mounts to Allen bolts. I love it.
30266526-F9A8-4566-933C-61D85E0D0F97.jpeg

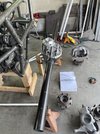
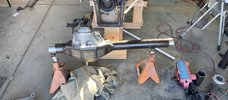
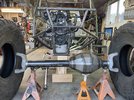
Front housing before.D3040F1B-5D1F-4E7F-AEB1-E2F92DA23E82.jpeg
After measuring and calculating like a billion times.
8FB2CE75-0389-4881-A0E1-CE40AD16A00B.jpeg
While I was sanding the tube ends the sander grabbed and pulled the housing off the stands. Neat.
6E5BB8D4-0EC5-44AA-8658-5AE7873672B3.jpeg
That was an unexpected issue but @skippy told me to put on my big girl pants and fix it with a file or whatever. It’s going to get dragged over rocks constantly and it’s just the seal housing anyways. I reluctantly cleaned it up and it’ll work fine with some RTV around the seal.

I fired up the ol BBQ and heated up some delicious C’s and then beat the hell out of them with my hammer. Annnnnnd here we are. My arms are tired.
CAE1BABF-F090-4495-B39C-C7A5F027CA43.jpeg
 
Last edited:

N-Smooth

Smooth Gang Founding Member
Location
UT
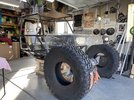
I picked up my aluminum sheets today, unloaded them and then just sat there staring at this thing. When I’m unmotivated I clean so I did that. Then after cleaning I saw the hood hanging up in the corner of the garage and thought hmmmm maybe I should play with that. So naturally I did the messiest thing ever and cut some lexan... Oh well, it’s fun to look at.
FD4882A3-32B8-4BC7-A630-25721B5D7458.jpeg

BA6FE019-21FA-4F87-9ACD-C520ED08C955.jpegIt’s a TJ hood so that adds some perspective to the size of this thing. Clearly I need to do quite a bit more cutting, add some wheel arches and cut out the grille area. I’ll be doing a flat plate grille for sure. I’m actually pretty happy with the rake where it’s sitting right now but I’m sure I’ll mess with it quite a bit more when the time comes. There’s a solid chance I’ll shorten it front to back too. It depends on how the proportions look.
 

I Lean

Mbryson's hairdresser
Vendor
Location
Utah
LMK how that Bauer drill works. I like the RPM range of it, versus my trusty Dewalt I've notched thousands of tubes with. 🙂
 

Hickey

Burn-barrel enthusiast
Supporting Member
LMK how that Bauer drill works. I like the RPM range of it, versus my trusty Dewalt I've notched thousands of tubes with. 🙂
I had to buy a mixer for the neverending tile job. The tile store had this massive drill/mixer combo for $99, so I went with that. It will definitely be used with a notcher when I get one.


N-Smooth

Smooth Gang Founding Member
Location
UT
LMK how that Bauer drill works. I like the RPM range of it, versus my trusty Dewalt I've notched thousands of tubes with. 🙂
It was $40 but yeah we’ll see 🤣

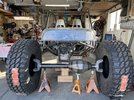
Those look pretty burly and seen to have a deep offset. How much backspacing are they?
They’re SUPER burly. I have Racelines on the XJ and these are beefier in every way. 3/4” thick rings and 3/8” bolts vs 1/2” and 5/16” on the Racelines. I’d have to measure but I’m thinking the wheel mounting surface is beefier on these as well. That being said I would’ve 100% gone with Raceline again if they didn’t try to dick with me on the pricing. I’m simply not dealing with that.

It’s just the angle of the shot or something. 9” wide, 4.75” backspacing.
 
Top