General Tech What did you work on Today?

zmotorsports

Hardcore Gearhead
Vendor
Location
West Haven, UT
I didn't get much done over the weekend. I worked for only a couple of hours in the shop on Saturday morning and then the wife and I hopped in the truck and took a nice relaxing drive.

I was able to get half of my doors done on the Jeep however. I have noticed that the passenger's side rear door has been slowly stiffening in the hinge over the past several months and I wanted to address it before it got any worse. I have seen these bind so severely that they have fatigue cracked inside the door jambs or even bound to where the door jambs get bent trying to open a door. I didn't want that mess on my hands so my plan was to remove the doors, polish the hinge pins and bushings and then reassemble after adding some anti-seize to the hinge pins.

I know many people have replaced the steel pin bushings with Delrin but I feel the doors are heavy enough that they cause accelerated wear to the Delrin and then it's into the hinge assembly so rather than replace with Delrin, I just wanted to clean, lube and reassemble as is. After getting the hardest door off first, I ran some emery paper over the hinge pins on the door to polish off the small amount of corrosion and then took some emery paper on a small mandrel and ran it through the bushing on the hinge to remove the corrosion. They cleaned up beautifully.
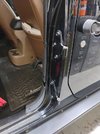
door1.jpg

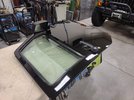
This next step wasn't planned but when I saw the door lying on the fabrication table and could see a few scratches from last year's wheeling trips I opted to take a few minutes and run some polishing compound over them to remove a few of the scratches at least. I realize it's a Jeep and not a show car but I also want to stay on top of the scratches so I hit them first with some 3M Finesse-It and a yellow polishing pad as I didn't think it needed the heavy duty compound nor while wool pad.
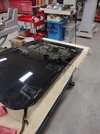
door2.jpg

After a few passes with the yellow pad and Finesse-It the door was already looking much better.
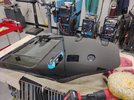
door3.jpg

Next I ran over it with the Machine Glaze and black foam pad for a swirl free appearance.
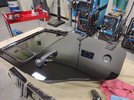
door4.jpg

Rear door pins anti-seized and reinstalled before removing the front passenger's side door for the same treatment.
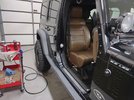
door6.jpg

An initial cleaning with some Final Inspection and then it's ready for some mild polishing.
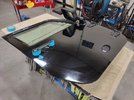
door7.jpg

First pass complete and using my small 3" Milwaukee polisher around the hinges and mirror.
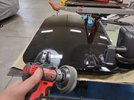
door8.jpg

Looking much better.
door9.jpg

Ready for installation after adding some lube to the hinge pins.
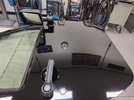
door10.jpg

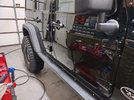
Passenger side completed.
door11.jpg

I hadn't planned on the polishing part of the process but it sure made it easier and quicker being off the Jeep and lying on the table. Half way done and now just the driver's side to go.

I think I'll put this on my preventive maintenance checklist and do this every few years to avoid binding. All in all she looks pretty good for a 11 year old Jeep with 148k miles on the odometer and one that sees regular daily driving plus flat towing and off-road duties.

Thanks for looking.

Mike
 

glockman

I hate Jeep trucks
Location
Pleasant Grove
I didn't get much done over the weekend. I worked for only a couple of hours in the shop on Saturday morning and then the wife and I hopped in the truck and took a nice relaxing drive.

I was able to get half of my doors done on the Jeep however. I have noticed that the passenger's side rear door has been slowly stiffening in the hinge over the past several months and I wanted to address it before it got any worse. I have seen these bind so severely that they have fatigue cracked inside the door jambs or even bound to where the door jambs get bent trying to open a door. I didn't want that mess on my hands so my plan was to remove the doors, polish the hinge pins and bushings and then reassemble after adding some anti-seize to the hinge pins.

I know many people have replaced the steel pin bushings with Delrin but I feel the doors are heavy enough that they cause accelerated wear to the Delrin and then it's into the hinge assembly so rather than replace with Delrin, I just wanted to clean, lube and reassemble as is. After getting the hardest door off first, I ran some emery paper over the hinge pins on the door to polish off the small amount of corrosion and then took some emery paper on a small mandrel and ran it through the bushing on the hinge to remove the corrosion. They cleaned up beautifully.
View attachment 156959

This next step wasn't planned but when I saw the door lying on the fabrication table and could see a few scratches from last year's wheeling trips I opted to take a few minutes and run some polishing compound over them to remove a few of the scratches at least. I realize it's a Jeep and not a show car but I also want to stay on top of the scratches so I hit them first with some 3M Finesse-It and a yellow polishing pad as I didn't think it needed the heavy duty compound nor while wool pad.
View attachment 156960

After a few passes with the yellow pad and Finesse-It the door was already looking much better.
View attachment 156961

Next I ran over it with the Machine Glaze and black foam pad for a swirl free appearance.
View attachment 156962

Rear door pins anti-seized and reinstalled before removing the front passenger's side door for the same treatment.
View attachment 156963

An initial cleaning with some Final Inspection and then it's ready for some mild polishing.
View attachment 156964

First pass complete and using my small 3" Milwaukee polisher around the hinges and mirror.
View attachment 156965

Looking much better.
View attachment 156966

Ready for installation after adding some lube to the hinge pins.
View attachment 156967

Passenger side completed.
View attachment 156968
I hadn't planned on the polishing part of the process but it sure made it easier and quicker being off the Jeep and lying on the table. Half way done and now just the driver's side to go.

I think I'll put this on my preventive maintenance checklist and do this every few years to avoid binding. All in all she looks pretty good for a 11 year old Jeep with 148k miles on the odometer and one that sees regular daily driving plus flat towing and off-road duties.

Thanks for looking.

Mike
Looks great Mike. What is your preferred product for plastic like the faded door handles? I have used SC1 with some pretty good results.
 

zmotorsports

Hardcore Gearhead
Vendor
Location
West Haven, UT
Looks great Mike. What is your preferred product for plastic like the faded door handles? I have used SC1 with some pretty good results.

For the plastic door handles, fenders and mirrors I prefer to use Aerospace 303 Protectant. It doesn't have a long staying power, but it does bring them back to near OEM appearance and what I like most is that they aren't left with a greasy or oily film and most of all they don't attract dirt/dust after an application. I generally apply 2-3 times a year.

Thanks.

Mike
 

zmotorsports

Hardcore Gearhead
Vendor
Location
West Haven, UT
I need a Milwaukee polisher! 😍

My thoughts, while I kind of like the smaller 3" cordless polisher, I am less than impressed with the larger 7" Milwaukee polisher.

I am in the camp of preferring corded or air tools as they seem to be more of a buy once/cry once theory and I am less than enthusiastic about things in my shop that require batteries. I'm not sold on the whole battery powered movement to be honest. Maybe I'm old school or I just don't like tools that hold me hostage to having to buy batteries down the road. Hell, I still use old fixed shade welding helmets even though I have a couple nice auto-darkening ones, they're just not my go to hoods, same with tools.

I have a fantastic old Black & Decker 7" variable speed polisher that has served me well for over 20-years and has polished many cars, trucks, street rods, bikes, etc. over those years but over the past summer when my son and I were doing the paint correction on his truck I thought I'd go against my better judgement and try the Milwaukee cordless polisher. Although I feel it is nicely balanced and with the battery angled at the end of the handle I feel it does a fair job of getting the job done, when push comes to shove, it goes through batteries like crazy and it really doesn't have the umph to get after a urethane clearcoat. With urethane it is a balancing act between moving fast enough to create just enough heat to remove scratches and clear yet not so much heat that you end up burning through.

When I really needed the polishing pad and compound to "bite" in and cut the Milwaukee just didn't deliver. I used it for several hours and actually until I had to wait for batteries to charge and then switched back over to my old school corded B&D variable speed polisher and it was a night and day difference. The Black & Decker just dug in and got the job done in less time, less movement and less compounding because it could provide more torque than the comparable cordless tool.

Maybe had I not put the cordless polisher down and immediately picked up the corded polisher I hadn't noticed quite the difference but in doing so I was able to see a huge difference in performance between the two. I now use the cordless Milwaukee for small "touch-up" jobs or detail polishing but when I have a large surface to cut & buff, I don't even grab it out of the cupboard and reach directly for the Black & Decker polisher.

Not sure if that is helpful or what anyone wants to hear but that's my impression and thoughts comparing the Milwaukee cordless polisher to a corded tool for the same process.

Mike
 

Hickey

Burn-barrel enthusiast
Supporting Member
My thoughts, while I kind of like the smaller 3" cordless polisher, I am less than impressed with the larger 7" Milwaukee polisher.

I am in the camp of preferring corded or air tools as they seem to be more of a buy once/cry once theory and I am less than enthusiastic about things in my shop that require batteries. I'm not sold on the whole battery powered movement to be honest. Maybe I'm old school or I just don't like tools that hold me hostage to having to buy batteries down the road. Hell, I still use old fixed shade welding helmets even though I have a couple nice auto-darkening ones, they're just not my go to hoods, same with tools.

I have a fantastic old Black & Decker 7" variable speed polisher that has served me well for over 20-years and has polished many cars, trucks, street rods, bikes, etc. over those years but over the past summer when my son and I were doing the paint correction on his truck I thought I'd go against my better judgement and try the Milwaukee cordless polisher. Although I feel it is nicely balanced and with the battery angled at the end of the handle I feel it does a fair job of getting the job done, when push comes to shove, it goes through batteries like crazy and it really doesn't have the umph to get after a urethane clearcoat. With urethane it is a balancing act between moving fast enough to create just enough heat to remove scratches and clear yet not so much heat that you end up burning through.

When I really needed the polishing pad and compound to "bite" in and cut the Milwaukee just didn't deliver. I used it for several hours and actually until I had to wait for batteries to charge and then switched back over to my old school corded B&D variable speed polisher and it was a night and day difference. The Black & Decker just dug in and got the job done in less time, less movement and less compounding because it could provide more torque than the comparable cordless tool.

Maybe had I not put the cordless polisher down and immediately picked up the corded polisher I hadn't noticed quite the difference but in doing so I was able to see a huge difference in performance between the two. I now use the cordless Milwaukee for small "touch-up" jobs or detail polishing but when I have a large surface to cut & buff, I don't even grab it out of the cupboard and reach directly for the Black & Decker polisher.

Not sure if that is helpful or what anyone wants to hear but that's my impression and thoughts comparing the Milwaukee cordless polisher to a corded tool for the same process.

Mike
That’s kind of what I expected it for, small jobs. I wish Black & Decker still had the quality that they did 20 years ago.
 

zmotorsports

Hardcore Gearhead
Vendor
Location
West Haven, UT
That’s kind of what I expected it for, small jobs. I wish Black & Decker still had the quality that they did 20 years ago.

Agreed. I haven't found a corded polisher that can match my old Black & Decker. Now I will concede that I don't polish as much paint as I did 8+ years ago but that thing has polished a shit-ton of vehicles in its life and it just keeps going and takes on anything I throw at it.
 

TRD270

Emptying Pockets Again
Supporting Member
Location
SaSaSandy
View attachment 156982

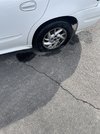
When you’re on your way to start your new job (which involves a flight to catch) and @moab_cj5 hooptie gets you again 😂


But took care of this like an aircraft mechanic. “Deferred maintenance” aired it up and threw my portable compressor in the trunk to be dealt with when I come back home 😬

Also I can drop a pin to anyone still desiring to paint a fire chicken on it. It will be there for 2-12 weeks
 

moab_cj5

Well-Known Member
Supporting Member
View attachment 156982

When you’re on your way to start your new job (which involves a flight to catch) and @moab_cj5 hooptie gets you again 😂


But took care of this like an aircraft mechanic. “Deferred maintenance” aired it up and threw my portable compressor in the trunk to be dealt with when I come back home 😬
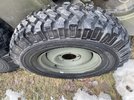
Didn't you replace the tires on that? I am sure I sold it "As Is" and disclosed all relevant information that I had on that POS. :rofl:
 

JeeperG

Well-Known Member
Location
Riverdale
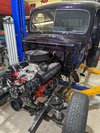
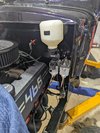
Still checking off boxes for the farm truck project. Got the plug wires cut and mounted, wipers on.
PXL_20230211_222520000.jpg
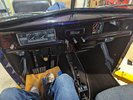
Neighbor has been doing a great job on the carpet, dual master cylinders mounted, switched pedal pad to a wider lokar to match the go pedal which took some fab work.
PXL_20230212_213502481.jpg
Started on the plumbing from master cylinder to the line lock.
PXL_20230212_230159850.jpg
Picked up four large hides for the rest of the upholstery, going a little bold.
PXL_20230211_213133241~2.jpg
Need to get center console built, look at stereo equipment, get wiring harness put in and start mapping things out plus a million other things.
 

Gawynz

Active Member
Location
Ogden, UT
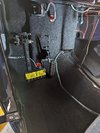
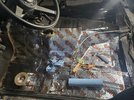
Thoughts on sound deadening mat, is it worth it? Figured I was already this far why not. This is just some Amazon mat that has good reviews, lays down and adheres really well. My one concern is trapping moisture, but figure if I seal the ends well it should be fine. Goal is to get the carpet in today.

20230218_075718.jpg
 

mbryson

.......a few dollars more
Supporting Member
Thoughts on sound deadening mat, is it worth it? Figured I was already this far why not. This is just some Amazon mat that has good reviews, lays down and adheres really well. My one concern is trapping moisture, but figure if I seal the ends well it should be fine. Goal is to get the carpet in today.

View attachment 157093


Interested to find out your assessment. I'll be putting some of that stuff in my Buick soon
 
Top