

Nope it's not it's mine I'm building it from the ground up. But nick is wiring it up as we speak. Hopefully he will have it wired here soon so I can get it finishedIs this panos' old rig? I love it.
You are using an out of date browser. It may not display this or other websites correctly.
You should upgrade or use an alternative browser.
You should upgrade or use an alternative browser.
General Tech What did you work on Today?
- Thread starter Gravy
- Start date
- Location
- Draper, UT
That really turned out good. I like it
Thanks.
Cool thing is I can swap out tiles or even use wood if I ever want to change the look.
TurboMinivan
Still plays with cars
- Location
- Lehi, UT
Today I picked up my shiny new (and newly-machined) pieces from the machine shop. The engine assembly is underway!


I did manage to get the (newly rebuilt) heads bolted on as well, but I didn't have time to get any more photos after I was done.
I did manage to get the (newly rebuilt) heads bolted on as well, but I didn't have time to get any more photos after I was done.
- Location
- Richfield, UT.
Whats it going in^?^
TurboMinivan
Still plays with cars
- Location
- Lehi, UT

- Location
- Richfield, UT.
The minivan or the hooptie? Im unsure based on your username.
Evolved
Less-Known Member
- Location
- Your Mothers Dwelling
I carved a "bowl" for the top of my waterfall that's still in the works. It was a battle but I won!


- Location
- West Haven, UT
Friday night I had a hitch adapter to repair for myself and one for a client so I thought I would knock them both out while machining and welding.
I have repaired about a dozen hitches and ball mounts in this manner now over the past 10 or so years and they have held up extremely well although they are a bit time consuming to do so if you have to take them to a shop to have done, it may not be cost effective. It is a common issue to have the hitch pin holes elongate over time (mostly miles).
Hitch pin clearance in elongated pin hole.

Some 1" 8620 I had on the shelf.

I used a 1" diameter sleeve with .625" hole drilled to accept a standard hitch pin, actually slightly bored out a few thousandths more. I then chamfered the sleeve to accept a weld bead yet be flush with the surrounding stinger. I then bored the elongated hole out to .998" so it would be an interference fit into the stinger before welding using some 309L stainless steel TIG rod. I like the 309 due to the slightly different composition material but also because it gives a slightly better elongation characteristics that seem to hold up better to the shock loads present on the hitches when in use.
Machining the sleeve as well as the side bushings/reducers for the receiver part of the hitch. I have the steel chucked up in my new 5C collet chuck on the lathe.

Picture of the sleeve pressed in and TIG welded. By chamfering the hole after boring and chamfering the sleeve while chucked up in the lathe it creates a vice groove or "V" for the weld fillet to lie down into. This weld sits nearly flush with the parent material and easily slid into a standard receiver tube.

Couple pictures of the first pass around the reducer.


Couple pictures of the cover pass with a slight weave to increase the size of the fillet.


All in all a pretty straightforward repair but it give a lot more surface area for the hitch pin to spread the load over.
Mike.
I have repaired about a dozen hitches and ball mounts in this manner now over the past 10 or so years and they have held up extremely well although they are a bit time consuming to do so if you have to take them to a shop to have done, it may not be cost effective. It is a common issue to have the hitch pin holes elongate over time (mostly miles).
Hitch pin clearance in elongated pin hole.
Some 1" 8620 I had on the shelf.
I used a 1" diameter sleeve with .625" hole drilled to accept a standard hitch pin, actually slightly bored out a few thousandths more. I then chamfered the sleeve to accept a weld bead yet be flush with the surrounding stinger. I then bored the elongated hole out to .998" so it would be an interference fit into the stinger before welding using some 309L stainless steel TIG rod. I like the 309 due to the slightly different composition material but also because it gives a slightly better elongation characteristics that seem to hold up better to the shock loads present on the hitches when in use.
Machining the sleeve as well as the side bushings/reducers for the receiver part of the hitch. I have the steel chucked up in my new 5C collet chuck on the lathe.
Picture of the sleeve pressed in and TIG welded. By chamfering the hole after boring and chamfering the sleeve while chucked up in the lathe it creates a vice groove or "V" for the weld fillet to lie down into. This weld sits nearly flush with the parent material and easily slid into a standard receiver tube.
Couple pictures of the first pass around the reducer.
Couple pictures of the cover pass with a slight weave to increase the size of the fillet.
All in all a pretty straightforward repair but it give a lot more surface area for the hitch pin to spread the load over.
Mike.
- Location
- Grantsville, Utah
I wanna see that car painted in the Petty livery.
- Location
- Bountiful, land of rocks
I wanna see that car painted in the Petty livery.
I want it to look EXACTLY like it does but have about 600 HP and scare the shit out of you when you hit the skinny pedal
- Location
- Grantsville, Utah
 Hosted by JeepParking.com
- Location
- Bountiful, land of rocks
Hosted by JeepParking.com
I've wanted to build something like that sans stickers and such since I saw Cale, Richard, and Buddy et all in the 70s going around a track on ABC's Wide World of Sports. Big cut fenders, low stance and FAT tires/wheels on all four corners with 500+ hp available.
- Location
- Bountiful, land of rocks
there's a F*rd version for you

glockman
I hate Jeep trucks
- Location
- Pleasant Grove
Repaired the passenger side power window switch in my 3rd gen 4 runner. The switch was working intermittently and only with a lot of pressure. Found a ton of carbon on the contacts. Cleaned if up with some 200 grit and it's working great now.

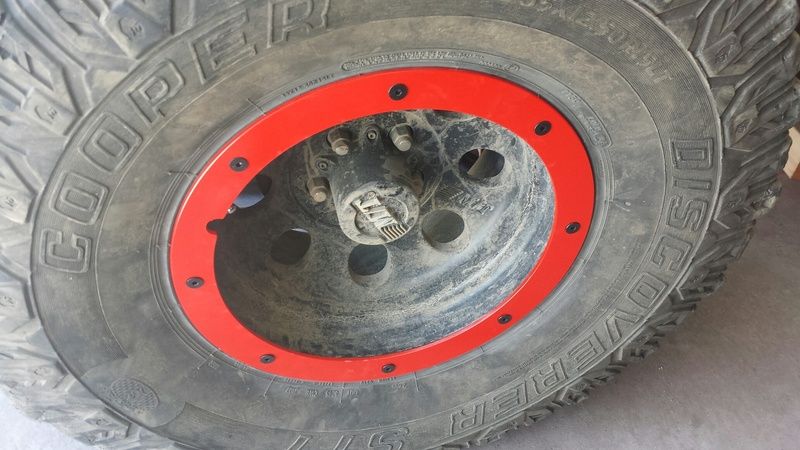
I finished up some replacement rings for my fakey beadlock wheels. The old rings were thin aluminum, and since they are only held on with 8 bolts they were very susceptible to damage, which you can see in this picture:

The new ones are 3/16" steel, and have countersunk bolts so they shouldn't catch on stuff as easily. Should make a difference....
The new ones are 3/16" steel, and have countersunk bolts so they shouldn't catch on stuff as easily. Should make a difference....

airmanwilliams
Well-Known Member
- Location
- Provo, Utah
Did you just drill into the wheel to mount them? I would like to dress up the wheels a bit on my smoker trailer and have thought about buying the allied fake bead locks for a bit.
Did you just drill into the wheel to mount them? I would like to dress up the wheels a bit on my smoker trailer and have thought about buying the allied fake bead locks for a bit.
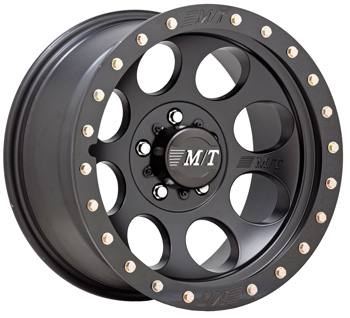
No, I just bolted them into the cast-in bolt bosses that were already there. They are fake beadlock wheels similar to this pic. Every 3rd bolt is an actual connector, the rest are just for looks.
airmanwilliams
Well-Known Member
- Location
- Provo, Utah
Gotcha. I will have to save for some then. I dont really need real ones but think they will dress up the trailer well.