Herzog

somewhat damaged
Admin
Location
Wyoming
IRRC, I've always paid about that much for two sets of uppers/lowers... not per side. Seems steep. It's been about 3 years since I last dealt with D44 ball joints.

The cheaper brands never broke on me, but they did wear out faster. Even Moogs wore out pretty quick.
 

'03_RUBI

Active Member
Location
West Jordan
We install cheaper ball joints for customers all the time when they request them. Granted they usually are just peoples daily drivers and don't see a lot of off road use but I have never had any problems with them.
 

X1994J

XJ's Bring the Uni-Suck
Location
Herriman, UT
I'd run the cheapies. As much as you wheel it they should pretty much last forever, your wheeling to garage ratio is not the greatest so far. :D
 

RockMonkey

Suddenly Enthusiastic
I'd run the cheapies. As much as you wheel it they should pretty much last forever, your wheeling to garage ratio is not the greatest so far. :D

Ooh, burn...

Actually I was thinking the same thing. They'll last forever sitting in the garage!

FYI, Four Wheel Parts closes at 3:00 on Saturdays. I got there at 3:13. :( So I went to Oreilley's and got the cheap ones. That way I'll be able to work on it if I get some time tomorrow. If/when they wear out I'll get Spicer joints.
 

X1994J

XJ's Bring the Uni-Suck
Location
Herriman, UT
I really would run the cheap ones. Seems like everything these days is made in one factory and re-boxed into 10 different manufatures' box anyway.
 

Gravy

Ant Anstead of Dirtbikes
Supporting Member
I'm sure you know all of this.... but use the studs for sure. They stay tighter. Make sure you get nuts that have lots of thread on them (similar to a ubolt nut). Or nix the cone washers and get acorn nuts. Lots of loctite. I can honestly say having the high steer arm come off is one of the most sucky break ever after watching Steve sheer all 4 bolts off his toy axle at little moab and burn up a trunion bearing getting it back to the trailer 4 weeks ago.
 

RockChucker

Well-Known Member
Location
Highland
I put in cheap autozone balljoints in my dana 30 in march i think it was since i was hoping to have the 30 gone by now. i just replaced them again a couple months ago. i got about 6 months out of them or so. i would get the spicers when your cheapies wear out in a few months. oh btw, i have a TJ on 35's for comparison. yours might last a little longer though. i think 44 ball joints are a little bigger.
 

RockMonkey

Suddenly Enthusiastic
Here is the first bent tie-rod end. This was the condition when I removed it after ~4 trails. It was bent down, and slightly forward. If it were hit by a rock it would have been bent exactly opposite of this. This almost had to have been caused by the drag link. This is the reason I'm reworking the steering.

attachment.php


The joint that replaced this one was bent after 1 day, although not nearly as bad as this one. I will post a pic that shows the new bent joint. I have not yet replaced it, but I will before the next trip.
 

Attachments

  • DSCN2806 (Medium).JPG
    DSCN2806 (Medium).JPG
    65.1 KB · Views: 126

RockMonkey

Suddenly Enthusiastic
I got the Reid Racing knuckle all assembled and installed on the axle. I had new spindle studs laying around, so I didn't bother pressing out the old ones from the old knuckle. I actually pressed in the bottom ball joint first, then realized that I could not get the bottom stud in with the bottom ball joint installed. I had to remove the snap ring and press out the ball joint, then press in all the studs, and finish by pressing in the upper and lower ball joints. If you are installing one of these knuckles, remember to install the studs first! Also one of the studs is threaded in, instead of pressed in. The threaded stud is included with the knuckle, and has some red lock-tight to keep it in. The spindle, brakes and hub all installed flawlessly on the knuckle. I temporarily installed the high-steer arm with the three bolts that it came with so I can continue to figure out the rest of the steering. I'll go back and re-install it with 4 bolts or studs (preferably) later.

attachment.php
 

Attachments

  • DSCN2804 (Medium).JPG
    DSCN2804 (Medium).JPG
    63.6 KB · Views: 124

RockMonkey

Suddenly Enthusiastic
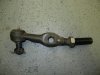
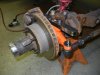
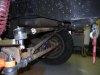
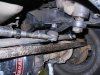
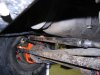
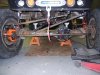
This is at ride height. With the drag link mounted at the top of the high steer arm, it's almost hitting the oil pan at ride height. With any suspension compression, it will hit the oil pan hard.

attachment.php


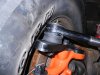
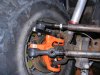
I dug through my giant box-o-parts, and came up with a pitman arm with less drop. It could be a stock XJ or YJ, or TJ. I'm not really sure which of my many previous vehicles it came from before it ended up in the box-o-parts. I reamed it from the bottom. The old pitman arm was lower, but reamed from the top, so even though this one is higher, the drag link will be lower. I took out the coilover springs and dropped the front suspension all the way down to full compression. This pitman arm, reamed from the bottom, is perfect! The drag link doesn't hit the oil pan or frame at full compression.

attachment.php


attachment.php
 

Attachments

  • DSCN2810 (Medium).JPG
    DSCN2810 (Medium).JPG
    63.7 KB · Views: 123
  • DSCN2817 (Medium).JPG
    DSCN2817 (Medium).JPG
    77.9 KB · Views: 123
  • DSCN2814 (Medium).JPG
    DSCN2814 (Medium).JPG
    53.6 KB · Views: 122

RockMonkey

Suddenly Enthusiastic
I measured travel of the pitman arm vs travel of the high-steer arm, to help determine drag link joint placement on the high-steer arm. I discovered that I would get full lock-to-lock steering almost no matter where I put the drag link on the high-steer arm. So I put it as far towards the end of the arm that the joint would safely clear the tire. You can also see the second bent tie-rod end in this picture. In this picture it is bent up, but when this joint was installed on the old knuckle, it was flipped upside down from this position, so it was bent down, just like the first one.

attachment.php


There is any clearance between tire and drag link end joint.

attachment.php
 

Attachments

  • DSCN2823 (Medium).JPG
    DSCN2823 (Medium).JPG
    64.7 KB · Views: 146
  • DSCN2822 (Medium).JPG
    DSCN2822 (Medium).JPG
    72.8 KB · Views: 146

RockMonkey

Suddenly Enthusiastic
[INSIDE JOKE]
My current drag link is too short for the new setup, so I need to measure for a new one.
attachment.php

[/INSIDE JOKE]
 

Attachments

  • DSCN2813 (Medium).JPG
    DSCN2813 (Medium).JPG
    43.4 KB · Views: 147

RockMonkey

Suddenly Enthusiastic
Here are pictures of the whole setup at full compression, and somewhere between ride height, and full extension. I haven't put the springs back in yet, so I don't have any pictures of ride height. The drag link should be somewhere close to flat at ride height. You can also see the slight angle of the tie-rod caused by it being installed above the knuckle on the driver's side, and below the knuckle on the passenger side. The angle is pretty slight, and totally acceptable. It will get a tiny bit worse when I replace the bent tie rod end, but it will still be unnoticeable to anyone that doesn't look at it really closely.

attachment.php


attachment.php


The next step is to build a new track bar, to match the new length and angle of the drag link. I will be able to use my existing frame mount (whew!), and I think I may be able to use the stock track bar mount cast into the Ford axle.
 

Attachments

  • DSCN2828 (Medium).JPG
    DSCN2828 (Medium).JPG
    77.3 KB · Views: 147
  • DSCN2827 (Medium).JPG
    DSCN2827 (Medium).JPG
    80.1 KB · Views: 147

gorillaxj

Always building hardly wheeling
Location
SLC
Nice build, been watching it for years. I really like the suspension setup front and rear. It's an overall great build.

its interesting how the reid knuckle is higher and flipped. I didn't and wouldn't have noticed if you didn't say it. I know I am late in the ball joint topic as you have it on. but these are what I am going to try next time I have to replace them, look promising... http://pirate4x4.com/forum/showthread.php?t=944903
 
Top