- Location
- The Land Northward (Bountiful), Utah
You are using an out of date browser. It may not display this or other websites correctly.
You should upgrade or use an alternative browser.
You should upgrade or use an alternative browser.
Gravy's 2005 Liberty Renegade
- Thread starter Gravy
- Start date
- Location
- Bountiful, land of rocks
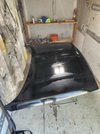
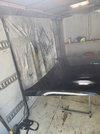
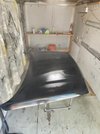
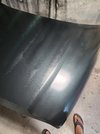
*I think I've knocked all the clear off Marc.*
I've never shot with a pro gun all ony own before (I've shot cheap stuff or had friends do the gun setup and I pull the trigger). So this is a bit new for me but I put down a whole pint on hood in 3 wet coats so if I need to I can color sand.
Did you prime or seal over those burn through spots? If you're just using base, you'll need a LOT of coats to not see those through the color when it's out in the sun.
- Location
- The Land Northward (Bountiful), Utah
Did you prime or seal over those burn through spots? If you're just using base, you'll need a LOT of coats to not see those through the color when it's out in the sun.
I hope I've got decent coverage, I stopped when I hit primer. Stock color hopefully so it should blend *ok* 🙌
It'll probably not be perfect, but for a $5-7k car it'll be great.
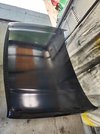
@mbryson
I'll probably let this cook a bit before I tack cloth it.
You can come help me spray clear later today, if you want.
Last edited:
- Location
- Bountiful, land of rocks
- Location
- The Land Northward (Bountiful), Utah
Well fail of the day for y'all.
The color is WAY WAY WAY too dark...
I should have checked with a spray out card... But again with the attitude of, "it'll be good enough," I didn't ---because reasons... Aaaand these Repaint Supply folks are usually spot on.
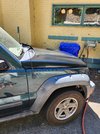
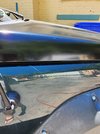
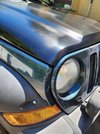
After speaking to a tech and verifying air pressure, outside temps, flash times, gun model, etc and emailing some pics to verify paint codes and such... They're sending me a new pint.
Just like I tell my sons in desert racing, "you either win or you learn."
I learned today. 🤦♂️
The color is WAY WAY WAY too dark...
I should have checked with a spray out card... But again with the attitude of, "it'll be good enough," I didn't ---because reasons... Aaaand these Repaint Supply folks are usually spot on.


After speaking to a tech and verifying air pressure, outside temps, flash times, gun model, etc and emailing some pics to verify paint codes and such... They're sending me a new pint.
Just like I tell my sons in desert racing, "you either win or you learn."
I learned today. 🤦♂️
Last edited:
hey next round I would really invest the time in better prep. You can see the hood wasn’t ready for paint. Cut the whole hood down with 220 on a da and get that clear feathered out. Then move to 340 on a da or 400 wet by hand. You really should seal the hood before paint. Even if it’s just a cheap 1k nason sealer it’s going to give you so much better and consistent results.
Don’t worry about color sanding a base coat, once the color has flashed off lay down a medium coat of clear and then follow with a wet coat. For a refinish that should be plenty. Add a 3rd coat if you have lots of garbage in it and want to cut and buff.
Don’t worry about color sanding a base coat, once the color has flashed off lay down a medium coat of clear and then follow with a wet coat. For a refinish that should be plenty. Add a 3rd coat if you have lots of garbage in it and want to cut and buff.
- Location
- The Land Northward (Bountiful), Utah
Thanks for the advice. I'll do lots more prep this next time.
I think perhaps that first picture you're looking at is throwing you off, that's about halfway through prep. If you look at that second picture on the last page, I wet sanded the entire hood with 380 and took all the bad clear off and feathered it out 2-3 inches. Beyond that photo I continued flattening until I couldn't feel any change in consistency with my fingers. Then came back and did the whole thing with 600. (I felt like I could still see scratches that would show through the base at 380).
I agree with you on sealer if you're changing color, but for a same color respray?
I can certainly do more prep, but when I asked about sealer with the tech yesterday he said it was unnecessary for same color.
Last edited:
Personally that hood is rough enough I would use 220 . 600 isn’t necessary for a refinish imo 340 or 400 is plenty.Thanks for the advice. I'll do lots more prep this next time.
I think perhaps that first picture you're looking at is throwing you off, that's about halfway through prep. If you look at that second picture on the last page, I wet sanded the entire hood with 380 and took all the bad clear off and feathered it out 2-3 inches. Beyond that photo I continued flattening until I couldn't feel any change in consistency with my fingers. Then came back and did the whole thing with 600. (I felt like I could still see scratches that would show through the base at 380).
I agree with you on sealer if you're changing color, but for a same color respray?
I can certainly do more prep, but when I asked about sealer with the tech yesterday he said it was unnecessary for same color.
And the sealer will just let the color be consistent. Every paint job I’ve done without it I instantly regret it as I’m laying way more color than I should need trying to get consistent color. The $30 for a quart of 1k sealer will save paint and give better results
- Location
- Bountiful, land of rocks
Sealer would be a good thing to get the inconsistent colors into a consistent color. You lay the sealer (I'd use a dark sealer in this case) over the inconsistent color spots and blend outwards from the sealer edges. That will use significantly less base. Then clear
Assuming your sanding is good to go, follow the below.
-Mask
-Liberally wipe everything down with wax and grease remover on a lint free rag. Clean the surface with the wax and grease remover. It will look a lot like the clear coat as you lay it on. That's your last chance to fix anything
-prepare your sealer and put it in the gun
-using a beeswax tack rag, wipe the surface down again (wax and grease remover should have all evaporated by then)
-spray sealer immediately over problem areas (1 coat is fine) and keep it tight to the affected area
-let sealer flash while you clean your gun
-prepare base mixture
-beeswax tack rag the surface off again
-immediately spray base concentrating on the sealed area and blending out from there (this is an art form-you'll suck at it but maybe not?)
-spray at least 2-3 base coats. Your blend area will get bigger each successive coat. Your last blend is the biggest part of the art form but is dependent on the other coats previously sprayed
-let flash while you clean your gun
-go look at your basecoat work when it's dried
-adjust any "blend" areas if needed with more base
-reclean your gun
-mix your clear (assuming you have the right activator for the temp)
-tack the surface with a fresh beeswax tack rag
-immediately spray first "rough" coat of clear. Every clear is a little different. I like to let that first coat flash as long as the instructions will allow. Masking paper is kind of handy here so you can test your clear. Pay particular attention to edges and any funky scoops or vents or whatever (I don't think you have those on this hood? Make sure the edges and front has good depth)
-wait for bugs and dust to get on the surface
-spray a good 2nd coat of clear, not quite finished glossy but pretty close. Check your edges for good coverage (I start spraying the edges. Some people finish with those).
-let flash until this is pretty set up. If you touch the masking paper and the clear still pulls up with your finger tip, I'd wait
-wait for more bugs and dust while the clear sets (probably about 10-15 min)
-lay a generous last coat on to gloss. This is the finished product and the last time (hopefully) you'll have clear in the gun. You want the clear to "flow" but not to the point you get a hanger or a run. Don't sweat those. The are usually easy to fix
-clean the hell out of your gun. Take it all apart and then clean all the parts again.
-go look at your finished product and swear about the bugs/dust
-check the clear on the masking paper again before unmasking
-swear at the bugs dust and maybe a dry spot (you have to respray to fix those ) or maybe a flow indicator or two
Put all your crap away and enjoy looking at your finished product (or not)
Last edited:
ID Bronco
Registered User
- Location
- Idaho Falls, ID
I like your attitude of learning when it doesn't go well. I did some "learning" today with a propeller.
- Location
- The Land Northward (Bountiful), Utah
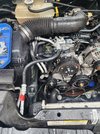
Well my AC wasn't running that great on this unit so I took it in to get refilled and leak tested since I don't want to be tracing all those lines down I don't have an evac system and don't care to vent those nasty chemicals into the atmosphere. They charge it and put dye in it and guys at the shop mentioned that the viscous fan clutch wasn't locking up real great so I picked the thing up and drive home after work at like quarter past 5:00 p.m. and park it for the night (it's too hot to work on so I figure I'll do it in the morning...) I picked a fan clutch up this morning in the truck and open the hood on the Jeep to change it and one of the ac lines was blown up! I changed the fan clutch and run to the auto parts store and put a new high side AC line on (which was super easy just two 10 mm bolts and 72 bucks.)
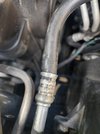
(Burst line -after washing off all the green tracer dye).
(New line, fan clutch replacement and serpentine& water pump inspection while I'm in here)
Well I'm picking up this new AC line and mentioning this to the manager at O'Reilly (her kids go to the same school as mine)-she goes, "did you happen to have this so and so shop charge your AC?"
And I said "yes how did you know?"
She said "we've heard from other customers that these guys have charged people's AC systems and we think they're overcharging them on purpose to ruin or damage systems and bill for more hours because this is the third person this month who's come in complaining about these guys." And she explains with commercial orders the owner is super condescending and sexist to her and female delivery drivers so much so that she won't send women to do deliveries to this shop anymore.
So I went back to the shop to ask them to refill the AC system (since I replaced the line) I didn't even expect them to do it under warranty or anything like that but when I asked him when they charged it yesterday what the head pressure was on the high side- he got super super defensive and condescending and told me I wouldn't understand.... and finally told me that he had put it between 350 and 400 PSI and 40psi on the low side... From what I understand this AC system is only rated to 300 PSI... And spec is 250psi on the high side and 25-29 on the low side.
I didn't ask him to replace the cost of the hose but I did mention that spec to him and I asked him to either refund the money I paid him yesterday or refill the system for free seeing as how he definitely over charged it. and then we would part ways and I'd find a new shop going forward. He did it but he was angry as can be... As a service guy myself I feel it's my duty to go out of my way to explain to my customers in plain terms what I've done and I'm not bothered when they ask me questions especially when it's their equipment I'm working on and their hard-earned money that they're shelling out to have me fix their stuff. I definitely make mistakes and have made mistakes in my 19-year career, but I'd like to think I'm the first to admit it and try and make things right even if it hurts my bottom line. I really have no respect for people who take advantage of customers or are condescending or sexist towards women.
Anyway I don't usually complain online but thought it was interesting that if this shop was willing to try to take advantage of me how much more so are they perhaps taking advantage of less knowledgeable individuals (often like women and the elderly?) I always thought the trope about mechanics being slimy and shady was just a myth but now I see there's always some bad apples and there's a reason why the feeling is so prevalent...
*Rant over*
Back to your regular scheduled program of me fixing stuff on an old Jeep.

(Burst line -after washing off all the green tracer dye).
(New line, fan clutch replacement and serpentine& water pump inspection while I'm in here)

Well I'm picking up this new AC line and mentioning this to the manager at O'Reilly (her kids go to the same school as mine)-she goes, "did you happen to have this so and so shop charge your AC?"
And I said "yes how did you know?"
She said "we've heard from other customers that these guys have charged people's AC systems and we think they're overcharging them on purpose to ruin or damage systems and bill for more hours because this is the third person this month who's come in complaining about these guys." And she explains with commercial orders the owner is super condescending and sexist to her and female delivery drivers so much so that she won't send women to do deliveries to this shop anymore.
So I went back to the shop to ask them to refill the AC system (since I replaced the line) I didn't even expect them to do it under warranty or anything like that but when I asked him when they charged it yesterday what the head pressure was on the high side- he got super super defensive and condescending and told me I wouldn't understand.... and finally told me that he had put it between 350 and 400 PSI and 40psi on the low side... From what I understand this AC system is only rated to 300 PSI... And spec is 250psi on the high side and 25-29 on the low side.
I didn't ask him to replace the cost of the hose but I did mention that spec to him and I asked him to either refund the money I paid him yesterday or refill the system for free seeing as how he definitely over charged it. and then we would part ways and I'd find a new shop going forward. He did it but he was angry as can be... As a service guy myself I feel it's my duty to go out of my way to explain to my customers in plain terms what I've done and I'm not bothered when they ask me questions especially when it's their equipment I'm working on and their hard-earned money that they're shelling out to have me fix their stuff. I definitely make mistakes and have made mistakes in my 19-year career, but I'd like to think I'm the first to admit it and try and make things right even if it hurts my bottom line. I really have no respect for people who take advantage of customers or are condescending or sexist towards women.
Anyway I don't usually complain online but thought it was interesting that if this shop was willing to try to take advantage of me how much more so are they perhaps taking advantage of less knowledgeable individuals (often like women and the elderly?) I always thought the trope about mechanics being slimy and shady was just a myth but now I see there's always some bad apples and there's a reason why the feeling is so prevalent...
*Rant over*
Back to your regular scheduled program of me fixing stuff on an old Jeep.
It sucks to hear of shady people. Hopefully the word spreads and they get it together or go out of business.
Back when I was a delivery driver for Bradshaw Auto Parts there were shops we wouldn't send the girls to. I was always glad to show up to those shops knowing damn well those dirty old creeps were hoping it was one of my female counterparts. We even had a couple guys request to only have the girls do their deliveries but my manager was a stud and shut them down immediately.
Back when I was a delivery driver for Bradshaw Auto Parts there were shops we wouldn't send the girls to. I was always glad to show up to those shops knowing damn well those dirty old creeps were hoping it was one of my female counterparts. We even had a couple guys request to only have the girls do their deliveries but my manager was a stud and shut them down immediately.
- Location
- The Land Northward (Bountiful), Utah
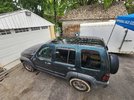
The fun part of having a cheap Jeep is I can
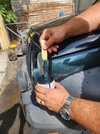
Not stress about having my kids help me, so they helped me pull off the roof rack and the I put the boys on sanding duty.
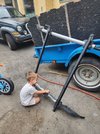
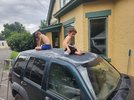
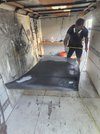
Then I finished what they started, washed and degreased, masked and tack clothed the thing.
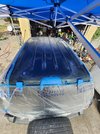
First 2 coats
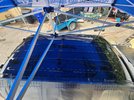
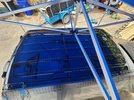
Then I added hardener on the last 2.
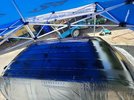
Cleaned the gun and I'm letting it cook while I eat some late lunch.

I only have a limited amount of clear so I haven't have decided if I should shoot the roof with the clear I have then buy more when I redo the hood? Or leave the roof be... (This is supposedly UV stable single stage enamel gloss).
What say you RME?
Not stress about having my kids help me, so they helped me pull off the roof rack and the I put the boys on sanding duty.


Then I finished what they started, washed and degreased, masked and tack clothed the thing.

First 2 coats


Then I added hardener on the last 2.

Cleaned the gun and I'm letting it cook while I eat some late lunch.

I only have a limited amount of clear so I haven't have decided if I should shoot the roof with the clear I have then buy more when I redo the hood? Or leave the roof be... (This is supposedly UV stable single stage enamel gloss).
What say you RME?
Last edited:
- Location
- The Land Northward (Bountiful), Utah
- Location
- Bountiful, land of rocks
Who's the dude with the fuzzy arms?
- Location
- The Land Northward (Bountiful), Utah
I threw this up in an auto body group I’m a part of. But post it here also If anyone has feedback.@J-mobzz laid down primer (thanks @mbryson)
View attachment 162131
And then as I laid down the first base color coat- Disaster! Something must have reacted...
View attachment 162132
So the plan now is: let it cook for a day or two. Wet sand it flat. Scrotchbrite and try to repaint those sections. If they react again strip it and restart.
I was helping a friend paint a hood this morning. We prepped everything with 220 on a DA feathering out the bad clearcoat then 340 on a DA went through everything with a Red scotch Brite, making sure it was scuffed well.
We sprayed the hood with some purple power degreaser, and then rinsed it really well and dried it off. And then before we sprayed the hood, we wiped everything down Good with isopropyl alcohol.
We sprayed a layer of 2K primer sealer that looks completely fine. Let it flash off for 15 minutes. And then sprayed the first coat of base and it started to check and lift.
Any thoughts on this? My friend thinks it was the primer and that we didn’t let it dry long enough. I’ve never had an issue with doing it this way in the past but would like to hear opinions?
To me it looks like it’s more in streaks and I’m wondering if it has something to do with the purple power degreaser it does appear that it was in some of the areas that we had the sand down to feather at the clearcoat getting it down to the factory sealer . I’m wondering if that being a more porous area took in some of the degreaser that didn’t get completely rinsed out or something?
We have enough basecoat that we can repaint the hood, but we don’t want to have to buy any more if we can avoid it .
Any help much appreciated
- Location
- The Land Northward (Bountiful), Utah
Well. I sanded back the crazing or whatever it was and primed a little.
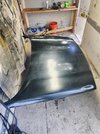
Spot shot some paint. It didn't react at all, and stayed flat, BUT while it was flat... the crazing showed through... (In other words I didn't sand deep enough).
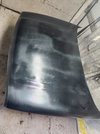
So I sanded it back smooth smooth took extra care and did a higher build primer let it sit a couple hours and flattened it out.
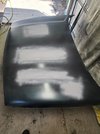
Tack clothed, then did some spot painting and one wet coat of color... Probably needed a second but ran out of color. So naturally I waited 45 minutes; mixed up my clear with a little extra reducer because of the heat and shot a fog and 2 wet coats. The clear turned out good I think, but time will tell if I made the right move without doing another base color coat.
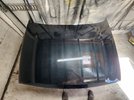
Honestly I'm kinda over it, it's 100°F out and I want to play with my kids, so it'll likely be "good enough."
I have other projects I care more about.
While I did all this I let my boys take apart a broken paper shredder we were throwing out and see how it works. Hopefully this will be core memory stuff and keeps them off the screens for the last few weeks of summer.

Spot shot some paint. It didn't react at all, and stayed flat, BUT while it was flat... the crazing showed through... (In other words I didn't sand deep enough).

So I sanded it back smooth smooth took extra care and did a higher build primer let it sit a couple hours and flattened it out.

Tack clothed, then did some spot painting and one wet coat of color... Probably needed a second but ran out of color. So naturally I waited 45 minutes; mixed up my clear with a little extra reducer because of the heat and shot a fog and 2 wet coats. The clear turned out good I think, but time will tell if I made the right move without doing another base color coat.

Honestly I'm kinda over it, it's 100°F out and I want to play with my kids, so it'll likely be "good enough."
I have other projects I care more about.
While I did all this I let my boys take apart a broken paper shredder we were throwing out and see how it works. Hopefully this will be core memory stuff and keeps them off the screens for the last few weeks of summer.
Last edited:
Jesser04
Well-Known Member
- Location
- Kaysville Utah
That pic is giving off hunter biden vibes. Great work on the paint though.
- Location
- The Land Northward (Bountiful), Utah
😂 "Put down the crack pipe" It's too 🥵 for a 👕. Thanks I'm learning the hard way. I've done better but usually it's with someone more skilled looking over my shoulder the whole time.That pic is giving off hunter biden vibes. Great work on the paint though.

