Hardline90's CJ7 RE-visited

Jinx

when in doubt, upgrade!
Location
So Jordan, Utah
I brought a couple other things too to justify the freight. Heavy is still heavy after a while.

It it seems like there are some blue torch vendors. Summit Machine? Skippy/Davy? Might help on the cost.
 

hardline90

Real rigs are built!
Location
Lehi, Utah
It was a fun project for sure and has worked great, but this winter it gets a full buggy treatment and a few things changed, so what for this thread to continue...
 

hardline90

Real rigs are built!
Location
Lehi, Utah
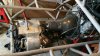
Here we go again........ Well it's been about 5 years since I did the last build and the Jeep has been awesome. I have been able to doing everything I have wanted to do with it, but it's time to go on to the next generation. I have purchased a buggy chassis and the plan is to use the parts off the Jeep to finish the buggy. Not sure I will get much more performance, but I have always wanted to build a buggy and I'm not getting any younger, so I guess now is the time. So here is the plan: Buggy chassis built by Factory Tubular (many years ago), but never built. When I purchased the chassis, it was a four seat, but after putting the tape measure to it, the shortest wheel base would have been 127", (Maybe why it never got built). So after looking at it for a few days, I decided to cut 21" out, which took out the rear seat, so it is now a two seat and should be around 110 to 113" when done. I have purchased a 05 5.3 L33 HO motor from BD Turnkey and planning on using my TH350 and Atlas out of the Jeep. I will also be using the D60 and 14 Bolt as well. The Coil Overs will be placed in storage why I give a set of ORI Struts a try. Then there will be just small things coming out of the Jeep like, radiator, steering, fuel cell, tires and wheels, gate shifter, etc.... The plan is around 6 months if all goes well, but there is allot of work. I will get some pics up soon once I get started.
 

Bart

Registered User
Location
Arm Utah
Sounds like a fun plan and good luck with the build. After being on this merry go round a few times I'm interested to see how this works out for you.
 

Greg

Make RME Rockcrawling Again!
Admin
:cool: I'd love to hear how the 5.3 L33 HO treats you, once it's on the trail! I think that's a pretty neat engine, always wanted one for a project.
 

hardline90

Real rigs are built!
Location
Lehi, Utah
:cool: I'd love to hear how the 5.3 L33 HO treats you, once it's on the trail! I think that's a pretty neat engine, always wanted one for a project.

I'm looking forward to it. It's rated at 350 hp, so should have many smiles per hour :) I just hope it's a good crawl motor also.....
 

hardline90

Real rigs are built!
Location
Lehi, Utah
That is one of the things Brian at BD Turnkey does when you purchase from him. He goes through the harness cutting out all the stuff you don't need in a buggy and he flashes the ECM for 91 octane fuel and custom tune for what you are going to use it for. Should be fun!!!
 

Coco

Well-Known Member
Location
Lehi, UT
I'll throw some pictures up for this. Saturday we got a lot of the Jeep tore apart. Kind of odd to take so long to build a rig, but you can strip one in a day! Got the trans, T-case, and axles pulled from the Jeep. hoping to start mounting up the drivetrain next week.


and a pic of the new heart of the buggy :D
 

hardline90

Real rigs are built!
Location
Lehi, Utah
Here is a little update. I got the motor and transmission in the chassis, but the stock exhaust manifold wasn't going to work, so I had to order some Block Hugger Headers to get around the frame, so all work on the drive train stopped until the headers come in. So I turned my attention to the 14 bolt axle. Over the weekend I was able to get the shave kit done and will now start on cutting off the old mounts and get ready to mock up the suspension once the drive train is mounted. Here are a few pics........

https://mail.google.com/mail/u/0/?u...tt&th=1532dd84d8110096&attid=0.1&disp=safe&zwAxle.jpg

Sorry for the crappy pics, I'm still trying to figure out the best way to work this phone to computer thing....
 

Attachments

  • Drive Train.jpg
    Drive Train.jpg
    93.2 KB · Views: 30
Last edited:

hardline90

Real rigs are built!
Location
Lehi, Utah
DSCF1210[1].jpgDSCF1211[1].jpgDSCF1212[1].jpgDSCF1213[1].jpgDSCF1214[1].JPGDSCF1215[1].jpgDSCF1216[1].jpgDSCF1217[1].jpgDSCF1218[1].jpg

So Colton was giving me a hard time because I hadn't updated the post in a while, so here is a quick update. I am finding out that when you purchase a chassis that was made by someone else without any idea of what their plans were for it, i.e., motor, trans, axles, t-case, driver size, etc... You find out that to make it what you want takes some changes. So to start off, I found out that to keep it a 4 seater would have made the buggy a minimum of 127" wheel base, to long for what I wanted, so I cut 21" out of the chassis and put it back together, First change.... Second, I found out the bottom hung way to far down. At ride height, I would have had an 18" belly height, so I cut the bottom off and raised it 2". Second change... Third, I had to move one of the main tubes to allow room for the exhaust. I purchased a set of Bock Hugger Headers which worked to get past the tube, but then I wasn't able to put in motor mounts, so the headers went back and I decided to move the tube. Third change.... Forth, when I mocked up the seats, I found out I had no leg room without having my feet right next to the exhaust, so the tube work behind the seat had to be removed in order to move the seats back to get some leg room. Fourth change... So I hope I'm done with the changing and get back to building.

The suspension links, rear shock hoops, fuel cell cage, air tank location and compressor location are all mocked into place. The radiator, seats, hood and grill are just sitting in place for reference. The rear section is mostly done, so next will be the front end, so front hoop work, shock hoops, radiator, fans, hood and grill are next on the list. Once they are done, I get to turn my attention to the interior and then finish welding, paint and final assembly. Wow, still allot more work, but getting closer.....
 
Last edited:
Top