
You are using an out of date browser. It may not display this or other websites correctly.
You should upgrade or use an alternative browser.
You should upgrade or use an alternative browser.
Jeep Nathan and Tanja's 99 XJ Build up
- Thread starter thenag
- Start date
-
- Tags
- build thread
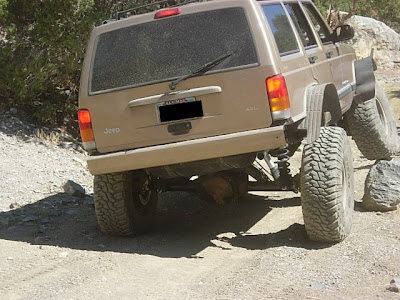
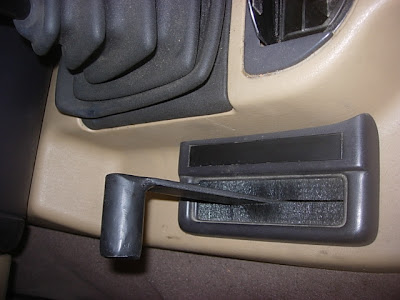
I want to start with this picture because I really like how clean it looks, I don't think you can do much better for a "factory" looking twin stick.
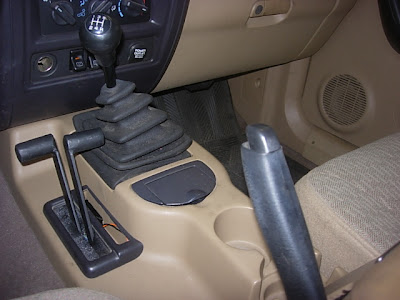

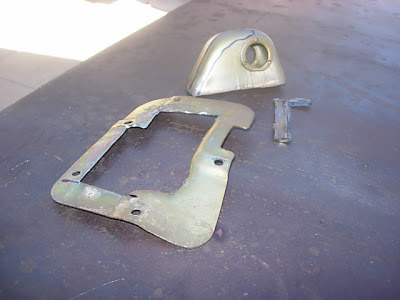
I cut up the original shifter thingy and sandwiched some foam in there to keep the outside out and the inside in.

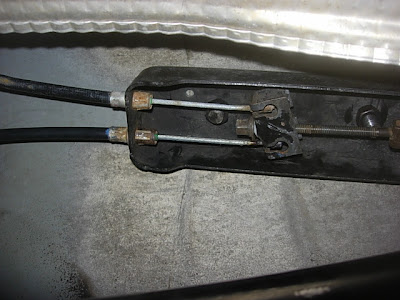
a couple shots of the parking brake setup, it still really doesn't give you a good idea of what I did. I mounted the OEM splitter to uni-body up in the transmission tunnel, in the first shot you can see the top of the drive shaft.

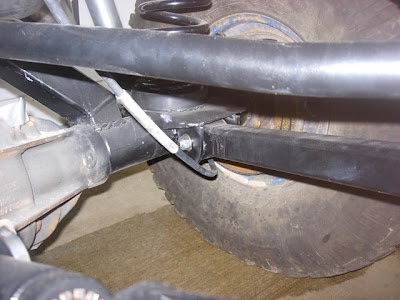
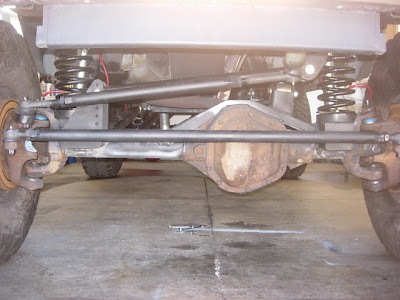
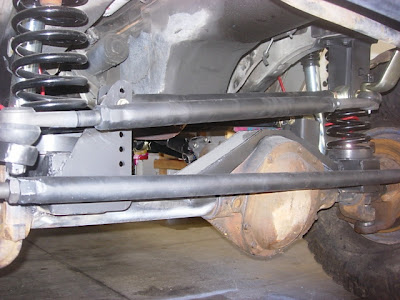
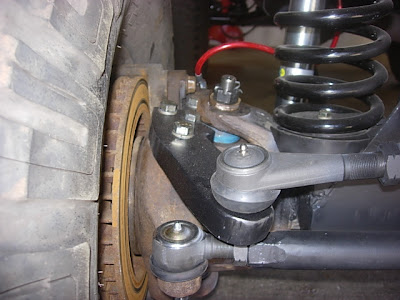
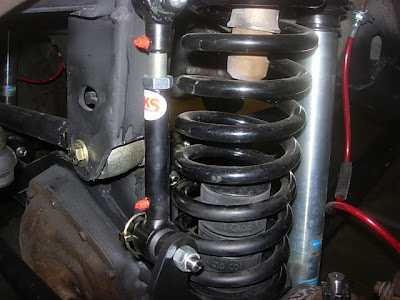
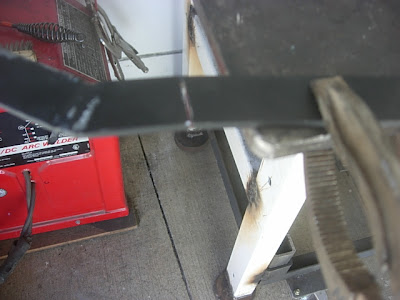
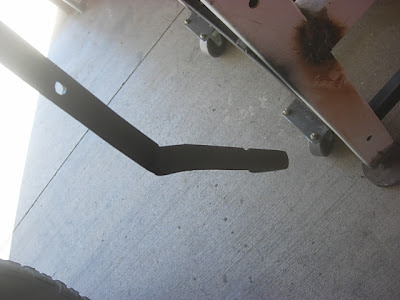
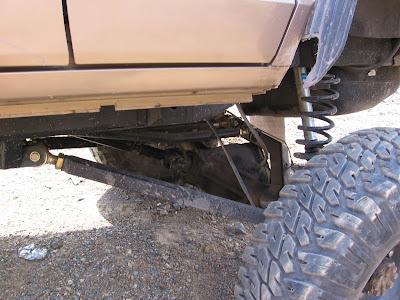
and a few shots of the steering all mounted up. I messed up this pitman arm by reaming it too deep for the GM TRE. There is real fine line between reaming not enough and too much on those things. I have a new one on the way. Nothing like jacking up a brand new pitman arm. . Josh Underhill cut out the hi-steer arm with a torch for me. I did the holes using some transfer punches with the old one as template and a drill press. The hole for the TRE is at about a 10 degree angle opposite the 10 degree angle that the hi-steer arm sits at. So the theory is the TRE is flat. I had to grind the bottom of the arm down a bit so the nut would sit flush. This arm is 1 inch thick and my old one was only 3/4 so even with the grinding and the hole at an angle there is quite a bit more steel around the hole than the old one. I like how it is hard to see the track bar since it is so damn parallel

Not much to do this weekend, I had to spend some money to get the civic to pass inspection so I can't spend a dime on the jeep right now but I have quite a bit on hand, I will get the body cut up and the sway bar disconnects mounted.
nathan
-- 99 xj
I cut up the original shifter thingy and sandwiched some foam in there to keep the outside out and the inside in.
a couple shots of the parking brake setup, it still really doesn't give you a good idea of what I did. I mounted the OEM splitter to uni-body up in the transmission tunnel, in the first shot you can see the top of the drive shaft.
and a few shots of the steering all mounted up. I messed up this pitman arm by reaming it too deep for the GM TRE. There is real fine line between reaming not enough and too much on those things. I have a new one on the way. Nothing like jacking up a brand new pitman arm.
. Josh Underhill cut out the hi-steer arm with a torch for me. I did the holes using some transfer punches with the old one as template and a drill press. The hole for the TRE is at about a 10 degree angle opposite the 10 degree angle that the hi-steer arm sits at. So the theory is the TRE is flat. I had to grind the bottom of the arm down a bit so the nut would sit flush. This arm is 1 inch thick and my old one was only 3/4 so even with the grinding and the hole at an angle there is quite a bit more steel around the hole than the old one. I like how it is hard to see the track bar since it is so damn parallel
Not much to do this weekend, I had to spend some money to get the civic to pass inspection so I can't spend a dime on the jeep right now but I have quite a bit on hand, I will get the body cut up and the sway bar disconnects mounted.
nathan
-- 99 xj
X1994J
XJ's Bring the Uni-Suck
- Location
- Herriman, UT
Why don't you just fill-weld the pitman arm, re-drill and re-tap it. I had to do that to mine and it's been fine.
- Location
- Grand Junction, CO
The XJ is looking great Nathan, keep up the good work!
DaveB
Long Jeep Fan
- Location
- Holladay, Utah
I have an XJ drop pitman already drilled for the chev tie rod ends if you can use it.
Why don't you just fill-weld the pitman arm, re-drill and re-tap it. I had to do that to mine and it's been fine.
I had not thought about welding it. Maybe I will do that and keep this one as a spare. What do you do just melt a bunch of 7018 rod in there?
I had Thought about using the tappered inserts as well, it just seems a little hokey to me.
We are trying to avoid hacking stuff together and "making it work" or "good enough" this is not a cheap build at all...
I have an XJ drop pitman already drilled for the chev tie rod ends if you can use it.
Damn you have everything I need... My new pitman arm will actually be delivered on Wed. If I screw up another one I will let you know. This one is also the perfect drop for the track bar bracket so unless you have an "extreme drop" I don't think it would be the right drop.
I still need to get that seat belt from you too.
Thanks!
Nathan
X1994J
XJ's Bring the Uni-Suck
- Location
- Herriman, UT
Yeah, just start filling it back in with weld then re-drill and tap it. Mine was drilled for the tapered inserts and you are smart to avoid them. They worked in the knuckles ok, but I have ditched them altogether. I had to completely fill my pitman in and start over as I needed a smaller hole for the heim joint vs. the tapered insert.
Your build is looking good. I really dig the shifters, nice and clean. Have you planned a break in run yet?
Your build is looking good. I really dig the shifters, nice and clean. Have you planned a break in run yet?
I had not thought about welding it. Maybe I will do that and keep this one as a spare. What do you do just melt a bunch of 7018 rod in there?
I had Thought about using the tappered inserts as well, it just seems a little hokey to me.
We are trying to avoid hacking stuff together and "making it work" or "good enough" this is not a cheap build at all...
Thanks!
Nathan
Yeah, just start filling it back in with weld then re-drill and tap it. Mine was drilled for the tapered inserts and you are smart to avoid them. They worked in the knuckles ok, but I have ditched them altogether. I had to completely fill my pitman in and start over as I needed a smaller hole for the heim joint vs. the tapered insert.
Your build is looking good. I really dig the shifters, nice and clean. Have you planned a break in run yet?
I actually am avoiding the tapered inserts due to you claiming they didn't work out for you. It did make me think they probably were not the best way to go. Any little play will just make the hole wear out.
read next post for test run...
Nathan
Ok so another one of those times when I did a lot and didn't post any pics.
Wednesday I got my custom axle shaft back (the first one had a bad forging or something, I didn't have to pay for a new one but it makes not want to buy Moser in the future) I also got another pitman arm and successfully tapper-ed it straight and not too deep!
So what that meant is the steering is safe all I had to do was build some temporary flares and I could drive it with no exhaust!
On friday I got to drive it a good amount, partly to get some estimates from exhaust shops. Partly because I like driving it. It is incredibly cool and frighting to drive something that you have done that much work to in one shot. I kept thinking that something was going fail and I would go crashing into something/someone.
The 4.10's do ok. It is not dangerously slow. Driving with no cat of muffler threw me off a bit as far as shifts etc. I was surprised at the lack of body roll around corners. the springs are stiff but still absorb bumps pretty well. The shocks are great.
The breaks work really well. I went to a parking lot and did a few 40-0 panic stops. The rears seems to lock up a bit before the fronts but it skids in a straight line. The parking brake holds the vehicle ok but doesn't really slow the vehicle down while moving. The pedal feels like it still has a little air in it but that may also be the Caddy rear calipers not quite adjusted right.
I went into a dirt lot. I couldn't wheel since without bump stops I will smash the oil pan. And it was so hard to not flex the thing out in the little gulley that was there, but managed to not do it. I did put the 231 in low and d-300 in low. I thought 110:1 in the bronco was low, man that 127:1 in the jeep is stupid low. I let the clutch out and thought I was in neutral, I didn't realize I was moving!
The a/c still works great!
So before I do a test wheeling run I need bump stops and exhaust.
As near as I can figure I am going to get one of these, (I'll call it a "kitten")
http://www.magnaflow.com/02catalyti...rttype=SPUN-CAT UNIVERSAL CATALYTIC CONVERTER
It says it is EPA certified and OBDII certified. Is anyone running one of these on a newer 4.0L? Do you pass emissions?
If I can get exhaust on it test run will probably be rattle snake or mineral basin on 8/6 or 8/7.
Before we do too much we need bumpers, sliders. I am going to pay Terry at Ridgedco for those.
here are some pics;
sway bar disconnects
some cut and fold action
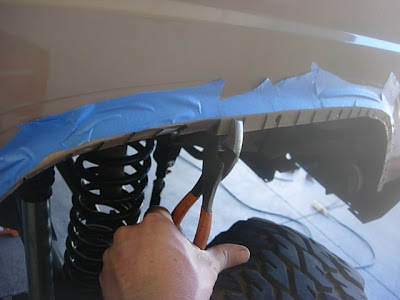
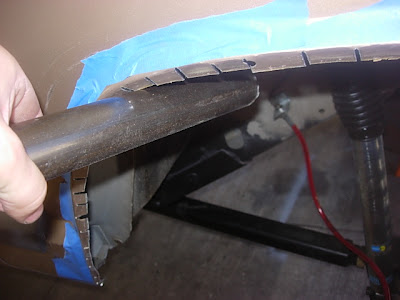
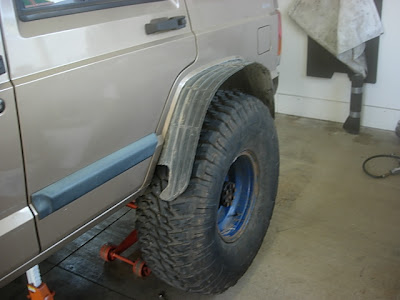
temporary fender flares and mud flaps

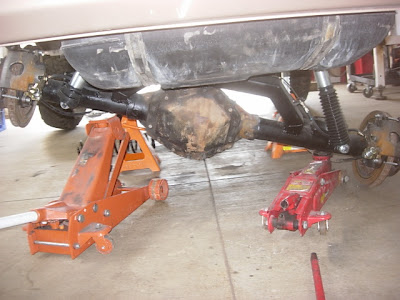
some shots of flexing without springs to figure out bump stops;
this shows that I still need to cut more...
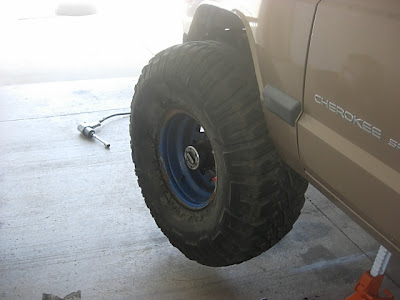
rear full compression
full articulation no springs no tires (Man I need to build a ramp...)
full album still here;
http://picasaweb.google.com/thenag/TanjaAndNathan#
Nathan
-99 xj body by jeep, everything else...
build thread... you looking at it
Wednesday I got my custom axle shaft back (the first one had a bad forging or something, I didn't have to pay for a new one but it makes not want to buy Moser in the future) I also got another pitman arm and successfully tapper-ed it straight and not too deep!
So what that meant is the steering is safe all I had to do was build some temporary flares and I could drive it with no exhaust!
On friday I got to drive it a good amount, partly to get some estimates from exhaust shops. Partly because I like driving it. It is incredibly cool and frighting to drive something that you have done that much work to in one shot. I kept thinking that something was going fail and I would go crashing into something/someone.
The 4.10's do ok. It is not dangerously slow. Driving with no cat of muffler threw me off a bit as far as shifts etc. I was surprised at the lack of body roll around corners. the springs are stiff but still absorb bumps pretty well. The shocks are great.
The breaks work really well. I went to a parking lot and did a few 40-0 panic stops. The rears seems to lock up a bit before the fronts but it skids in a straight line. The parking brake holds the vehicle ok but doesn't really slow the vehicle down while moving. The pedal feels like it still has a little air in it but that may also be the Caddy rear calipers not quite adjusted right.
I went into a dirt lot. I couldn't wheel since without bump stops I will smash the oil pan. And it was so hard to not flex the thing out in the little gulley that was there, but managed to not do it. I did put the 231 in low and d-300 in low. I thought 110:1 in the bronco was low, man that 127:1 in the jeep is stupid low. I let the clutch out and thought I was in neutral, I didn't realize I was moving!
The a/c still works great!
So before I do a test wheeling run I need bump stops and exhaust.
As near as I can figure I am going to get one of these, (I'll call it a "kitten")
http://www.magnaflow.com/02catalyti...rttype=SPUN-CAT UNIVERSAL CATALYTIC CONVERTER
It says it is EPA certified and OBDII certified. Is anyone running one of these on a newer 4.0L? Do you pass emissions?
If I can get exhaust on it test run will probably be rattle snake or mineral basin on 8/6 or 8/7.
Before we do too much we need bumpers, sliders. I am going to pay Terry at Ridgedco for those.
here are some pics;
sway bar disconnects
some cut and fold action
temporary fender flares and mud flaps
some shots of flexing without springs to figure out bump stops;
this shows that I still need to cut more...
rear full compression
full articulation no springs no tires (Man I need to build a ramp...)
full album still here;
http://picasaweb.google.com/thenag/TanjaAndNathan#
Nathan
-99 xj body by jeep, everything else...
build thread... you looking at it
sixstringsteve
Well-Known Member
- Location
- UT
It is incredibly cool and frighting to drive something that you have done that much work to in one shot. I kept thinking that something was going fail and I would go crashing into something/someone.
I know that feeling well. I'm always afraid I forgot to torque something important. But then I think about all the dumb kids out there who work at tire shops that forget to torque their bolts, and stuff falls apart. I can't be worse than them.
Looking really good!
RockChucker
Well-Known Member
- Location
- Highland
jeep is looking great, as to that cat. my dad just bought one for his jeep b/c it was relatively cheap, and according to the website, it would be enough for the 4.0L. we went to meineke on 33rd and state in sl, and they wouldn't do it because it was not specifically made for that vehicle. they said it would throw a cat code and all that. plus they wanted a pretty large sum of money for it. we ended up getting the TJ specific one that we was a little more expensive, but we could do it ourselves. but that cost really isn't too big of a deal for you though since your are needing a whole exhaust. i would call exhaust shops and see what they have to say so you don't end up with a cat you probably could use and be fine, but they won't install it for you.
DaveB
Long Jeep Fan
- Location
- Holladay, Utah
I have several OBDII cats laying around, from TJs and ZJs.
jeep is looking great, as to that cat. my dad just bought one for his jeep b/c it was relatively cheap, and according to the website, it would be enough for the 4.0L. we went to meineke on 33rd and state in sl, and they wouldn't do it because it was not specifically made for that vehicle. they said it would throw a cat code and all that.
Had a guy at a Master Muffler tell me about the same thing, basically tried to sell me a $400.00 cat. However he was the first guy I talked to that said it will need to have some restriction in it to have good torque. I hope Ray's is open today and all the police between here and bountiful are still sleeping I want to talk to those guys...
I have several OBDII cats laying around, from TJs and ZJs.
Thanks, I think I am going to go new on this one. Especially that little magnaflow, it is tiny.
nathan
Seven
Active Member
- Location
- Ogden southside
I put the following magnaflow cat on last summer and it hasn't thrown any codes. I know it is not what you posted, however mine was a magnaflow universal cat.
http://www.summitracing.com/parts/MPE-23226/#sf
http://www.summitracing.com/parts/MPE-23226/#sf
I put the following magnaflow cat on last summer and it hasn't thrown any codes. I know it is not what you posted, however mine was a magnaflow universal cat.
http://www.summitracing.com/parts/MPE-23226/#sf
Yeah that looks like more of what is recommended to run. I think I will go with something like that. The guy that was at Mr. Muffler seems like he won my business at this point.
Saw this thing today I think on 54th and 40 west about 30 minutes ago. Looks good
Thanks,
I am sure you heard it too.
Nathan
Well it goes in Monday for an exhaust system.
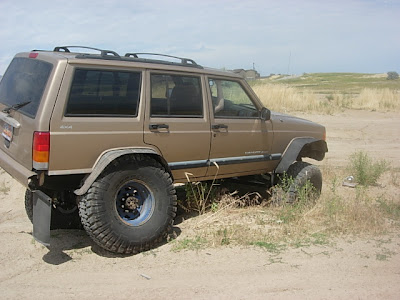
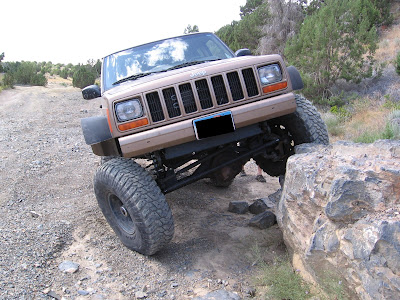
We couldn't help but take it out real quick since I got the bump stop extensions in so here is the mandatory flex poser shot;

I installed some hockey pucks to extend the bump stops, I also decided the only thing that is really stupid about the Clayton rear kit is that if it compressed all the way two bolts would likely hit instead of the two plastic pieces that should hit. anyway mine will hit hockey pucks. I probably over thought these. And I really don't know why I didn't just use a piece of all-thread through the middle and to hold the coil bucket on... There is not a nut to hold the pucks down, I put some RTV to hold the pucks together but they just sit there. I doubt they will move at all.


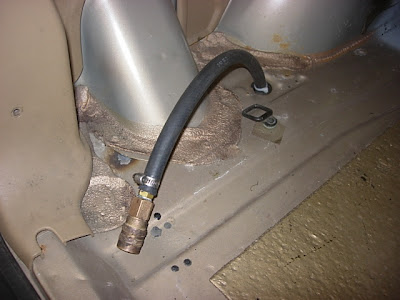
I started to finish off the OBA system. I plumbed in everything on the compressor; pressure switch, safety pop-off check valve, oil separator and a coupler to hook up to an air hose.

I ran an air line all the way to the back, I had a free clip that should work nice for it.
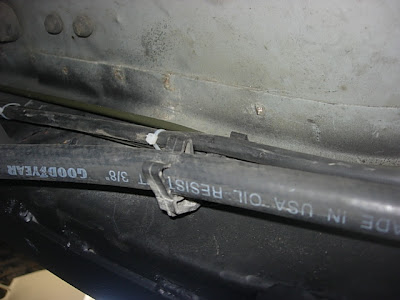
Chrysler provided me with a hole for the air line to come through;
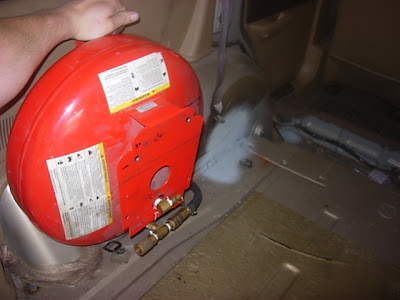
and I will somehow mount this tank where the spare used to be for a temporary tank;
I then installed these two switches, power for the york clutch and the other will power a solenoid to air shift the 231. The black one is a momentary on-off-on rocker. When you push it up the air cylinder will extend, when you push it down the air cylinder will retract... hopefully, I still don't have the solenoid.
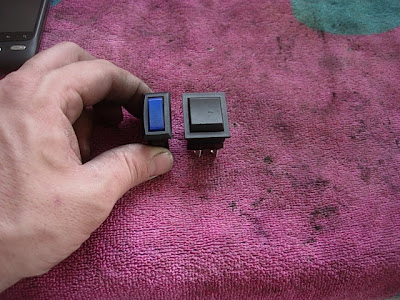
I modified the console, I took out one of the cigarette lighters, I used the power from that to power the two switches. It is only on when the the key is on and has a separate 25 amp fuse. I also removed the fog light switch. The flash really makes that panel look worse than it really does.

Tomorrow I should be able to get the air tank mounted and if the exhaust is done by the end of the week we will be doing a few laps around rattle snake on the weekend...
nathan
99 xj
build thread... here
We couldn't help but take it out real quick since I got the bump stop extensions in so here is the mandatory flex poser shot;
I installed some hockey pucks to extend the bump stops, I also decided the only thing that is really stupid about the Clayton rear kit is that if it compressed all the way two bolts would likely hit instead of the two plastic pieces that should hit. anyway mine will hit hockey pucks. I probably over thought these. And I really don't know why I didn't just use a piece of all-thread through the middle and to hold the coil bucket on... There is not a nut to hold the pucks down, I put some RTV to hold the pucks together but they just sit there. I doubt they will move at all.
I started to finish off the OBA system. I plumbed in everything on the compressor; pressure switch, safety pop-off check valve, oil separator and a coupler to hook up to an air hose.
I ran an air line all the way to the back, I had a free clip that should work nice for it.
Chrysler provided me with a hole for the air line to come through;
and I will somehow mount this tank where the spare used to be for a temporary tank;
I then installed these two switches, power for the york clutch and the other will power a solenoid to air shift the 231. The black one is a momentary on-off-on rocker. When you push it up the air cylinder will extend, when you push it down the air cylinder will retract... hopefully, I still don't have the solenoid.
I modified the console, I took out one of the cigarette lighters, I used the power from that to power the two switches. It is only on when the the key is on and has a separate 25 amp fuse. I also removed the fog light switch. The flash really makes that panel look worse than it really does.
Tomorrow I should be able to get the air tank mounted and if the exhaust is done by the end of the week we will be doing a few laps around rattle snake on the weekend...
nathan
99 xj
build thread... here
Wow I can't believe it has been more than a month since I updated.
August is a hectic month at work for me, The jeep has gotten some on and off road miles on it. Some flaws are showing a little, but mostly it kicks ass.
I will start with exhaust, I had Mr. Muffler in SL do the exhaust work, I am mostly happy with it, I mean I don't see any thing he could have done differently. He modified the stock down pipe then it was all new after that. He used a 3.5 inch glass pack that is like 30 inches long. It sounds really nice, not too loud or anything, still sounds like 4.0L just not stock...


exhaust is surprisingly hard to take pictures of...
The air shifting for the np231 is working well so far. Pretty much we shift it into low when we air down then shift the d300 between high and low, and front and rear on the trail.
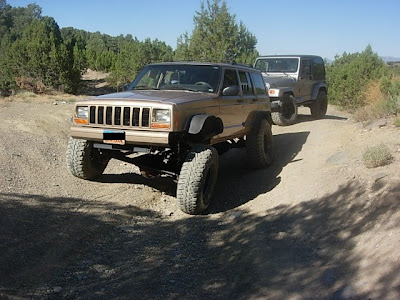
A couple pictures of the maiden off road voyage to RS. I was psyched it made it there and back, I knew the trail would be easy. (without bumpers or rock sliders Constrictor will have to wait)
The front fenders needed to be cut more, which I expected, the front axle yoke got into the exhaust down pipe which I didn't expect, and Mr. Muffler "clearanced" the down pipe a bit, which meant heat it up and beat it with a hammer, much like team CAD did from the factory. (not pictured cause I forgot to take pics). Also the d300 Rear stick in Low range hit the bezel in the console so I had to adjust the stick so it leans back a bit more.
modified and all painted up
and a pic of the bezel with the OEM 4WD stuff painted over (rear stick not installed... the paint was drying on the stick)
I am having an issue with sway bar links, well I am not sure what is going on. The ends that are welded to the axle bend so that the pin for the sway bar is pointing down a bit. I adjusted the length of the sway bar disconnects and we will see if that helps, Other than that I guess I will have to gusset the sway bar tabs on the axle.
We went up Mineral Basin on 8/19/11 and didn't take any pictures. I did get a little hung up in the rock garden but other than that the jeep did great.
Then we went to Rattlesnake on 8/20/11. This time the only pics we got were on the poser rock. (so here ya go...)


The Cruise Control doesn't work right now for some reason, the only things I messed with since it worked are; brake master cylinder, exhaust (I need to test vacuum), and charcoal canister...
I gave Terry at Ridged Co. a deposit for bumpers today, we are going back out to Rattle Snake tomorrow.
The thing seems really stable for how high it is, on and off road. I guess a combination between good shocks and slightly stiff springs. On the highway it is obvious there are no bushings on the front end (just Jonny Joints). There is constant road vibration. The A/C still works great. The PS pump seems happy with how little belt contact it has.
I am getting sick of jumping in and out of it so I may have to put a small nub on the up coming rock sliders to aid with getting in and out, I don't care if it is a rock grabber at this point.
Nathan
-99 xj
build thread... your looking at it...
August is a hectic month at work for me, The jeep has gotten some on and off road miles on it. Some flaws are showing a little, but mostly it kicks ass.
I will start with exhaust, I had Mr. Muffler in SL do the exhaust work, I am mostly happy with it, I mean I don't see any thing he could have done differently. He modified the stock down pipe then it was all new after that. He used a 3.5 inch glass pack that is like 30 inches long. It sounds really nice, not too loud or anything, still sounds like 4.0L just not stock...
exhaust is surprisingly hard to take pictures of...
The air shifting for the np231 is working well so far. Pretty much we shift it into low when we air down then shift the d300 between high and low, and front and rear on the trail.
A couple pictures of the maiden off road voyage to RS. I was psyched it made it there and back, I knew the trail would be easy. (without bumpers or rock sliders Constrictor will have to wait)
The front fenders needed to be cut more, which I expected, the front axle yoke got into the exhaust down pipe which I didn't expect, and Mr. Muffler "clearanced" the down pipe a bit, which meant heat it up and beat it with a hammer, much like team CAD did from the factory. (not pictured cause I forgot to take pics). Also the d300 Rear stick in Low range hit the bezel in the console so I had to adjust the stick so it leans back a bit more.
modified and all painted up
and a pic of the bezel with the OEM 4WD stuff painted over (rear stick not installed... the paint was drying on the stick)
I am having an issue with sway bar links, well I am not sure what is going on. The ends that are welded to the axle bend so that the pin for the sway bar is pointing down a bit. I adjusted the length of the sway bar disconnects and we will see if that helps, Other than that I guess I will have to gusset the sway bar tabs on the axle.
We went up Mineral Basin on 8/19/11 and didn't take any pictures. I did get a little hung up in the rock garden but other than that the jeep did great.
Then we went to Rattlesnake on 8/20/11. This time the only pics we got were on the poser rock. (so here ya go...)
The Cruise Control doesn't work right now for some reason, the only things I messed with since it worked are; brake master cylinder, exhaust (I need to test vacuum), and charcoal canister...
I gave Terry at Ridged Co. a deposit for bumpers today, we are going back out to Rattle Snake tomorrow.
The thing seems really stable for how high it is, on and off road. I guess a combination between good shocks and slightly stiff springs. On the highway it is obvious there are no bushings on the front end (just Jonny Joints). There is constant road vibration. The A/C still works great. The PS pump seems happy with how little belt contact it has.
I am getting sick of jumping in and out of it so I may have to put a small nub on the up coming rock sliders to aid with getting in and out, I don't care if it is a rock grabber at this point.
Nathan
-99 xj
build thread... your looking at it...
Last edited:


XJEEPER
Well-Known Member
- Location
- Highland Springs
Not sure if you've seen this already, but here's the write-up that T&T Customs did on their XJ, with body mods to accommodate 37's.
http://www.naxja.org/forum/showthread.php?t=1032532
http://www.naxja.org/forum/showthread.php?t=1032532