General Tech What did you work on Today?

Troop92

Well-Known Member
Location
Layton, UT
No pictures, but Saturday I changed the oil in my commuter, wife's minivan, and the Jeep. I've never had all three vehicles hit in the same day. I'd shudder to think what that would have cost me through a reputable shop or dealer.

It was nice to spend time in the garage with the extra illumination from a few weeks back and with my new torpedo kerosene heater. Took the sting out of my poorly sealed/insulated garage while I was puttering around.
 

zmotorsports

Hardcore Gearhead
Vendor
Location
West Haven, UT
I didn't get anything done in the shop last night but I worked on something I've wanted to get done for a few years now on the outside of the house. The lack of lighting outside has bugged me about this house so I finally got around to it last night with the help of a friend.

On the west side of the double deep (50') third bay on the house garage, there is absolutely NO lights. I don't know what the original owners were thinking (well, like everything else, they weren't thinking) but if I were building this house I would have installed lights along the third bay of the house garage to light up the side yard.

In the summer months with the longer days it isn't too awfully bad but with these short winter days and by the time I get home from work to clear snow the daylight is gone, I've needed some extra light alongside the approach back to the shop from the gate. Also when we either get home late from vacation with the coach or we have friends arrive later in the evening to stay with us having some extra light to use when backing the coach into the back yard would be very beneficial. I've wanted to add these lights for the past couple of winters but haven't had the time and then summer rolls around and it becomes less important. Since my neighbor put up his detached garage and added the roof I've noticed it gets darker on the side of my place sooner with his shop somewhat blocking some sunset light. Now was as good a time as any to address this once and for all.

Last night a friend and I added 2 LED wall packs to the west side of my third bay and one LED wall pack to the south wall just above the man door aimed at the shop. The LED flood lights on the shop reach about halfway to the house and now these LED wall packs will fill in the void for full light between the house and the shop as well as from the house nearly all the way to the fence and onto the lawn in the side yard. This was the final piece of the puzzle that makes the place feel like it's perfect now. One thing I always loved about my last place was how much light I had outside when needed and now I have that here as well.

Installing the LED wall packs to the exterior.
b50be3f2d6d19b940d334ed840e55610.jpg


Installation completed and picked up the mess from installation.
4ac4eda8fd36753d14a67ff158cc9c8d.jpg


Trying them out just as the sun was about to go down.
33825f90182373248374fd44cb87dd87.jpg


We surface mounted the EMT inside the garage plus added an electrical outlet so I can plug in the timer for my rear sprinkler system and no longer need an extension cord to reach the next outlet.
55ca976242182fb3347162bb3ccf8890.jpg


ff68ee17cef160b18814d47f08289115.jpg


Lights on at dusk.
9da70d1dc23c35b3682efaa4dfe402c7.jpg


From the front looking into the back yard.
126a0c4457c50e3a6e2be9cc364b54b0.jpg


Showing the wife how well they work after complete darkness.
09003a1969ea828e4f44b0057263044e.jpg


0dbe63e515b8369a2cbf93bcbad2211a.jpg


Thanks for looking.

Mike
 

zmotorsports

Hardcore Gearhead
Vendor
Location
West Haven, UT
I had a guy that I did some work for about ten years ago when I had my business contact me via one of my YouTube videos over the weekend. Evidently he only had my old phone number which is no longer active. He had a small job but was desperate and asked if I would be willing to help him out.

He had an LS cylinder head with a broken exhaust manifold bolt that also had half of a easy-out broke off in it and asked if I could remove them.

935bbf79d6d5215ea688eac9a296ca79.jpg


e6453f1e9ee9c67fa6c2689b21ab62fd.jpg


50ab1336c1cb8197c584fabea1dd7442.jpg


39a00b3af034550ffed881b867cd27c8.jpg


02134115168bd5819dcf4b05f38c5bf7.jpg


6f98bedeb4c1f6d107c2f775fb41424b.jpg


1c9c97b9189e7ee9c05e82490e916938.jpg


ba454c919183143b2c8272bc480e80d3.jpg


e0ab5f120e63d5f7f9832baed147cec3.jpg


c6e1ffa8d6bec54935587d3ace830b96.jpg


Another successful bolt extraction.

Mike
 

RockChucker

Well-Known Member
Location
Highland
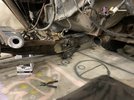
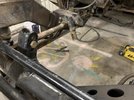
Designed and fabbed a new frame side upper control arm mount. This will improve front geometry by reducing anti dive and allow for better bolt access to remove it without removing the exhaust. Just tacked in for now. Want to make sure everything clears like I think it will when I sink the motor back in. I still need to clean the frame and paint while the motor is out. Ugh. 28D70918-2483-455A-B549-B45BA5D63505.jpeg
F7CA58FA-E2A3-4522-A2F9-E3E0EDCBF84D.jpeg
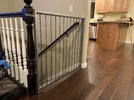
Since our baby is very close to crawling, I started building a baby gate for the stairs. Turns out I hate all the ones you can buy and didn’t want to be cussing at a latch every time I need to go downstairs.
B993BBDA-38B6-47BB-B470-106134BC0630.jpeg
 

N-Smooth

Smooth Gang Founding Member
Location
UT
Designed and fabbed a new frame side upper control arm mount. This will improve front geometry by reducing anti dive and allow for better bolt access to remove it without removing the exhaust. Just tacked in for now. Want to make sure everything clears like I think it will when I sink the motor back in. I still need to clean the frame and paint while the motor is out. Ugh. View attachment 133732
View attachment 133733
Since our baby is very close to crawling, I started building a baby gate for the stairs. Turns out I hate all the ones you can buy and didn’t want to be cussing at a latch every time I need to go downstairs.
View attachment 133734

I love the cut-out on the motor mount for maximum up travel. that's money.

My advice with kids and stairs is make sure the kiddo isn't a complete stranger to them. We didn't do baby gates for our last two kids and just taught them that stairs are dangerous and showed them how to handle them. It's interesting to see the difference it makes.
 

glockman

I hate Jeep trucks
Location
Pleasant Grove
Designed and fabbed a new frame side upper control arm mount. This will improve front geometry by reducing anti dive and allow for better bolt access to remove it without removing the exhaust. Just tacked in for now. Want to make sure everything clears like I think it will when I sink the motor back in. I still need to clean the frame and paint while the motor is out. Ugh. View attachment 133732
View attachment 133733
Since our baby is very close to crawling, I started building a baby gate for the stairs. Turns out I hate all the ones you can buy and didn’t want to be cussing at a latch every time I need to go downstairs.
View attachment 133734
Nice work on the baby gate. I also like your garage floor art.


What is the tubing coupler on the motor mount? Skid plat? if so, do you have any good pics of it?
 

zmotorsports

Hardcore Gearhead
Vendor
Location
West Haven, UT
I made more progress on the White Mountain ice cream maker last night.

Made a collar to grasp the splined shaft in the 6-jaw chuck.
d33b125a3f087907b79bae4f9b32605c.jpg


ebc0c3ef9557fae483b0f89d565292cf.jpg


Facing the splined shaft to length.
456e8d892cb36d546f71678b76eddbd3.jpg


Machined to length and turned down to the minor diameter. I left the minor diameter slightly oversized to compensate for the wear in the housing.
8fa3566c00719656c0f6c8663bcb21f3.jpg


Perfect fit with no play.
3b5ffbb4f385d2bed26e65b8edf6f344.jpg


This part is completed and ready for assembly.
7858588147c4efb8524fe874b8b829fd.jpg


After welding up the output gear with silicon bronze I chucked it up in the 6-jaw and turned to diameter and faced.
1287c01ea0f9b20a86ec799418bc66e1.jpg


e0f97720274e31f913af54e316e22e51.jpg


0e86da5dd3a51dc56fc7bfe9fdfbb9cb.jpg


Ready to start cutting teeth.
6083b0f8b854991a6916f61c3e1fbcfb.jpg


Scrap piece to make a mandrel to space the gear out away from the chuck in the dividing head.
5cae6ac6803d25e5f80414fe12b70daf.jpg


Mandrel faces, drilled and tapped to hold the output gear.
2b8080f24be8f9af0301bc2c4d32011d.jpg


4ec89612480d10db2d51bd45ead5cbae.jpg


Set up in the dividing head on center and to the correct depth.
242f5d8f5cabd0faba2eeb188d20ae84.jpg


Now to calculate the tooth count and I’m ready to cut some teeth and finish this project up and return to its owner.

Thanks for looking.

Mike
 

frieed

Jeepless in Draper
Supporting Member
Location
Draper, UT
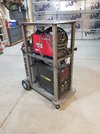
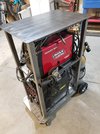
Got the majority of my new welding cart finished this week.
Still need to get the drawer mounted under the top and figure out some cable hooks.
Paint will have to wait till it gets a little warmer.

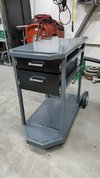
Drawers are the best thing ever in a welding cart.

20180208_075443.jpg

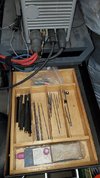
Get a silverware drawer organizer to hold your tungsten and stuff


20201229_220205.jpg

Mine are 20" front to back on 24" full extension slides to extend the back of the drawer past the top handle for the cart.
If I were to do it again, I'd put two vertical handles on it...

20201229_220222.jpg
 
Last edited:

glockman

I hate Jeep trucks
Location
Pleasant Grove
Drawers are the best thing ever in a welding cart.

View attachment 133873

Get a silverware drawer organizer to hold your tungsten and stuff


View attachment 133871

Mine are 20" front to back on 24" full extension slides to extend the back of the drawer past the top handle for the cart.
If I were to do it again, I'd put two vertical handles on it...

View attachment 133872
Nice. I built the drawer, it's 12x20 but only 3" deep. I had planned to use 22" soft close slides, now that you mention it, maybe I'll go with 24" slides.
I was planning some sort of divider for torch and mig gun parts as well as silver pencils and other welding specific small parts.
I also have to fold up a box for the outlets like Ilean did.
 
Top