General Tech What did you work on Today?

UNSTUCK

But stuck more often.
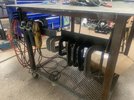
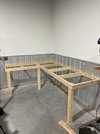
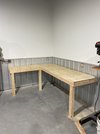
I’ve wanted to organize my grinders and some clamps on my welding table for a while now. On Friday I had to cut down a long bed ladder rack to fit in a short bed pickup. As luck would have it I cut out two pieces of angle iron frame in the lengths I needed to fit between my table legs. I welded up the ladder rack and finished that job. Feeling motivated I jumped on my table project.
In the process I decided to sacrifice an extension cord to make my power strip longer as I hated always plugging a cord into it.

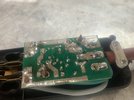
I took the power strip apart and soldered in the new extension cord for it.
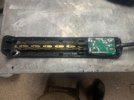
IMG_4598.jpeg
IMG_4601.jpeg

The power strip powers up and verified to be working right.
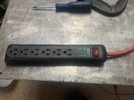
IMG_4603.jpeg

I then welded my two pieces of angle iron together, opposite of each other. One side to hang my grinders on and the other to hang clamps on.
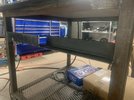
IMG_4605.jpeg

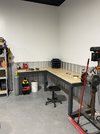
The finished project.
IMG_4606.jpeg
 

Herzog

somewhat damaged
Admin
Location
Wyoming
I’ve wanted to organize my grinders and some clamps on my welding table for a while now. On Friday I had to cut down a long bed ladder rack to fit in a short bed pickup. As luck would have it I cut out two pieces of angle iron frame in the lengths I needed to fit between my table legs. I welded up the ladder rack and finished that job. Feeling motivated I jumped on my table project.


The finished project.
View attachment 164585
Nice, gonna steal angle iron that idea!
 

STAG

On my grind
Location
Pleasant Grove
Messing with some more forged carbon fiber. This is an experimental automotive part.

3D printed mold.

View attachment 164571

1/4” chopped carbon tow
View attachment 164572

Slow-cure epoxy resin
View attachment 164573
Fill hole
View attachment 164574
Compress overnight
View attachment 164575
So this was both a success and a fail.


I got a successful, useable carbon fiber part. It actually looks about as good as I really could have hoped for.

The failure though is that the mold got destroyed in the process of removing the CF part.

Last time I did a forged CF part, I sprayed the mold with an automotive (1k) clear coat to act as a sealer. This time I didn’t do that and I just relied on PVA mold release. Turns out I don’t think that was enough.

The resin ended up penetrating the 3D printed mold a little bit and making the plastic very brittle.

I think on the next part of the mold I will try a 2k clear coat as a sealer, then if that’s a success then I may even look into making aluminum molds.
 

JeeperG

Well-Known Member
Location
Riverdale
This here is some of the finished interior panels, used ABS plastic, wrapped in foam and leather, installed some clips to snap it all in.
PXL_20231006_195942006.jpg
I like seeing shiny stuff come together
PXL_20231006_212021918.jpg
Should be dialed in close to ride height, that'll change some with wheels and tires and final adjustments. You can see I'm going to be blowing a lot of dust up under that bed.
Probably gonna have to drain that 9" won't stop dripping.
PXL_20231006_220541563.jpg
 

_Auzzy_

Current Rig: 12W Boots
Location
Richfield Utah
Finally took some time to do some much needed maintenance on my lady’s fiat. Changed the oil, cleaned the air filter, rotated tires, checked brakes, all that jazz. But the high light of it all was I got bored and realized there were no tow points on the front lol so I made these. 1/4” plate with 1/2” of material around the holes and enough room to get a shackle or 3/8 hook it. Made internal sleeves and giant washers for the top to sandwich it all together with 1/2” bolts. Amazingly the square tube I bolted them to that’s the “bumper brace bars” are actually 3/16” thick aluminum with internal bracing and are 2.5”w x 2.125”h so yeah not too worried about them getting hurt. Plus the car weighs like 2900lbs so yeah I over killed it. Sadly didn’t take any pics of the inner workings etc but here’s a crap shot of the finished product. She’s ready to nerf the ditch this winter now

IMG_0714.jpeg
 

NYCEGUY01

Well-Known Member
Location
Willard, UT
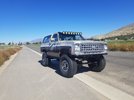
Finally putting some miles on it.
Got the rear shock mounts welded on, front fenders trimmed, fixed the brake light switch, chased a bad stereo wire, added wipers, replaced the plug wires that were arcing, blah, blah, blah...lol

Still have a good sized list of to-do's but getting closer and I drove it to cars and coffee .

My tape measure alignment seems good to go and the beads in the tires must be working as it rides nice and smooth...

blaze.jpg
 

zmotorsports

Hardcore Gearhead
Vendor
Location
West Haven, UT
Finally putting some miles on it.
Got the rear shock mounts welded on, front fenders trimmed, fixed the brake light switch, chased a bad stereo wire, added wipers, replaced the plug wires that were arcing, blah, blah, blah...lol

Still have a good sized list of to-do's but getting closer and I drove it to cars and coffee .

My tape measure alignment seems good to go and the beads in the tires must be working as it rides nice and smooth...

View attachment 164875


Looking good JJ. Nice stance to it.
 

SLC97SR5

IDIesel
Location
Davis County
My 211k '97 4Runner had developed a slight intermittent buck, mild misfire feeling when going up hill under moderate load. It never set a code or flashed a CEL. I cleaned the MAF, gave it a LOF and swapped the fuel filter. Nothing improved but the other day after coasting downhill and quickly accelerating into traffic it fell on its face and would only regain speed if I feathered the throttle. I think I've got it narrowed down to a failing TPS. The resolution on the ScanGauge II is not great but the DVOM shows some opens during the sweep. I can't imagine how many times the little wipers in the TPS have gone back and forth.
View attachment 162568View attachment 162569
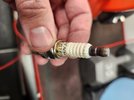
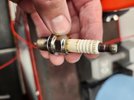
Well the TPS only temporarily resolved the surging feeling, it happened again the other day. Still no MIL or codes. After double checking my work I removed the plugs and found the culprit. All 6 were worn evenly and looked really nice except for this sucker.
20230909_090951.jpg20230909_090945.jpg

It was the only one with carbon tracking.
The 3 coils tested in spec and all of the boots and grommets are still supple. Replaced the six plugs after gapping them although NGK/DENSO say they are pre-gapped...well they are they were just all different from each other.
20230907_213008.jpg

It has been 500ish miles and all seems ok.
 

STAG

On my grind
Location
Pleasant Grove
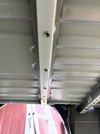
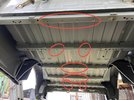
Installed 14 of these 1/2” rivnuts. It’s one of those projects I’ve been delaying because I thought it would bring the suck.

It actually went really easy. I find that to be the case with most of those ‘potentially sucky’ projects I delay.

687C8E93-8904-4AA8-BB6E-1C48CEBB6A02.jpeg
23C5E25B-76D9-46F0-8BA4-41AC7F0275C7.jpeg

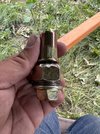
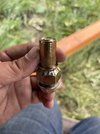
Here’s my setup. From top to bottom you’ll see:

•Rivnut
•9/16” ID conical lugnut (9/16 so it’s a slip-fit past the 1/2” bolt) with grooves cut into the taper so it bites on the face of the rivnut to prevent slippage
•roller-bearing thrust washer with 1/2” ID
•1/2” flange head bolt with anti-seize on the threads
FE474E97-89E7-446B-A97E-5FC5F07FA496.jpegACD7C9F9-ED55-46E2-8A95-B8E9A3A8380B.jpeg
 
Last edited:

Tonkaman

Well-Known Member
Location
West Jordan
Installed 14 of these 1/2” rivnuts. It’s one of those projects I’ve been delaying because I thought it would bring the suck.

It actually went really easy. I find that to be the case with most of those ‘potentially sucky’ projects I delay.

View attachment 165050
View attachment 165053

Here’s my setup. From top to bottom you’ll see:

•Rivnut
•9/16” ID conical lugnut (9/16 so it’s a slip-fit past the 1/2” bolt) with grooves cut into the taper so it bites on the face of the rivnut to prevent slippage
•roller-bearing thrust washer with 1/2” ID
•1/2” flange head bolt with anti-seize on the threads
View attachment 165051View attachment 165052
Great idea! I’ll have to try that method.

I bought a Rivnut tool that kinda looks like a rivet gun. It sucks! My Rachio of ruined to successful rivnuts is about 50/50.
 
Top