Hot Rod parts, off to be sandblasted!

spencurai

Vanilla Gorilla
Location
WVC,UT
Here is Rat-Rod owned by a guy we went riding with during the summer...blown big block...chopped so far you had to step into it. We were chugging on the bikes while he was following us out to the Ore-House nad I guess we weren't going fast enough because he passed us doing about 140mph. We all dropped down a gear and took off after him, I let up at 130mph because he was still pulling away from me and I kinda need my driver's license for work...:rofl::ugh:
 

Attachments

  • Jamesratrod.jpg
    Jamesratrod.jpg
    128.1 KB · Views: 77
  • Jamesratrod2.jpg
    Jamesratrod2.jpg
    155.2 KB · Views: 51
Last edited:

hambone

web wheeler
if your into stuff like that you should check out the shifters viva las vegas car show at the gold coast casino. bad part same week as EJS every year. there are some sweet car at that show.
 

Greg

Make RME Rockcrawling Again!
Admin
Time for an update! Or... "how to build frame rails in an afternoon!" :D

I got off early today & decided to take the 2 pieces of 2 x 3 x .120 wall rectangular tubing and build some frame rails. I have had the tubing sitting in the garage for a couple months now while I was thinking about the best way to build the frame. I've never build a frame from the ground, up so this was something new to me. So far it's been a great learning experience.

I decided to "Z" both the front & rear, which will hopefully make the suspension sit higher & allow the body to sit very low. I took the 2 pieces of channel, which are 14' long, and laid them side by side. Once both pieces were level I clamped them together and tack welded each section that was going to be cut out, top & bottom.

1003294wu1.jpg


1003299uz7.jpg


The center of the frame, where the body will sit, was measured out at 48" on the top. From there I made 4 cuts on the chop saw, each at a 75* angle. On the front I cut 10" out of the frame. The back had 18" cut out of it.

After getting the tubing cut into 5 pieces, I had to mock it up to see if I liked the layout. Here's how it looked.

1003300dv0.jpg


1003301vy8.jpg


1003302mx3.jpg


Looks great!! I was getting excited at this point! Next up was welding the pieces together. I wanted to make sure the frame was as level as it could be, but I don't have a fancy frame jig or a welding table. I did have a piece of metal I bought years ago for a project that is long gone & haven't been able to part with it. I thought it would come in handy, and did it! It's some 3" x 3" square, 1/4" thick tube. I decided to tack my center frame piece onto the 3x3 and add the kickups from there out, measuring as I went. From the kickups, I worked my way to the front, then the rear. Once it was all tacked into place, I checked the heights again, then started welding the joints together.

1003306vd7.jpg


The cuts allow for 6" from the bottom of the frame to the ground on the front Z and 13.5" from the bottom of the frame to the ground on the rear Z.


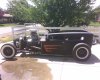
After I had welded up the visiable joints, I got out the grinder & cut the tack welds that were holding the rails to the 3x3 as well as holding the rails together. I seperated them and set 'em up to see what they looked like.

1003310sq1.jpg


1003311hx8.jpg
 

Greg

Make RME Rockcrawling Again!
Admin
Here's the Farmall tractor grill, after recently being slathered in flat black from a rattle can, :cool:

1003313hi4.jpg


And since I now had frame rails, I just HAD to set up the tub & grill. The grill is further forward and higher from where it will sit once it's completed, but you get the idea.

1003314un8.jpg


1003315ow4.jpg


1003316tm5.jpg


In this picture, the rear frame rails are about 10" too long. They need to be trimmed, gonna do that tomorrow.

1003317bi7.jpg


Tomorrow I'll be adding 3 crossmembers and capping the opened parts of tube in the frame. Next up... suspension & drivetrain mounts!
 

Greg

Make RME Rockcrawling Again!
Admin
NICE!!!!

so when are you chopping the Farmall grill? :)

I'm going to leave it relativley as-is. I will need to trim the sides, on the bottom so it will slide down in between the frame. Other than that, it's going to remain close to as you see it.
 

Tacoma

Et incurventur ante non
Location
far enough away
so it's gonna sink a bit towards the ground... but is it going to stick up that high above the cowl height??? might look funky.... in a bad way.

eh, it's nothing that can't be fiddled with later. I can't wait to see this thing done! Definitely going to stop by when I'm down there.
 

Greg

Make RME Rockcrawling Again!
Admin
so it's gonna sink a bit towards the ground... but is it going to stick up that high above the cowl height??? might look funky.... in a bad way.

eh, it's nothing that can't be fiddled with later. I can't wait to see this thing done! Definitely going to stop by when I'm down there.

No, it'll sit level with the cowl!! READ!! I've mentioned this at least 3 different times!

Guess its hard to explain, but it'll look right. Trust me. :D
 
Top