Jeep Project "Culpepper" 5.2L V8 Swap

Slangy

Sgt. CulPepper
Location
Utah
So does the radiator you got have a built in trans cooler or are you going with a separate cooler?
The project is looking good though... now on to the pesky wiring

Yeah the radiator has built in cooler lines so I won't be using a seperate cooler unless down the road I start having issues with it. As for the wiring I am getting a little nervous but I have been asking Jordan at JRTOffroad which is out of Alabama and am hopefully going to get something started on the harness here in the next few days. Let's hope I don't screw anything up since I am on a pretty tight deadline. My wife asked me the other day why the hell I always wait until the last month to start a project before we head to Moab. I just told her, that is what it's all about, if I didn't wait until the last minute, that last month until Moab would drag on forever.:D

I just ordered my motor mounts from Backwoodsoffroad and they should be on there way tomorrow.:)

I just hope I can do a good write-up for everyone following this so everyone has some good information incase they are wanting to do this swap as well.
 

Slangy

Sgt. CulPepper
Location
Utah
What is the difference between the Summit headers and Backwoods' headers besides price?

Not sure, but Backwoods are chrome and from the looks of them they tie into each other a bit different than mine do, and the obvious $320 price difference. Mine are just the summit racing brand that are not cleaned up all fancy:-\
Jordan of JRT used the summit brand and has had good luck with them so I decided I would give them a try. Here is a link to his build, I have been using his TJ as example. Obviously mine will not be as clean as his judging by the pictures of what mine looks like right now, although I am going to try to clean the engine bay up so it is semi nice and clean.
http://www.rubiconownersforum.com/phpbb3/viewtopic.php?f=23&t=67905&hilit=installed+power+adder
 
Last edited:

Slangy

Sgt. CulPepper
Location
Utah
Last night I went and bought my Auto shifter assembly, handle, gear indicator bezel, shift cable, brake pedal assembly and shift cable bracket for the transmission. I cleaned it up the best that I could and bolted into place, now all I have to do is get the stupid handle off so that I can put the molding back into place. Since I started with the manual transmission I didn't have an existing light wired to molding, so I will have to rewire it so that when my lights come on I can see what gear I am in. Should be a fairly small job considering the mass amounts of wires I am going to have to dig through to get the two harnesses meshed together.:D

I went and bought a new water pump and plug wires. I am amazed the Durango would actually start because the wires were all shredded and looked like crap. I had to buy the water pump because I could not get the nut for the existing fan off, I figured instead of messing with it I might as well replace it while the engine was out of the vehicle.
 

Attachments

  • P3220534.jpg
    P3220534.jpg
    192.6 KB · Views: 64
  • P3220536.jpg
    P3220536.jpg
    195.1 KB · Views: 49
Last edited:

rholbrook

Well-Known Member
Location
Kaysville, Ut
The nut on the fan may be reverse threaded. To get them off you have to wedge something in between the belt and the pully and then you should be able to twist it off. May take two people.
 
Last edited:

Slangy

Sgt. CulPepper
Location
Utah
The nut on the fan may be reverse threaded. To get them off you have to wedge something in between the belt and the pully and then you should be able to twist it off. May take two people.

We tried for a minute and said to hell with it. Bent my idler pulley in the process and figured I might as well buy a new water pump and not risk breaking something else. I don't need the fan off the old water pump anyway since I will be going with an electric fan.
 

Slangy

Sgt. CulPepper
Location
Utah
Its looking good, what is the shifter assembly out of?

It's out of a 2000 Cherokee. You want to get all the parts that are associated with the cherokee to switch over into the TJ, Auto shifter assembly, handle, gear indicator bezel, shift cable, shift cable bracket for trans. Supposedly you need the brake pedal which I also bought but I am not sure if I will really end up using it, I can't see why I would need it but the kit I was looking at for this swap said it was included so I just grabbed it while I was there.
The bezel snaps right into the TJ molding right where the shift boot used to go.
 

Slangy

Sgt. CulPepper
Location
Utah
Its looking good, what is the shifter assembly out of?


Well I lied, the shift assembly out of the cherokee lined up great but the shift indicator that snaps into the existing molding is too wide. I should have known it would not be that simple. I am off to find a gear indicator bezel that is the same size as the TJ. I will let you know when I find the right one.:mad:
 

Slangy

Sgt. CulPepper
Location
Utah
Well I found a new indicator out of a wrecked TJ in Michigan. Let's hope I don't have any issues with this one.:ugh:

The UPS man showed up today with my motor mounts from Advance Adapters, now once I get the old mounts cut out I will get these bad boys welded in and we will be ready to rock.:D

Sold the 2.5L yesterday which is good because I could use the extra cash to pay for the parts I have had to buy. Tonight the engine bay will be engineless and then I can pull it out of the garagge to clean the engine bay up a little so it doesn't look so white trash. You would think I never cleaned under the hood (okay maybe I haven't for a while but who is keeping track)
 

Attachments

  • IMG_0707.JPG
    IMG_0707.JPG
    118.3 KB · Views: 23
  • IMG_0709.jpg
    IMG_0709.jpg
    125 KB · Views: 44
Last edited:

Dominic

Well-Known Member
Location
Salt Lake City
I highly suggest you slap these in with the headers. I have doug thorley headers on my 5.2L and it's a tight fit, you may have more room in the Tj but it's worth it. If the regular header bolts back out you will be going through head gaskets quickly. Install these once and don't worry about them backing out or having to retorque them. http://www.stage8.com/mopar.html
 

Slangy

Sgt. CulPepper
Location
Utah
I highly suggest you slap these in with the headers. I have doug thorley headers on my 5.2L and it's a tight fit, you may have more room in the Tj but it's worth it. If the regular header bolts back out you will be going through head gaskets quickly. Install these once and don't worry about them backing out or having to retorque them. http://www.stage8.com/mopar.html

I appreciate the heads up, I will have to take a look into getting some. Easier to put them in now then wait until I am having problems.

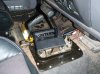
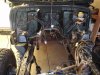
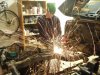
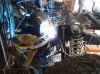
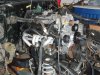
Well we had some good progress this weekend. Friday night my buddy Brett who has been helping me do the swap stayed the weekend and we got the might 4 banger pulled from it's resting place of 14 years. Came out a hell of a lot easier than the 5.2 came out of the Durango. Then we started cutting the old engine mounts off, they came off pretty good with only one incident when the grinder kicked back over bretts hand, luckily he had a good pair of gloves, all it did was cut his thumb a little nothing to dramatic. Then we took the mini sledge out and beat them off. Once they were off he ground the welds down so we can prime and repaint them so they don't rust.
Saturday was a busy day, we had a wedding at noon and a party at our house at 7. (Sorry no beer pong in the garage, we had to move it into the kitchen:D
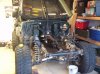
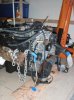
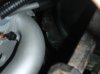
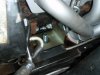
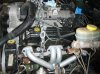
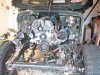
). After the wedding Brett and I took the 4 popper to the storage shed to wait til the new owner picks it up and then we were off to pick up the 5.2 so I could begin tearing off the old headers and installing the new water pump, wires and other miscellaneous crap that has to go on before I slap her into place.
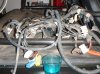
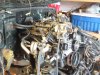
Sunday I moved the kitchen table to the side of the dining room, laid down a All A Dollar table cover and brought in the two wiring harnesses so I could begin tearing off the split loom and chasing down the wires I will be keeping. After talking to Jordan with JRTOffroad I will only be keeping a few things from the Durango harness and mending them into the TJ harness. I will be keeping all the wires that go to the engine and the PCM.
Tonight I will continue on with the harness and also start putting parts onto the 5.2, I will be pulling a few long nights since I only have util the 22nd to finish the project, oh wait I still have to outboard my rear shocks in the meantime. Oh well, we have plenty of time.....Right:eek:

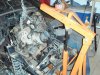
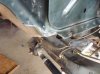
I just want to say thanks to Brett for working his ass off Friday while I was at the wedding. He got the engine bay cleaned up so it doesn't look so skanky. And please, don't make fun of him for wearing a green bandana with peace signs and little flowers,it's not his fault he forgot his bandana at home and I love to make him look like a prissy priss:D.
 

Attachments

  • P1010552.jpg
    P1010552.jpg
    181.3 KB · Views: 98
  • P1010553.jpg
    P1010553.jpg
    180.1 KB · Views: 94
  • P1010556.jpg
    P1010556.jpg
    185.4 KB · Views: 102
  • P1010558.jpg
    P1010558.jpg
    181.1 KB · Views: 95
  • P1010568.jpg
    P1010568.jpg
    174.2 KB · Views: 105
  • P3250543.jpg
    P3250543.jpg
    193.8 KB · Views: 100
  • P3250548.jpg
    P3250548.jpg
    196.1 KB · Views: 108

Slangy

Sgt. CulPepper
Location
Utah
Well nothing to crazy to report, I made a stop at a local junk yard to see if I could find a fan out of a Ford Taurus but every single car I went to the fan had been taken already. I was originally going to do the Flex-A-Lite Black Magic fan but I decided I didn't like the $300+ price tag so I am on the hunt for a Taurus with a 3.8L. But on a good note I did find a new gear indicator from an older Cherokee, I'd say 1995, it was a little sun bleache but nothing a little armor-all couldn't fix:D. I had to get a new one since the first one that I bought was out of a 2000 Cherokee and it would not snap into my console because it was to large. The new one came with a whopping price tag of $5.

I have to admit I have been pretty hesitant to start on the harnesses, but last night I put on some Pandora, grabbed a garbage can and started stripping off the split-loom from the Durango harness. I isolated all the wiring that goes to the engine, tranny and t-case. Since I am tying everything into the Jeep harness I was able to eliminate all the wiring for all the miscellaneous crap like lights and AC. It doesn't sound like a lot but believe me that was about half of the wires associated with the harness. All the wires I needed came from two of the three plugs that tie into the PCM, the wires then go to the needed sensors, plugs etc and finish by running into the fuse box. Once I disconnected the plug in the fuse box I had a little less than half the harness to focus on. I am now about 4.5 hours into the wiring and I predict I have at least 10 more hours:ugh:. But if all goes right and it works I will have a much better understanding of how my engine and computer communicate with one another.

My buddy Brett is coming back up from Highland this weekend to help me hopefully get the engine mounted back in the Jeep. Keeping my fingers crossed that everything goes as planned.
 

Slangy

Sgt. CulPepper
Location
Utah
Well this weekend was very productive, We started Friday night by priming and painting the locations where the old motor mounts were ground off the frame. Then we took c-clamps and attached the new motor mounts to the frame so we could put the engine in and make sure everything was in place before we welded everything up. After that we attached all the new parts that the engine was needing like plug wires, headers etc. We then looked for the best place to hook the chains up to the block for the test fit. We were having a hard time finding a good location so that the engine and tranny would have a good angle to dive into the bay. I finally decided to use some extra tabs I had lying around from my RCI 5 point harness. I drilled out a hole big enough for the screw open chain link to fit on the harness bracket. Brett questioned me at first on the strength of these but in the end they worked out great, you can see them in the picture attached with the motor mount.
After we placed the engine in the bay for the first time we noticed that when we lifted the transmission to where it belonged that we were hitting the firewall. We marked it and notched it out when we pulled the engine back out. We threw on some primer and paint and everything fit like a charm. I then realized between transporting the engine from my father-in-laws house that I somehow lost the flexplate dust shield, hopefully I can go to his house today and find it lying in a pile of parts:ugh:
Then we broke out the welder and got the motor mounts welded in. I called my cousin to come and do the welding for me since I didn't want the engine to fall out when we are driving down the road:D. After we were down welding we painted the mounts so they won't rust, cracked a cold one while we waited for he paint to dry and got ready to place the engine where it will hopefully be sitting for a long time to come. Everything fits nice and tight, we had to unscrew and rotate the line coming from the powwer steering reservoir because it was hitting the steering linkage. But other than that everything worked out pretty nicely.
Sunday I started oin the wire harness again, since I am not going to haver AC I eliminated all the wiring associated with it so I don't have as many wires to work through. Still haven't finished it yet but I am taking my time so I don't have to go back and trouble shoot everything.

I may have to re-run new transmission cooler lines because they look like they may be getting in the way. Do I need to run metal lines or can I use hydralic hose of some sort. If I can use hydraulic rubber hose can I just get that from EVCO.
 

Attachments

  • P4020599.jpg
    P4020599.jpg
    190.1 KB · Views: 105
  • P4020602.jpg
    P4020602.jpg
    142.9 KB · Views: 100
  • P4020604.jpg
    P4020604.jpg
    165.4 KB · Views: 107
  • P4020605.jpg
    P4020605.jpg
    191.2 KB · Views: 107
  • P4020606.jpg
    P4020606.jpg
    185.7 KB · Views: 98
  • P4020608.jpg
    P4020608.jpg
    169.9 KB · Views: 104
  • P4020611.jpg
    P4020611.jpg
    179.8 KB · Views: 111
  • P4020612.jpg
    P4020612.jpg
    187.2 KB · Views: 108
  • P4020613.jpg
    P4020613.jpg
    192 KB · Views: 112

Slangy

Sgt. CulPepper
Location
Utah
Well after about my fourth visit to local junk yards I finally came across this beauty. It was laready nuplugged and was hanging on by one bolt:D
The first one I found was in a SHO taurus which is only a single speed fan, but finally the last car that would have it did. Let's just add the wiring for this guy to the massive amounts of work I still have for the harness.:ugh:
 

Attachments

  • IMG_0717.jpg
    IMG_0717.jpg
    183.2 KB · Views: 27

Slangy

Sgt. CulPepper
Location
Utah
Well we finally finished all the wiring. Talk about a pain in the ass. Hooked everything up and click.......click.......click. Son of a *****, nothing, everything turns on but the starter isn't even kicking over. So I then take it back out to try to trouble shoot the problem. After testing the statrer we find that it is in working order, we then test the fuse box and find out that there is power to the starter relay but when you turn the ignition, the relay will not switch on and give power to the starter bypass. So I had a good I dea that I had screwed up the wiring for the Park/Neutral switch that goes to the transmission.
I learned that with a manual transmission the wire going to the park/neutral switch runs into a plug and doubles back as a ground so it tells the computer all is good to send signal to the starter. But with my automatic that wire goes to a switch and when it is in park it closes the circuit creating a ground which sends the signal to the starter.
As I was looking at the wiring I found that I had the fused ignition switch output wire soldered to the back-up light wire:ugh:. I then traced my park/neutral wire to make sure it was connected properly, which it was, grounds were all good so I figured I would try it again.
45 minutes later I jump in and turn the key and the starter engages but the battery peters out:mad:. Throw on the charger for a while and then try again. It turns over, starts up, flames fly out the headers onto the floor and...... well look at the pic and you tell me what you think happened:D

All is well and it starts, now it is time to start putting everything back together.
 

Attachments

  • IMG_0720.JPG
    IMG_0720.JPG
    134.3 KB · Views: 100
Top