Herzog

somewhat damaged
Admin
Location
Wyoming
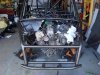
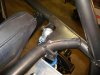
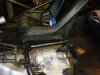
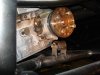
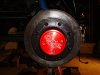
Well, that front axle gave me hell today so I didn't ever get to the rear end. Maybe next weekend. But I did finally finish setting up the gears on the front end and threw a lube locker from Summit Machine and a heavy duty Teraflex diff cover on it. (Thanks TeraFlex! ;))

DSC08290.jpg DSC08291.jpg

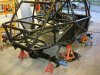
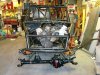
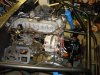
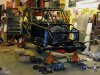
In between pulling bearing and scattering shims all over the place I did a lot of cleanup of various parts and painted quite a bit. Next session the buggy will start to be put all back together.

DSC08293.jpg DSC08294.jpg
 

Herzog

somewhat damaged
Admin
Location
Wyoming
Anybody have info on this flange? Is it a 1410 or 1350 Flange? Appears to be 4.25"... not sure if it actually uses all 8 holes for mounting or just 4. I wouldn't mind using this flange that came on the rear axle if I can find the matching end. Also, my atlas has flanges that are drilled to this same pattern, plus 1310 flange pattern and one other so that's a bonus for making this rear driveshaft the same on both ends.
DSC08296.JPG

DSC08297.JPG
Setup the rear axle. The OEM (D60u) carrier used thick shim spacers on the outside of the bearings similar to a d35, but the shims were not fragile castings. The OEM bearings were also shimmed on on the inside too. I was concerned about this but it appears that the only difference to allow the use of the outer shims was that the oem carrier was machined down slightly more where the bearings press on. See pic below:

OEM D60u (1999 Ford E350) carrier | Normal OEM D60 carrier
DSC08300.JPG DSC08301.JPG

Spit shined & added a tera cover!
DSC08303.JPG
 

Herzog

somewhat damaged
Admin
Location
Wyoming
With the axles setup, I decided I would plop the engine back in and start puting it back together.
 

Attachments

  • DSC08304.JPG
    DSC08304.JPG
    101.6 KB · Views: 52
  • DSC08305.JPG
    DSC08305.JPG
    127.6 KB · Views: 58
  • DSC08307.JPG
    DSC08307.JPG
    141.5 KB · Views: 63
  • DSC08309.JPG
    DSC08309.JPG
    153 KB · Views: 61
  • DSC08310.JPG
    DSC08310.JPG
    58.4 KB · Views: 58

Herzog

somewhat damaged
Admin
Location
Wyoming
I then took the oportunity to clean and paint most of the parts while assembling. Probably took up most of my time. Glad that's over with.

This is the first time the rear shafts have been in the rear housing. Looks like my measurements all worked out. :D
DSC08314.JPG

Decided not to rebuild the king pins. They were in pretty good shape.
DSC08315.JPG

Here's how she sits now.

attachment.php


More misc pics below. Yeah the engine is still pretty dirty.
 

Attachments

  • DSC08323.JPG
    DSC08323.JPG
    137.8 KB · Views: 64
  • DSC08322.JPG
    DSC08322.JPG
    128.9 KB · Views: 62
  • DSC08325.JPG
    DSC08325.JPG
    105.4 KB · Views: 62
  • DSC08326.JPG
    DSC08326.JPG
    115.4 KB · Views: 62
  • DSC08329.JPG
    DSC08329.JPG
    104 KB · Views: 58
  • DSC08331.JPG
    DSC08331.JPG
    142 KB · Views: 71
  • DSC08318-2.jpg
    DSC08318-2.jpg
    152.2 KB · Views: 392

Herzog

somewhat damaged
Admin
Location
Wyoming
Just some more updates.

Added some bling to my non-bling build. Thanks Summit Machine! :cool:
Best drive flanges in town.
attachment.php


So now the front axle is complete. 5.38 gears, detroit locker, OEM inners for now, spicer joints, yukon 35 spline outers and finished it off with the drive flanges.

I also got most of the fuel lines ran. Still need a different fitting and a run of hose down to the pump and I also need to route the breather but the supply and return is ran all the way up to the fuel rail.

DSC08352.JPG DSC08354.JPG DSC08357.JPG

ECU & TCU mounted under dash, shifters in place... checking fit of center console cover.

DSC08358.JPG DSC08360.JPG

And started building a tail shaft support for the atlas. Yes I'm cheap like that. :p
attachment.php
 

Attachments

  • DSC08355.JPG
    DSC08355.JPG
    57.1 KB · Views: 433
  • DSC08351.JPG
    DSC08351.JPG
    54.5 KB · Views: 434

Herzog

somewhat damaged
Admin
Location
Wyoming
Today I got the dashboard top in and also the front. I used some extra polycarbonate that I had laying around for the front. Next up is placing switches and gauges in it.

DSC08364.JPG DSC08367.JPG

The tail-shaft mount all finished up. The bolt is overkill but that was the only sleeve size I had laying around.

DSC08363.JPG DSC08372.JPG DSC08375.JPG

If anybody is looking to make one, the tailshaft housing is 3.90". I had a friend keep an eye out for a piece of scrap tube close to that ID and he found one the next day. The actual ID on that tube was 3.99" but after slicing it a little extra wide, it clamped down perfectly all around. The piece pictured is about 3/8" wall and 1/2" thick. The bushing is from Summit Machine and the piece in between the two is just 3/8" plate.

:cool:
 
Top