General Tech What did you work on Today?

Vonski

nothing to see here...
Location
Payson, Utah
Shop wood stove project should have been finished by now, but I’ve allowed myself to get bogged down in the details (crazy, I know 🤔). One of which is adding a crucial feature to my chimney wall support pieces prior to painting. Anti-bird spikes are just one of the necessary defensive measures in my war against multiple trash varieties in the area. The cap on the chimney will also get the spike treatment.
 

Attachments

  • 9E88CF0C-9A7B-41C6-B7CC-9E39315EB433.jpeg
    9E88CF0C-9A7B-41C6-B7CC-9E39315EB433.jpeg
    219.8 KB · Views: 42

Hickey

Burn-barrel enthusiast
Supporting Member
Shop wood stove project should have been finished by now, but I’ve allowed myself to get bogged down in the details (crazy, I know 🤔). One of which is adding a crucial feature to my chimney wall support pieces prior to painting. Anti-bird spikes are just one of the necessary defensive measures in my war against multiple trash varieties in the area. The cap on the chimney will also get the spike treatment.
Hook them up to 220. 🚬
 

zmotorsports

Hardcore Gearhead
Vendor
Location
West Haven, UT
Got quite a bit done on the square body between Christmas Eve and yesterday afternoon.


Christmas Eve I moved a few shims around in the carrier a couple of times and landed at .0065" back lash and a nice wear pattern so time to finish up the axle assembly by installing the axle shafts and diff. cover. Axle shafts installed with C-clips.
k101.jpg

The Eaton TrueTrac uses a pin to keep the axle shafts outboard and the C-clips engaged in their grooves.
k102.jpg

Center pin installed and end cap ready to install over the center pin.
k103.jpg

Retaining ring ready to install over the end cap.
k104.jpg

Differential fully assembled and ready for the gasket and diff. cover.
k105.jpg

Gasket installed.
k106.jpg

Differential cover installed as well as new extended brake line.
k109.jpg

Yesterday I went out and installed the new rear leaf springs and hardware for the lift kit.
k107.jpg

Teaser shot.
k108.jpg

It does need driveshafts as the originals are too short to connect to either the front or the rear axles due to the lift now. That is going to look sharp with that tire/wheel combination at that lift.

New shocks were dropped off last night and hopefully tonight I can start putting the front axle back together and buttoning last details up.

Mike
 
Last edited:

zmotorsports

Hardcore Gearhead
Vendor
Location
West Haven, UT
Only had about an hour or so last night to work but got all of the front outer axle parts ready for assembly.

Drove the old races out of the hubs, cleaned the hubs and reinstalled the new races.
k101.jpg

New spindles cleaned and ready to accept the inner bearings.
k102.jpg

New bearings, races and lock nuts ready.
k103.jpg

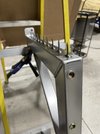
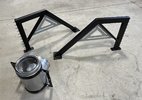
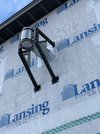
Grabbed my old Alemite bearing packer. Bought this about 20+ years ago and it has packed a shit ton of bearings over the years. Between front axles and trailer bearings it seems like this bearing packer was getting used several times a month. Now it has been several years since I have used it.
k104.jpg

It sure makes short work of packing bearings though.
k105.jpg

Races installed, bearings packed, inner bearings installed, seals installed and outer bearings packed and ready for installation.
k106.jpg

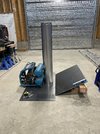
Moving over to the press to install the inner bearings in the spindles.
k107.jpg

One down, one to go.
k108.jpg

Installing the seals after packing the bearings with grease.
k109.jpg

Seal between the knuckle and spindle prepped and ready for installation.
k1010.jpg

That should be all of the front hub parts ready for installation.

Mike
 

NYCEGUY01

Well-Known Member
Location
Willard, UT
Called Tom Woods with measurements yesterday at 4:45pm and ordered 2 new driveshafts. They called me today at 11:45am to let me know they were built and ready for pickup.

They must be running 24hrs around the clock in that little shop..lol.

Ive gotten pretty dang lucky on this build so far. Everything ive needed has been sourced pretty easy. Not much drama.

Once i gave up on ORD and just ordered stuff myself its all been pretty easy to get.

Even the shocks that were on a 4-6 month backorder showed up in just a few weeks.
I bought cheapies to install until the good ones showed up and we arent even gonna need to use them.

This whole supply chain issue must be working itself out a bit. At least if you need stuff for old Chevys anyway..lol
 

JeeperG

Well-Known Member
Location
Riverdale
I think we are about done with custom fabricating the small stuff on the farm truck? Ran the filler panel all the way to the end of the bumper. Couple small projects and then start tackling body work.
PXL_20211219_221315970.jpg

PXL_20211211_224912115.jpg

PXL_20211211_232753402.jpg

I still need to do some shaving on the front bumpers to get the gapping equal. Should be close to ride height, wish I could get wheels made.
PXL_20211211_232333623.jpg
 

UNSTUCK

But stuck more often.
This was yesterday:

AD99123D-1864-4FAF-ACEB-5AF9A86E3F8D.jpeg

We relocated a good third of our belongings to the city landfill.

I completely underestimated the weight of our household goods. Our plan was to fill our 24’ enclosed with 5300 pounds of stuff to max the gvw. I quickly learned that 5300 is nothing. I ended up grabbing a 26’ uhaul to help out. I scaled it empty at 13500. I will weigh it again full so I know how much everything weighs. Then I’ll have to find a truck/trailer that can handle that weight for the move to Alaska. 😡
 

NYCEGUY01

Well-Known Member
Location
Willard, UT
Is the move just gonna be a 1 trip and thats it deal or are you making trips up before hand ?
I had a buddy a few years ago that moved there and he bought a big ass trailer for the move and planned to sell it after he moved.
He couldnt give it away, apparently thats lots of peoples plans..lol

Might be worth looking for a big ass trailer up there and towing it home for the move. At least youll be in it cheap...
 

Vonski

nothing to see here...
Location
Payson, Utah
I was gonna spare y’all from anything but a completed install pic (like one with smoke coming out the chimney), but things were delayed a little. 🤷‍♂️ I painted and installed the wall support junk, but then got pulled into another project and just now getting back to building the roof mount. Got the distance and pitch mocked up and built the clamp and feet (that get lagged to the roof. A couple outriggers between and some paint and golden. After that, it’s just a painful wait until a day when the roof is dry. 😳😂
 

Attachments

  • B2190ECA-600B-4391-8823-75E37E500CDF.jpeg
    B2190ECA-600B-4391-8823-75E37E500CDF.jpeg
    412.4 KB · Views: 24
  • FD2EF67C-9493-410B-A515-46DD4438CC43.jpeg
    FD2EF67C-9493-410B-A515-46DD4438CC43.jpeg
    454.2 KB · Views: 24
  • 4C821F1C-E47D-4480-8152-415189AB7680.jpeg
    4C821F1C-E47D-4480-8152-415189AB7680.jpeg
    561.3 KB · Views: 24

Coco

Well-Known Member
Location
Lehi, UT
No pics, but I did install a new garage door opener. I'm a belt-driven man these days. It's SO much less noise than my 15 year old screw drive that died.
Our house came with the OG door opener. You know the one, the big white single push button, and the car remotes the size of the old Nokia brick phone. It really sucks now having a key pad for the external opener. Its fun when you lock yourself out of your own house, and cant get through the garage.

Needless to say we will be getting a new opener at some point.
 
Top