Door-slammer CYJ7+1 buggy

xtremexj

Active Member
that's sweet. It'd be cool to clear coat that and keep the raw steel look.

I was actually thinking of using Scotchbrite pads to put a nice satin finish on it and then use Sharkhide as a protectant. That way I'll have the silver I want and the metal will be protected with a clear finish. We'll see what happens when the time comes.
 

xtremexj

Active Member
Well, I've got the panels sort of mocked in place. I've found that some parts of my chassis are still not squared up so I'm going to have to do some repositioning again so things fit properly. On top of that, I've had to modify the panels more than I'd hoped. I had to cut 1/2" off the cowl to shorten it down where it was supposed to be and I had to cut 1/4" off the quarter skins for fitment. The door panels are a bit bowed which I would guess is from the heat of welding the curved sections of the door openings. With some persuasion they flatten out so they should hold once I get the bottom mounts attached. I don't like how the grill looks at the moment but I have a couple of ideas to address that.;) 
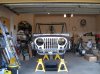
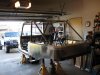
Anyways, here's a few pics of how it looks mocked up for now.
 

Attachments

  • juggy51.jpg
    juggy51.jpg
    183.2 KB · Views: 68
  • juggy52.jpg
    juggy52.jpg
    180.6 KB · Views: 86
  • juggy53.jpg
    juggy53.jpg
    179.2 KB · Views: 77

Herzog

somewhat damaged
Admin
Location
Wyoming
That's looks great. Keep at it, it's paying off. I've had a lot of "step backs" but it's always worth it somehow.

Glad you updated this build thread. :cool:
 

xtremexj

Active Member
That's looks great. Keep at it, it's paying off. I've had a lot of "step backs" but it's always worth it somehow.

Glad you updated this build thread. :cool:

Thanks for the encouragement Shane - I can sure use it. Lately frustration has been replacing motivation.:( Anyway, I'm on holidays for the next week and a half so hopefully it will give me some time to mentally regroup and get back on track.:)
 

blznnp

Well-Known Member
Location
Herriman
looks good man, i would love to build a rig from scratch like this, but i have a hard enough time trying to figure out why i can't get my engine to run. can't wait to see it done
 

Ford Prefect

Registered User
Location
Provo, Ut
Looks great. Are you going to skip putting in rear seats, or are they planned for later days?

By the by, I personally love the look of the grill in there. You could fill in a little next to the turn signal slots to meet the bards you fabbed, but still it looks super as is.
 

xtremexj

Active Member
Looks great. Are you going to skip putting in rear seats, or are they planned for later days?

By the by, I personally love the look of the grill in there. You could fill in a little next to the turn signal slots to meet the bards you fabbed, but still it looks super as is.

No rear seats in this buggy - just the wife and I so no need. We'll see what I do with the grill once I get a bit further.:)
 

xtremexj

Active Member
Well, it's been exactly two months to the day since my last update on the build. Lately, I've just been doing some minor tweaking and fitting of the panels and finally have everything where I can start doing the mounts for them. While I was fitting the quarters, I realized that the support bars I had installed from the kickers down to the bumper were going to interfere with the panels.:eek: So, I decided to remove them and the bumper and build a new rear hoop similar to Twisted Customs and Jim's Garage. By doing this, I wouldn't have to notch the panels and I would still have the support I needed for the kickers. The bumper will attach behind the rear bar so it will be in roughly the same position I had originally planned.:)

juggy54.jpgjuggy55.jpgjuggy56.jpg
 

xtremexj

Active Member
I decided to strip all the panels off and take a series of pics that shows the bare chassis as it sits today. I really need to find some money for an engine and trans so I can start adding more tubing where it will be needed as well as the coilover mounts.

juggy57.jpgjuggy58.jpgjuggy59.jpg
 
Top